Hi,
Released CAD Transform 2.0 for blender 4.x !

Order from gumroad (10€ + VAT)
Wow, impressive
Hi,
First of all, I wanted to thank you for this wonderful add-on, it looks really promising.
Unfortunately, I’ve encountered some strange behavior - when I press “r” or “s,” it seems like it activates incorrect functions, judging by the icons and tooltips. For example, when I press R, the scaling icon appears. Please take a look at the attached gif. I’ve checked this behavior on two different machines. Am I doing something wrong?
Rotate and scale operations start by setting up a pivot point. You definitely should take a look at video tutorial - see first post.
@stephen_leger Are stacked transformations not available anymore? I’m following Keep Making’s tutorials but when I try to do a stacked movement the second axis replaces the first one. Also, I cannot find stacked transformations in the documentation
In addon preferences, you’ll find “Exit on confirm” (enabled by default).
When disabled you may stack your operations but you’ll need to exit “by hand” using right click or esc.
Pushed a bugfix release for issue with move widget on mac.
It is available for download on your gumroad’s library.
Hi,
Released CAD Transform 2.0.3
This is mostly a bug fix release and provide some enhancements
Bug fix
Enhancements
You may download from https://gumroad.com/library
Just got and have been testing this new version
I really dont like this 3 point rotation and scale, is there anyway to have an option to switch to the old 2 point system. I found it much faster and honestly easier to use
If we can switch between 2 and 3 point modes that would be best, or is it there already and im missing it?
Also a small suggestion, as the change to have the geometry to hold position and have a outline version be the thing you move/rotate/scale. we cant access snap points behind the object
My suggestion is swap the real object and the ghost/wireframe object so the ghost object holds position and shows us where the object was and the real object is moved around just like before. As long as the ghost/wireframe object dosnt block snappoints we can see and easily snap to points under itself
Obviosity we could just rotate the view or enable xray but for a scene with lots of stuff going on xray may not be ideal and having to rotate the camera all the time for this is more of a task when this wasnt the case in the old version
I do like all the new visuals and the ghost object just think it can be done better as suggested
Another thing i just noticed, when scaling an instance it changes all instances.
Previous version didnt do this
New version
Pivot “by 3 points” is a “up to (optional)” 3 step operation, but at any step you may “confirm and exit” by holding shift, so if you only need one point, use SHIFT + left click and then pick start point.
May add an option to “make unique” when scaling instances, so it does work as old 0.9.x.
Keeping a ghost allow to snap to “self”, you may disable “snap to self” option, so when you “snap to” the selected object will not be snap able.
Swapping “ghost” and real object is not a viable option, there are edge cases like you can’t recover from a 0 scale on any axis once done on a mesh, where previews doesn’t suffer from that issue.
It also ensure that blender’s data are only changed once when operation is done, in order to cope with undo and when user cancel the action.
Ah okay, would be nice to have an option to have it set to 2 point, i have no use for 3 so its just kinda in my way in terms of work flow. Iv tried the shift click as you say, it still wants another click for whats called start point that wasnt a thing in the last version. I didnt realize this which is why i couldn’t rotate things the way i wanted for the first 10 minutes as i didnt know why things wouldnt rotate after i selected the 3 points or weirdly because i clicked in a random spot which set the start point in a random place(coming from the old version it confused me)
This is just a minor annoyance but this new system requires more clicks then 0.9x. Before it was just two mouse clicks the first point, the end point then you just move to snap or type numbers, the new system is 4 clicks the 3 points and start point selection or one click and a shift click to do a 2 point then another click for the start point. It requires more clicks and buttons then the old system, only minor but adds up with many operations.
If in preferences we can set the system to 2 points which just removes the need to shift click where it just performs this on all second clicks, so this mode just performs a shift click on all second point clicks making it a 2 point system automatically removing the need to hold shift
Then just have a ‘use last point as start point’ checkbox, this will set the start point to the last selected point automatically removing an additional click.
These two options would allow me to rotate an object with just two clicks and no hotkeys like the old system.
So the issue im having with this new ghost system is now the object dosnt move in realtime it can be in the way of itself
The reason i said about swapping the visuals of the ghost and the solid object is now you cant see points behind the object as it stays in the way, you can still snap to them with self snap off but you cant see them before hand without hovering around to find the point.
I just want to say i am greatfull for this tool and had been using the older version for a long wile, dont want to sound like a moaner lol Just giving my feed back all be it abit nit-picky ![]()
Pivot “by 3 points”
In this version, the pivot setup and rotation operation are separated, as it does provide way more freedom, and the workflow remains consistent across grid / pivot setup and “align” operator.
As long as you are transforming things about vertical / horizontal axis a 2 points setup looks optimal, but as soon as orientation is more random, it does not work anymore.
Setting up the pivot “by 3 points” make sense as 2 points are not enough to fully determine a coordinate system, so some rotation / scale operations where impossible in 0.9.x.
This freedom comes with a one click more cost.
You may enable “release confirm” to save you from one click so snap from and to are a “press and drag” operation. It is disabled by default as it does prevent view navigation while transforming.
There is an alternative way to setup a constraint axis using an edge, or a constraint plane using a face, by moving the mouse pointer over an edge / face so it is highlighted, then pressing “C”, this allow to move objects over a plane, or rotate things about any edge quite fast.
Scale and instances
Scale operations does affect the mesh (as 0.9.x does) instead of object’s matrix, so it is able to scale objects using arbitrary axis not aligned with the local object coordinate system itself, like squeezing a cube so it became a diamond-shaped or altering a randomly oriented radius, witch is not possible using blender’s native transform unless you rotate the mesh (…), while preserving scale based modifiers like bevel. The way it is done in 2.0 does prevent object rotation precision issues that occur in 0.9.x.
The old system basically unlink objects when you scale only one of them under the hood as it was not possible on linked objects at the time.
With multiple objects edit mode support, it is now possible so the new system does not unlink by default - my guess here is that instanced objects must all behave the same way.
You still may edit the object’s transform matrix using blender to have different scale for each instance.
Display and snap to hidden objects
Source object not moving allow to handle “snap to itself” witch is impossible with current object moving.
May add an option to temporary turn source into “wire” display.
When you disable “snap to self”, it only skip source object snap while picking “snap to”, and you may disable it once for all subsequent operations.
I agree with @BlueStar on the 3 point mode.This fundamental change in the workflow was annoying / confusing at first. Your suggesting of using SHIFT + left click was also not obvious until seeing this thread - there is no mention of this in the documentation or in popup window.
I would also appreciate the option to go back to using the 2 point system and maybe this behavior to be documented.
Thank you for the great plugin btw.
In facts it is : “Confirm and exit”, how would you label this so it is more obvious ?
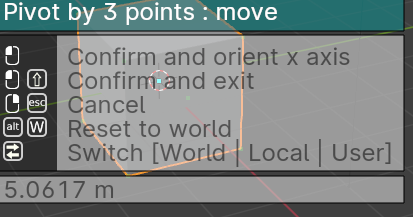
In the documentation
You’ll be able to move the pivot, then align x axis, and last y axis.
At any time you may confirm and exit using SHIFT + LEFT MOUSE button or SHIFT + ENTER.
Any suggestion for a better wording ?
Maybe adding an example of usage for 2 point move/operations would clarify it further? A simple line of text would suffice and make it clear at a glance for those looking for it. After all, it’s a very common usage of the tool. Just a suggestion.
Loving the addon!
I still think a 2 point mode would be nice, perhaps when you enter into move/rotate/scale mode before doing any point selections we can press shift once to switch modes. So the UI that says ‘Pivot by 3 points’ changes to say ‘Pivot by 2 points’ It makes it far more clear to have it as mode.
Have the shift mode switch on the UI as first in the list, Shift - Switch [3 pivot | 2 pivot]
In preferences we could have a selection to set which mode is used by default 2 or 3
All the 2 point mode needs to do it automatically skip the third point selection, so for those of us that just want to use 2 points only we can set our default mode to 2 and not deal with extra keys and things ect and use this new version just like the old one
New thing i just noticed cad wont snap to Geometry node instances
Is this something to be added later on?
Blenders snap base dose work with GN instances btw
With the many building generators we wouldnt be able to move and snap them around atm
Geometry nodes objects using instances must rely on “Realize instances” node before output to be visible for object ray cast.
Ah yer i see, i can use a switch so i can realize when i want to transform and unrealize to turn everything back into proper instances. Dont seem to get the ghost with a realized GN, this a limitation?
Looks like i forgot this one in mesh preview generating code, so modifiers are not taken into account.


