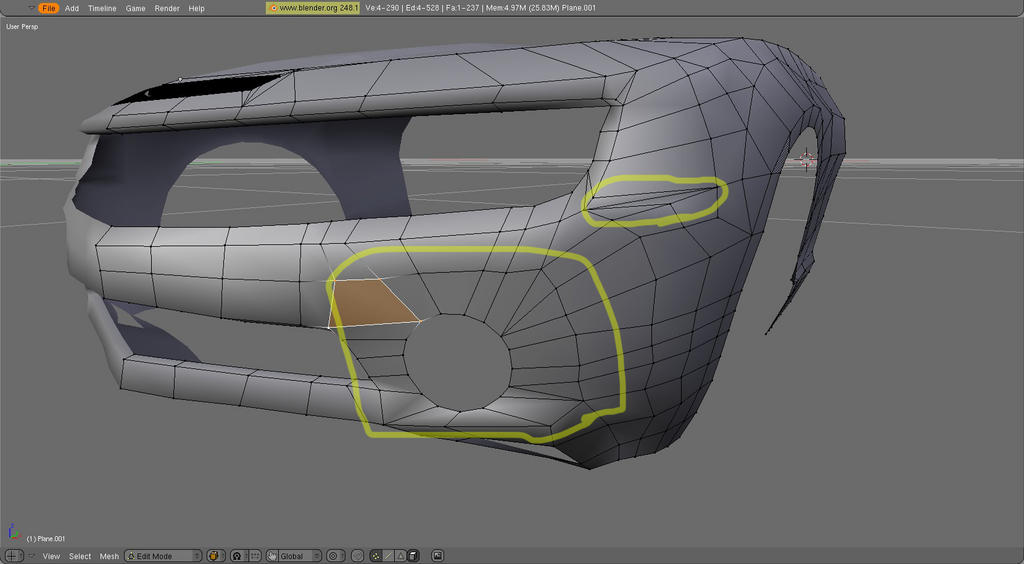
Hi , I am doing a Camaro in blender and I have a problem with the front part please help me fix it.
:o Thank you ")

I think smooth would be your friend here. Select the areas with pinching and press W then select smooth (not shade smooth) maybe a few times.
I would also check that the normals are set right.
Hi Chylla,
I’m not very good at modeling cars. In fact, I only did it once, and it was a horrid failure. =(
But from what I can see here, it looks like you’ve got some concave edges. In at least one spot (the higher area you circled) it looks like you can convert those two triangles into a quad instead. Try that and see if that gets rid of that dark spot on your mesh.
That’s all I can think of. But no one else was offering any help, so I figured a little help is better than no help at all, to quote Han Solo. =D
Ah! Someone did help before I posted! “Yes, to LoopyShane you listen!”
Star Wars rocks. =)
J
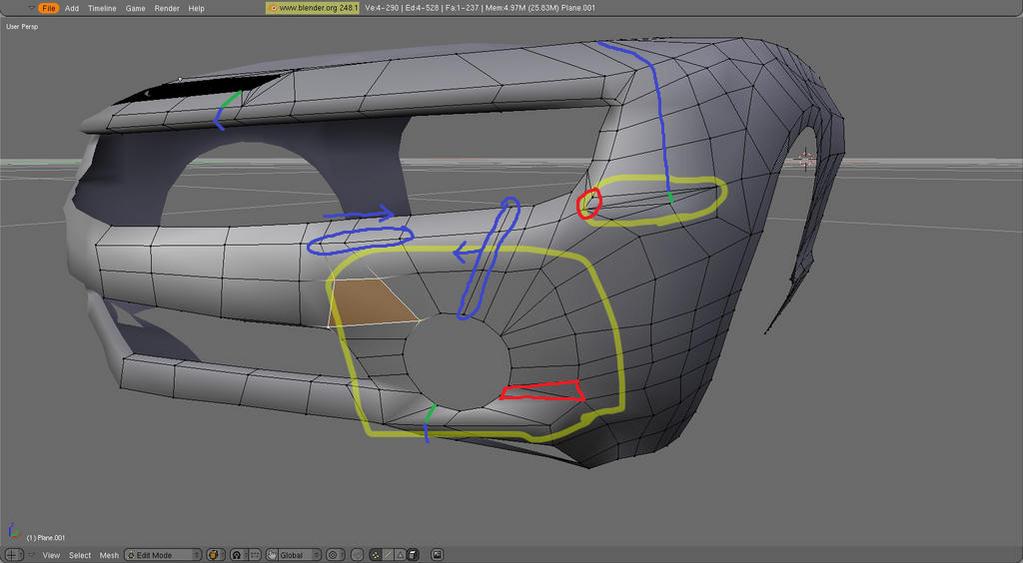
Hopefully you can understand my paint-over :).
Blue lines are where you want to add loopcuts or shift them to smooth them out. Green lines are edges you’ll need to add to make the loopcuts work. The red circle you’ll want to merge those vertices, and the red square you’ll want to change from triangles to a quad. It also looks like you need to smooth out a lot of edge loops. Finally, check the normals with Ctrl-N
Hopefully this helps.
Attachments
Kk , thank I will try that tomorrow and see the result that I will share you …
When I smooth my faces becomes smaller …what can I do to fix the smaller parts other than scale it…?.?
Srry normals are already right
Did not work I think and smooth make my car too small and round:mad:


Looks like you have tried to model each feature, but not thought how to attach them together, so you have dissimilar number of vertices on each feature, which is what is leading to the odd looking mesh with triangles and the like.
At this point I would make another copy of the mesh, and then clean up each feature by putting at least two if not three edgeloops around it, parallel to the edge of the feature, keeping the vertex count down, then join the features using the minimum number of edgeloops, trying to follow either a horizontal/vertical grid, or a grid that follows the general contours of the body. Then add back in extra density using the knife tool. You can do all of that without losing the existing shape by retopo-ing the new mesh over the old one, deleting out loops between the features and adding them back.
Plan the features as you go so that you have, perhaps, 4 vertexes per blender unit ( or whatever works for you) consistent among the features. This will mean you have at least a reasonable chance of joining the parts together without having to split edgeloops and getting triangles.
HTH
Matt
http://blenderartists.org/forum/showthread.php?t=192844, the are two blend files you might find somewhat useful in that thread. Keep in mind that the are a bit work in progress. At the time I was making the SS version of the car I changed that to the RS version but am not likely to give that Blend away I have given away my fair share of car blends and this current one is going into my portfolio. Wires are a modelers DNA and my way of saying this my work and nobody else work.
A simple tip stay away from any circle with more than 8 verts, its too much work to connect into a mesh with 2 levels of subdivisions on that sucker it will look circular, any more than 8 and you are just asking for trouble which is what you currently have.