Can this picture effectively be “camera mapped”? From all the tutorials I’ve seen, it seems there must be some sort of vertical walls or something on the sides in order for it to work??

Can this picture effectively be “camera mapped”? From all the tutorials I’ve seen, it seems there must be some sort of vertical walls or something on the sides in order for it to work??
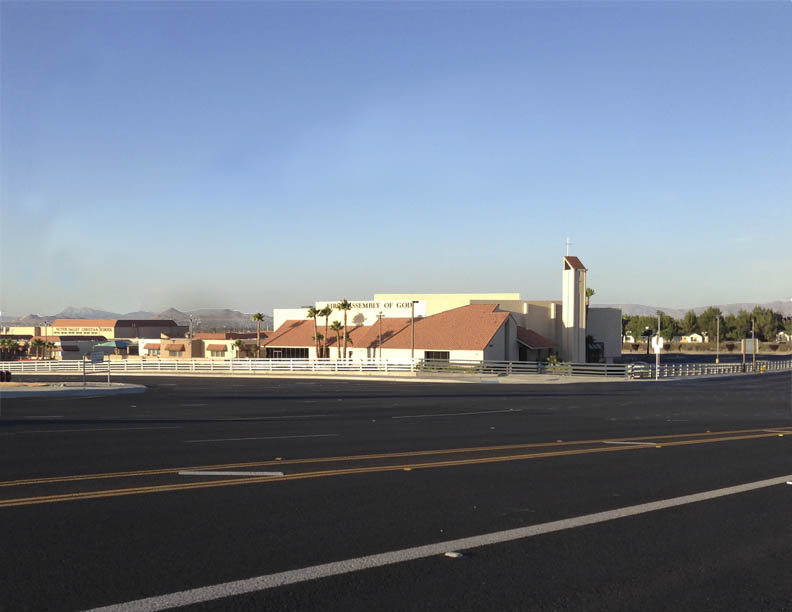
well you would normally have some foreground interest, but there is nothing stopping you from mapping this image. put the road on one plane and then create mapping objects for the background buildings etc
Thanks! Would you recommend the trees/mountains be on a separate plane, as well as the sky be on its own plane?
The trees are going to be the biggest hassle, especially if the camera is moving to the side. You would need to have them as a separate object in order to get some parallax. If the camera just moves straight forward, you might be able to get away with not having to make them separate objects.
Steve S
Thanks, Steve, for the input! I’m only planning to move the camera straight forward, and then only to move closer to an “object dropping on the street.” This is my first camera mapping attempt, and I’m not real experienced with Blender - just trying to improve my learning curve with this project!
Thanks again.
Having something in the foreground will help distract people from noticing any flaws in the background.
Steve S
yes i’d seperate it into 3 sections as your just going to be moving forward slightly.
the skyi would place on a large plane that curves slightly over the scene to help give the effect that your moving under the sky, rather than towards it. it can be a bit fiddly to get right but will look better than a flat background sky.
mountains need to be on their own layer for sure as they are so far away will hardly move at all when you move towards the buildings.
the biggest issue normally is that there is very little mountain available for you to clone into behind the house but your shot just moving forward this doesnt matter as the mountains will always be behind the house.
personally i would put the trees and fence on a seperate layer, but you can easily get away with not doing that as was mentioned previously, and the obviously a plane for the road.
Perhaps you could get an aerial/satelite photo of that area so you could get the layout for the streets and city-blocks? (the buildings themselves would be hard to extract from those photos since they usually aren’t taken straight from above, but from an angle and then deskewed, distorting the buildings in the process)
To get the camera parameters to match, I think you might be able to use BLAM, with the two sides of that white line closer to the camera for one axis, and the vertical edges of the buildings for the other.
Thanks for the input, everyone. I’m considering everyone’s ideas into a final image. Thanks again!
OK, I’ve created these three PNG images:


Can someone please advise me on the next steps to import and use for mapping? The transparent portion of the images appear white, and I’m not sure how to place them in the scene? Do I then UV map them, one at a time?
Sorry, but with my limited experience with Blender, I may have bitten off too much; however, I really want to learn how to do this. Thanks much for any help!!
ok well now you have your images ready, take a look at this tutorial on how to do the camera mapping i’m sure you’ll find it useful and not too daunting
Thanks, Small Troll. I’m taking the plunge and attempting to follow this tutorial. Right up front, my PNG images are displaying white where the transparency is?? On the pics I posted above, for instance, when imported into Blender, the top half of the pic with the road is all white, rather than transparent?? There must be a “transparency” button or selection I’m missing??
In the middle pic you’ll want to use the Clone brush to fill in where the church spire was, as well as where all the hills and buildings were. One thing you can do to help fill in the horizon is to rescale the image a bit by grabbing the bottom of the image and pulling downward. Since the sky is basically just a gradient, you’ll never notice that it’s been stretched a bit.
In your post above, the dark gray background is showing through, but when I right click and select View Image I get the white background.
Steve S
In your post above, the dark gray background is showing through, but when I right click and select View Image I get the white background.
Steve S[/QUOTE]
Exactly, Steve. Why is the white showing when imported into Blender? Shouldn’t the image appear just like the post…transparent, with the background color showing through? Otherwise, how can you tell where they “match up”??
Thanks for the reminder about cloning - as soon as I work out the transparency issue, that’s my next step.
Is premultiply turned on for the image or alpha over?
3pointEdit - I’m so confused, not sure I can answer your question! Found “premultiply” in texture tab, and selected it. Imported the image, but still no transparency??!!
Here’s the Blend file if you have time to look at it? Thanks a lot!! https://jumpshare.com/b/FRJRTdNJS6KnS7NhXpLo