Can I Use Objects to Create Normal Maps?

I’m only just getting into normal maps in Blender and I was wondering about using objects to create detailed normal maps.

As an example, I need to create a normal map to apply to a sphere, and I need the normal map to contain stitching detail. So I create the sphere (the sphere that will eventually contain the normal map), and then I position a small repeating capsule in a ring formation around the sphere, slightly submerged into the surface to create the look of evenly-spaced stitching.

So what I need to do now is bake a normal map for the sphere, but most importantly of all, the normal map needs to capture the repeating ring of capsules onto it so that it looks like stitching on the normal map of the sphere, so that once baked the ring of capsules is no longer needed.

Is this possible, and if so can someone please give a step-by-step example or provide a link to a video that specifically demonstrates the work-flow I’m describing here?

Any help on this is much appreciated.

depends on the size of your capsules
and is there some inward faces ?

can you show some pic for your model

might be easier to work with a bump for large details and normal map for small details

there are tut on web for this

happy bl

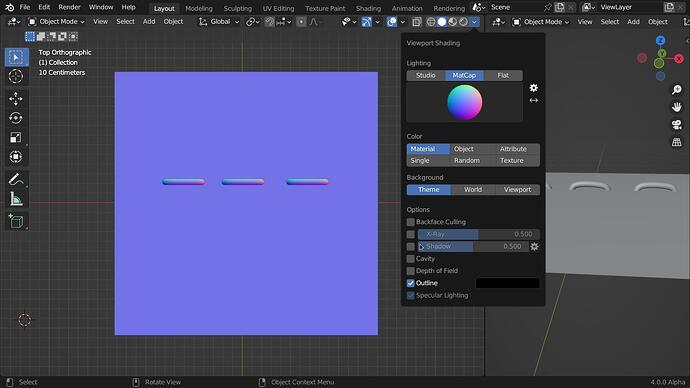
A dirty cheat way is to make a plane and the stitches (curves) and from the top view do an eevee viewport render with the Nomals matcap.

6 Likes

Thanks for the replies.

The example I gave is just that, an example, but it’s basically that work-flow I’m wondering about, whether it is even possible. Neat idea on the MatCap but it wouldn’t work in my case since I need to be able to bake from all directions just as a bake operation does.

I suppose another way to put it would be, how would a person go about capturing various objects into one normal map?

I don’t follow you here- @DNorman 's example is how you capture stitching as a normal map. Normal maps don’t replace geometry, they are a visual trick that only work from certain camera angles. If you want something that looks perfect from every possible angle, normal maps aren’t going to work for you- you’ll have to use geometry. Here’s a good example- see how these bricks are actually very clearly just a flat polygon?

The bricks still have lighting information, because of a normal map, but they don’t have real depth from the side, because you can’t have that kind of depth without displacement or geometry. If that’s what you want, a normal map is not what you’re looking for

1 Like

It’s definitely a normal map I want from it, but the reason the MatCap thing wouldn’t work is because it’s from one direction only. Unless I’m misunderstanding something here, how would I capture what isn’t visible to the camera using the MatCap?

In my example, the stitching would go all the way around the sphere, so the MatCap thing wouldn’t work because there is no way to bake it from all directions, you only get a head-on front view.

You’d need to repeat the texture (easy way) or do this same process many times from a bunch of different angles, UV unwrap your sphere, and stitch the textures (hard way)

Ah, I see what you mean now, but no, I’m not doing that.

I’m surprised to be honest, because I would have thought that since we can just select an object we want to bake a normal map to, I just assumed that if I grouped them into a single object that it would tell Blender that I want them all baking to a single normal map.

Bummer really cause Blender isn’t the best when it comes to sculpting high resolution detail that can be baked to a normal map. I know it can be done, but to get the sort of polygonal resolution needed for sculpting the detail in the first place, brings blender to an absolute crawl.

I don’t do subscriptions either so won’t be touching ZBrush, which is usually the response people get when wanting to greate detailed normal maps. I just wish there was some way to be able to generate normal map detail in Blender without it coming to a damn crawl.

I mean, say I modeled a pair of jeans and wanted the normals for the stitching. Something as simple as that appears to be unrealistic because the amount of polygonal subdivision would be insane before the stitches could be sculpted detailed enough to look good enough for a normal map.

So this is why I was hoping to be able to generate the normal maps from actual objects and why I gave the example I gave. So if I had created a pair of jeams, all I would need to do is conform a repeating curve of capsules up the side of the leg and around the pockets to generate the stitching. And because they’re objects they are easy to move around, edit, scale and reposition etc before baking it all to a normal map.

Yes, they are if they have the same material assigned to them and are correctly UV unwrapped so the projections of the stitches are done in the right positions. What I don’t know is if there will be some kind of conflict due to overlapping normals.

1 Like

Edit: As I said, it does, but it doesn’t deal well with overlapping faces, so you need to find a way to solve that. Maybe combining 2 normal bakes. I don’t know.

1 Like

Yes sorry I answered the thread title pretty literally.

I realized afterwards and wanted to elaborate but had to go out.

A longer answer:

The idea of making a normal map of one stitch is to not have to model all the stitches, or sculpt a really high poly ball to make a normal map. You can repeat the image across your ball.

Depending on your ball and its topology it may not be easy to map the stitches. But if you have a double edge loop where the stitches go you can make a secondary UV map and unwrap the stitches with follow active quads. (first select all the loop press U- reset, then make one qaud active and pres U again and choose Follow active qauds)
This will put all the loop of quads where the stitches go in a straight line so you can easily repeat the stitches by scaling the line of quads.

The Uvs of the rest of the ball need to be scaled so they are in a flat bit of the normal map.

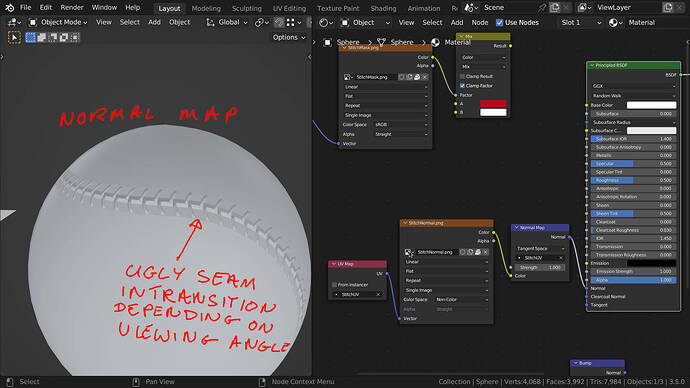
I tried this out and the result is not optimal. As J says normals maps have limitations. With the method I suggested depending on the viewing angle you start to get a “seem” where the stitches end and the flat part begins. This is because we are confusing Blender due the the way normals are calculated.

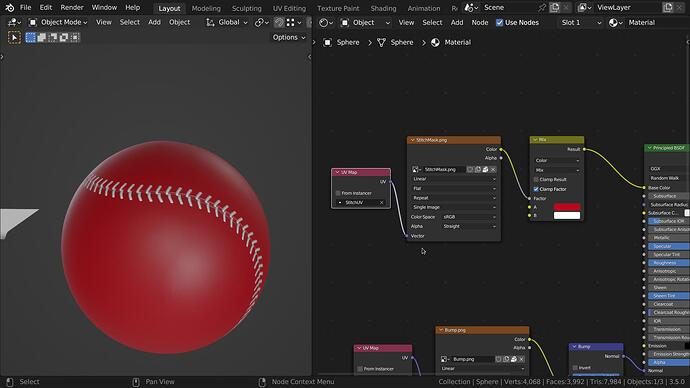
So I tried making a bumpmap instead of a normal map and it is much more effective in this case. I used a similar method to create the bumpmap, instead of using matcap I made a material with a gradient from black to white (from the bottom to the top of the stitch.) then a lazy screenshot saved in png and I cropped the stitch in gimp. For better results it is best to do an Eeevee viewport render and save as 16 BIT png

The bump map is much more effective as it is simple height info and not not try to force weird lighting angles.

The normal Map:

The BumpMap:

This is all a bit hard to explain so here is the file with the maps and UV’s so you can see what I did and how it works (or fails in the case of the normal map). I also made a mask for the stitches so you can colour them separately.

The file :
stitches.blend (421.6 KB)

I still think this method is easier than modeling a high poly ball with stitches or modeling and placing all the stitches.

Oh and if you plug the colour mask in:

My ball has 2 UV maps because you may want to add some image to the rest of the ball.

7 Likes

Once you have a bump map you can bake another normal map using the bump as your base. I think this way you can avoid those problems.

2 Likes

As a side step to all the other answers…
Add a curve on (for example) some jeans and use Geometry nodes to repeat a stitch along the curve.
Because it is GN it is reusing the single stitch. So adding embroidery will only add all the location data, not 5000 new mesh chunks.

Obviously this will give you bumps from the side view.

https://www.popoops.com/geometry-nodes-procedural-stitches/

Oh - Welcome to the forums.

4 Likes

Hey all, thanks for going to these lengths in order to help out on this, it’s very much appreciated!

Unfotunately none of them would work for me (too cumbersome). They provide an interesting insight on different approaches to the problem though, so although I won’t be using them I’m pleased they were pointed out and demonstrated.

And I have some good news (ecstatic news if I’m honest about it)!

I just found out something that I think the Blender community in general are not aware of (I know I certainly wasn’t), and it’s quite a biggie cause it’s a technique that effectively lets you paint Normal maps live in Blender on even the lowest resolution objects while allowing you to genertate a Normal map so detailed, it’s restricted only by the resolution of the Normal map itself, not by the resolution of the mesh!

I got wondering why (since we can paint Bump maps in Blender and see the result live in the viewport), why on earth can’t we do the same with Normal maps?

Well guess what, it turns out Blender is capable of internally converting Bump into Normal information and it’s actually really easy as demonstrated in the attached video. You will notice that in the video he uses a procedural bump, but no doubt the same process is possible with a painted map too!

This is big, I certainly think so, because it allows you to do texture-map-resolution Normal maps directly in Blender, and all completely independent of the resolution of the mesh! With this at your disposal, there is nothing stopping any Blender user painting live using Bump, and then converting it internally to a high reolution Normal map.

This is the sort of stuff I’ve always been led to believe I would need ZBrush to achieve. Not so, I just tried it and it works perfectly, it literally allows you to paint insanely detailed Normal maps directly in Blender, all onto a low poly mesh, and all it needs is a Bump to Normal conversion once you’ve painted (or as shown here, procedutally generated) your Bump map!

Out of all the videos I’ve ever seen regards Blender tips, this one has to take the top slot for being a game-changer. I’d bet my life there are literally thousands of people out there buying ZBrush because they have no idea this is even possible!

I was so excited by it that I almost posted before trying it yesterday. But I thought it was too good to be true so I thought I’d better try it first, and wow, it actually works, you can actually paint super-detailed Normal maps in Blender thanks to Blender’s ability to internally ‘Bake’ a Normal map directly from Bump information with no high resultion mesh needed, so it’s all handled smooth as butter by your computer, no need for it to break into a sweat!
Yes I was aware of that, you can also use a small normal map as “stencil” to paint, but that does mean having to paint all the stitches (possibly hundreds of them with different angles).

Matakani’s GN solution is also a good one and you should be able to bake a normal map from the results.

But yes these things can get complicated, there are different approaches and you have to decide which one is best for your needs.

2 Likes

I’m absolutely ecstatic about it and I’m really surprised more YouTubers don’t cover it!

By the way, thanks again for going to all that trouble (all of you), I appreciate it and it’s always good to know of other workflows so they didn’t go to waste. No doubt I’ll forget by the time I need them, but I can always revisit the thread.

1 Like