Hi, I’m curious if there’s any way for the compositor nodes to behave more like After Effects/Photoshop in how it handles the colorspace. The way the nodes behave now is really hard to control, I think because it’s pulling the data from the full render data (waves hands around), instead of the more narrow range in the final image? (I’m not super knowledgeable about this stuff, just speculating). But there’s this general feeling that the ‘range’ of each node can feel crazy and inconsistent. Where instead of 1-255, it’s something more like 1-10000? I dunno. I get that there’s cases where someone might want that, but there’s also many where I don’t. Is that possible?
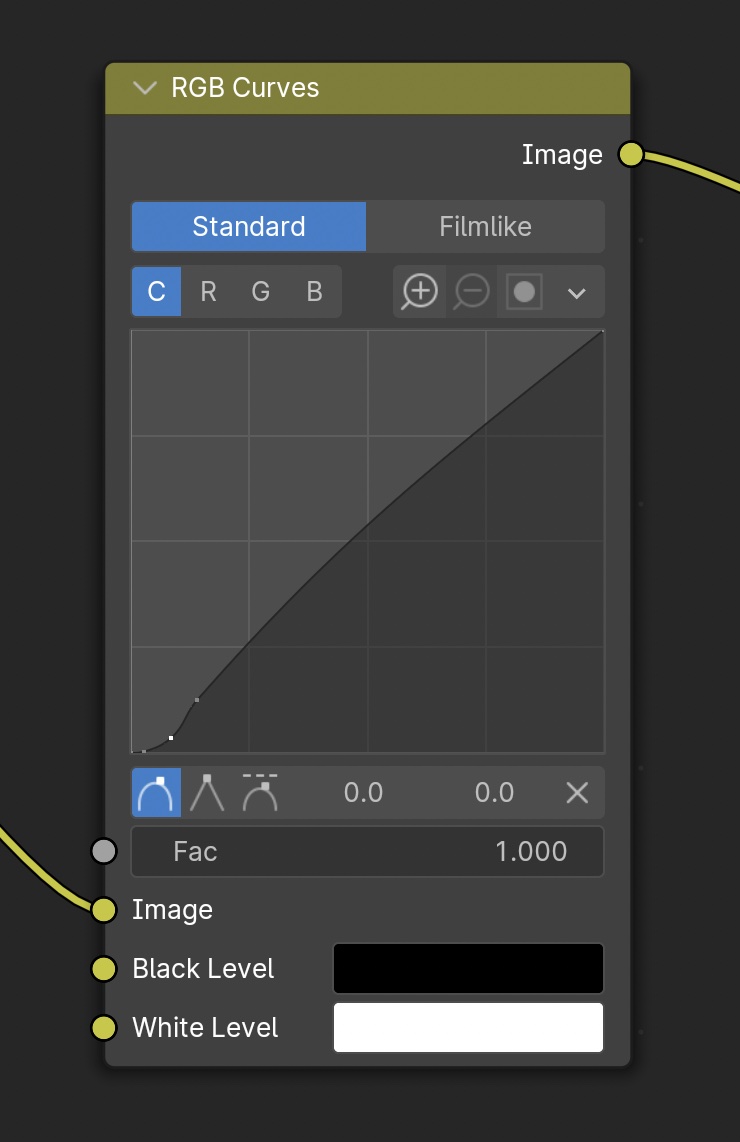
This image is an example of what I’m talking about. Because the scene has bright lights, the value range is huge. So to do a fairly standard S-curve color correction to push contrast, you have to work with 1/15th of the total curve range to accomplish anything that feels natural.
Thanks for the replies. Unfortunately both methods change the final output a great deal. Light areas become greyed-out blobs and overall values change. Ideally it would just match the current output, but be clamped to srgb values, in the same way that the final rendered output is srgb.
dynamic range issue, and that’s why we went from 1-255 to more
be careful with color space transforms it’s tricky if i had your image i can do tests
highlights clipping
sometimes you have to transform to do an action in a certain color space and then transform back cause blender will apply the scene color management (transform) again for the results (like all software)
in other words try the opposite of the transform after your curve
advise: you’re missing out on the dynamic range by doing this but sometimes it’s the right thing to do based what you need
cool! BTW i never meant you have to use those values in the screenshot, it was just an example to show you the node exists, you have to be color space aware and transform from where you were to what you want and back to stay consistent
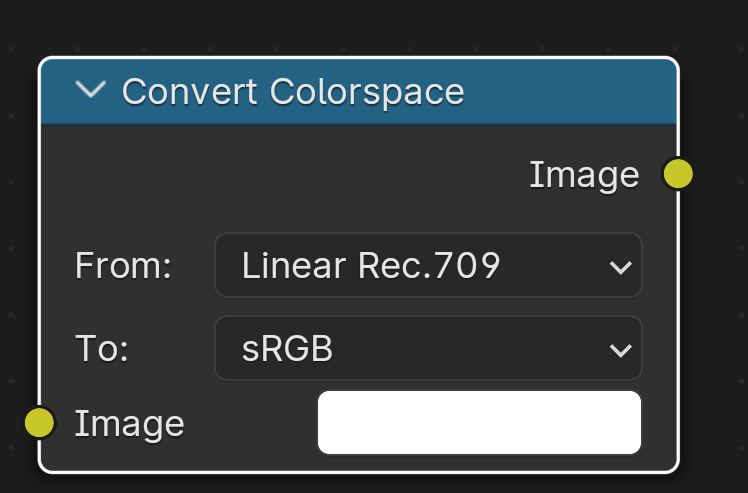
Just want to share my test results for grading in compositing.Some Blender nodes works best in log colorspace.This means in log colorspace the image values are converted to 0-1.
Eg you could change the colorspace from rec709 to AgX log and place your nodes after that.Then at the end change the colorspace back to your output colorspace.
In this example from AgX log back to rec709.
That’s the conclusion throught the thread but i want to add NOT JUST Blender
Same thing in Davinci Resolve… Some nodes need a certain color space to work as intended. Like the film looks. And that’s why the color transform nodes exist btw and it’s not just in the project/clip setting
The issue is that this needs to be done in many other places in the graph (like before and after every mix node), it just convolutes the graph, and probably costing extra compute time. It is just a side affect of working in linear and displaying on the screen.
I actually reported this to ask for further improvement down the line but the report hit a dead end. YimingWu recommended another solution. I did not test it.
“you could add two math nodes one before and one after the mixing operation and give it a power of about 2.2, so it’s closer to the non-linear blending you’ve used to.”