I really hope this is the right category, although I’m more trying to sculpt rather than modeling.
The problem is that when I try to merge the head and the body of my character, two things happen:
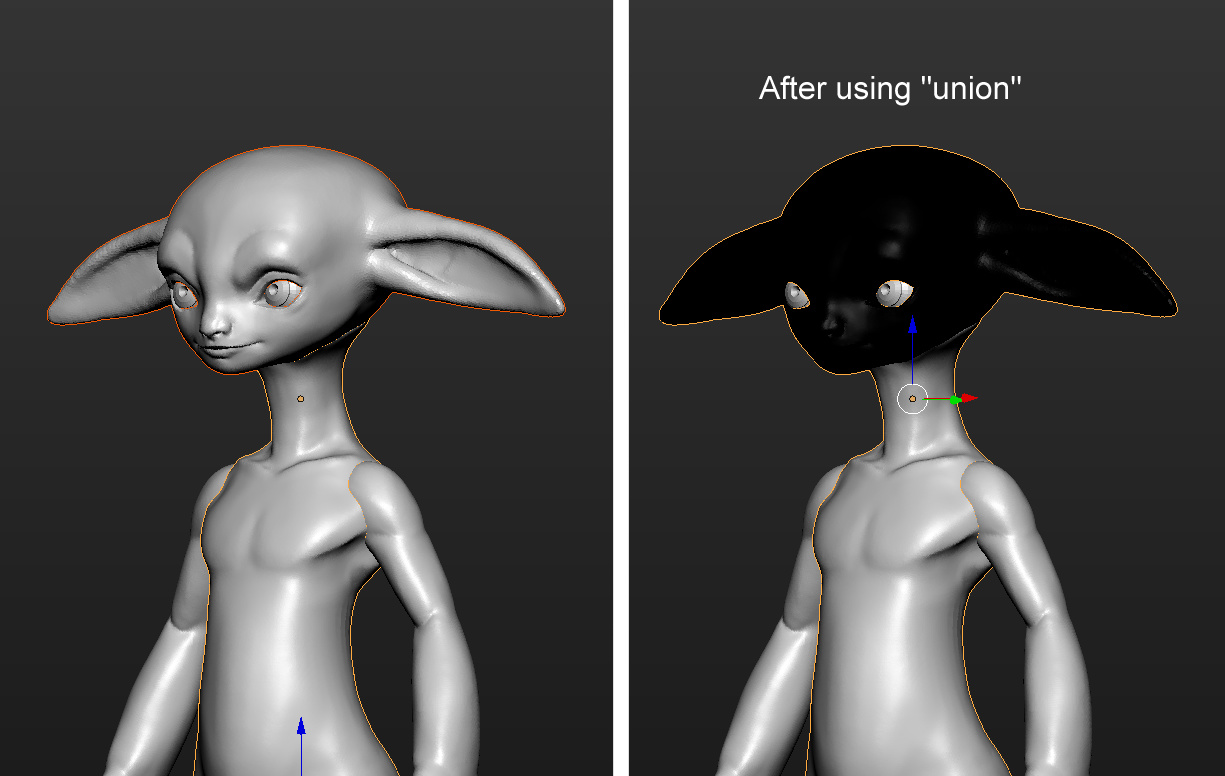
Either the head turns completely black [In object mode… with no textures or anything as I haven’t got to that yet.]
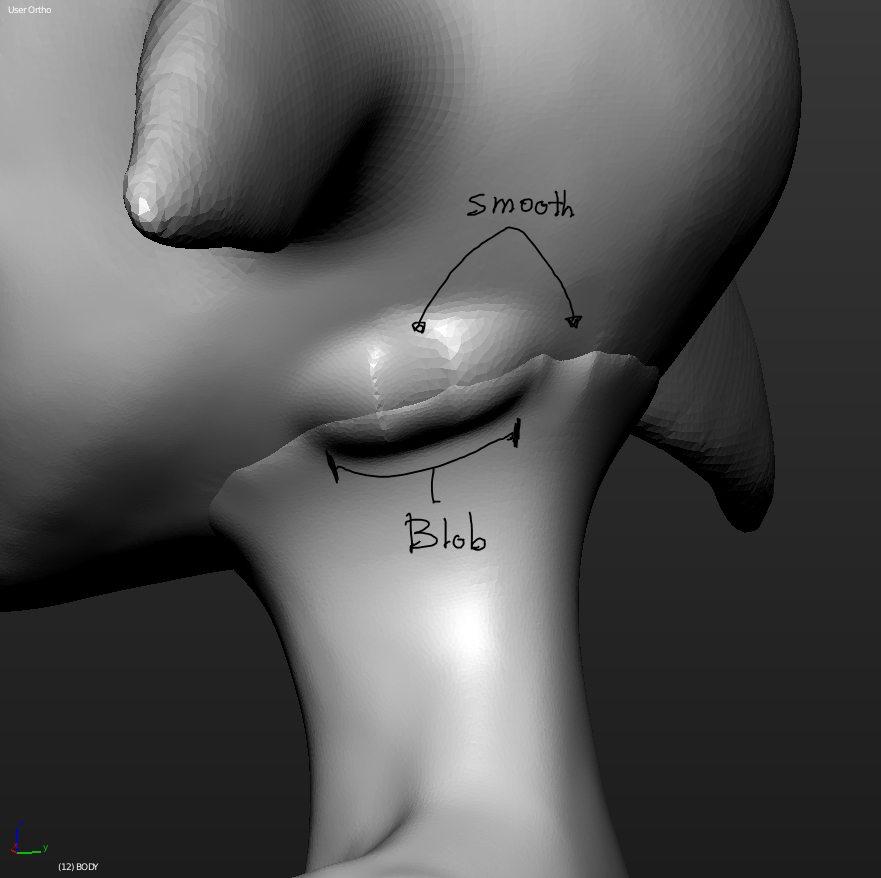
Or I can’t continue sculpting because a seam always appears where both objects merged, no matter which brush I use.
I saw that “make manifold” would often solve the problem, however when I click that after the objects have been merged, there’s some weird stuff going on with the neck [it’s a really weird shape]
I’m pretty new to blender, so I don’t know what else I might need to add to make the issue easier to spot.
[Also the character I’m trying to sculpt is a generic Asura from Guild Wars 2, thought I’d leave credits for the design!]
I merged the head and the ears before so I’m thinking the problem might be the body.
Thanks in advance!
This is really weird… and you’re model is really good, so I hope we can fix it (we - the blender-artists community)
After joining the two objects, in edit modeA I would press “remove doubles” (left panel on 3D view - tools tab), then bottom of 3D view > Mesh > Normals > Recalculate outside.
Hello! Thank you so much for replying! ;v; [And you are so kind, thank you for the compliment, I’m glad the model is turning out alright! I’m learning so much]
I tried removing doubles the way you described, however the problem seems to persist: When I go to sculpt mode the seam won’t go away. [Pic of the seam showing after using 2 different brushes on top of it]
I think I should mention! when I used “Join” [Tools>Edit>Join] The weird black head thing didn’t happen.
“Union” [Sculpt>Sculpt Tools>Union] is the one making the head black.
Again thank you for suggesting something I could try out!
I don’t know what the problem was, but I continued to work on sculpting all the separate parts as well as clean up the torso [which I think was the problem] and as I attempted to merge the arms, then the legs, then finally the head, I didn’t encounter that problem anymore. I moved a bunch of stuff through the process, and I’m not entirely sure what fixed things.
But yeah thought I’d update the thread!
I’m not sure if this will add any insight to what just happened - especially since it has resolved itself.
Before merging things together, you generally want to apply the rotation of the constituent elements. Ctrl+A Rotation. The equivalent in 3ds max would be to reset XForm if you’re familiar with max.
It can affect how the program calculates vertex normals if you join multiple objects with different rotations. Program gets confused, some of the pieces have their normals flipped. Recalculating Normals via Ctrl+N can help, but if you have any open faced objects, it could calculate it to face the wrong way so that’s one thing to be beware of.
Boolean features also tend to join things in a rather rubbish way, though since you are sculpting I personally think it wouldn’t matter so much or at least be not so apparent. Removing doubles has been mentioned, but you would want to do a remove doubles in the area with merge distance set higher than the default 0. So the really crazy topology vertices actually get merged together.
Relaxing the sector might help, but I personally think blender’s default relax is a bit insane and rubbish and might make the issue worse.
There is a relax plugin I found which I personally prefer over the default.
If you ever run into the issue again, maybe you could give these suggestions a shot.
Hmm!! I don’t remember rotating the mesh at any point really, but maybe it could’ve happened by accident? Thank you so much! I’ll definitely keep it in mind to use Ctrl+A before merging in the future! [I haven’t used any 3D related programs before, Blender is my first try, I’ve heard of Maya and Zbrush, I’ll take note about 3ds max!]
How do you adjust the “merge distance”? I only tried the way yogyog explained, but it was only a button, is there another way to remove doubles that let you do the merge distance set higher than default 0?
[Sorry, I’m super new still]
Also does that mean Boolean should be avoided if possible?
I had been using Union under “Sculpt Tools” [I think it’s an outside add on] and Join under “Tools”
I did try Boolean as well to see if it made a difference but I just noticed the same thing as the other methods.
What does “relaxing the sector” mean/do? I googled it but it sounds a bit confusing.
But yes thank you so so much! I’ll keep everything you’ve mentioned in mind in the future, so I can try it out!
[I think the doubles thing might’ve been the issue, at one point I went to edit mode after continuing some of the sculpting, and there was _something_ selected, however there was also another form [within the torso?] not selected, and there was a visible difference where I had sculpted, like something underneath what I sculpted was selected? if that makes sense? So I probably made a double at some point…]
When using most Blender functions, an additional… thing? will pop up allowing you to control and tweak what you just used below the tools on the left menu. When moving, extruding, scaling etc. you can actually use these to control various aspects of your action.
Boolean functions can be a quick and easy way to do things, but as shown they can create problems. But such problems can be resolved. I don’t believe any tool should be avoided, just be aware of what they can do.
Relaxing means using a relax function. Such functions try to ‘smooth’ your mesh out. Blender doesn’t have such a function by default, but if you go to File => User Preferences => Add-Ons and search for loop tools - it adds an additional set of modeling tools. Relax being such a function. Or you can try installing the plugin I linked.