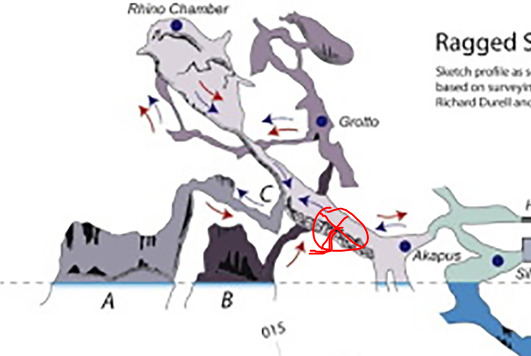
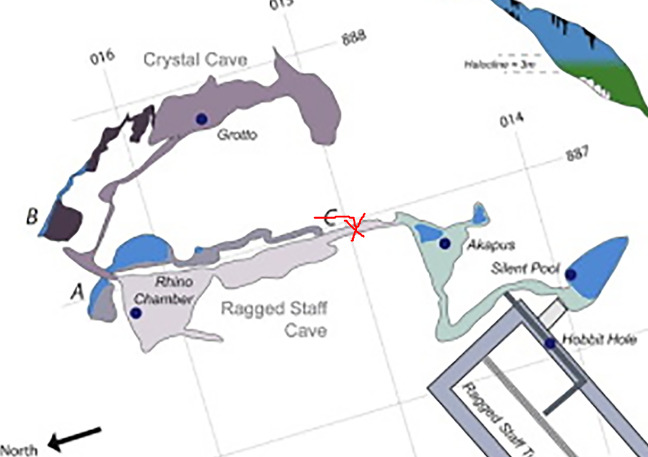
I am an avid caver and have an insight on the structure of a particular cave. Also, I have sketches of it as reference.
I’ve been trying different techniques, but I have been focusing mostly using curves (bezier curves in particular) to somehow plan out the general structure as sort of tunnels and then perhaps work with the different rooms/adjoining passages to resize the structure in accordance with my memory/sketches.
I worked on the idea of using a bezier circle and use it as a bevel object to follow the curve in order to form a tube-like structure.
But this I find complicated because I haven’t found a way to sort of “branch out” the tubes to accommodate the different junctions in the cave.
And anyway… even if this were achieved, I would end out with a uniform tube-like general structure which is not what I want. I’d need to work on it extensively to open up and model e.g. the different caverns within.
I would prefer to work with cave system dynamically so if changes need to be made to the length/positions of each “branch”/ size of caverns etc that they can be changed in an efficient manner.
Remember that this is not a “flat” cave - the passages stretch upwards/downwards and in all directions including corridors, large caverns, shafts and fissures.
Grateful for any techniques for structuring caves/tunnels.
If using a Curves approach, here’s how I’d do it. Although I’m not sure I’d do this with curves. Seems better to use the already mapped out cave in your images as a rough blueprint for initial hand modeling, then remesh that and in the end, sculpt the final result. But anyway.
(Note: Values are arbitrary, change them to your liking. Made a quick demo video, you may want to skip until the end, to see the result pertaining to the steps below.)
Prep:
For step 1, activate the built-in addon called Add Curve: Extra Objects.
Steps:
In Object mode, Shift-A > Curve > Single Point Poly Curve.
In the Curve object’s Data properties: increase Depth to something like 40 cm.
In Edit mode: select a point then E to extrude.
Scale chosen points with Alt-S.
Create branches by selecting a point between two other points then E.
Rinse and repeat steps 3–5.
To get a better end result, and to mitigate some glitches that likely occur, add the following modifiers:
Subdivision Modifier: set to Level 3.
Remesh Modifier #1: set to Blocks and Octree Depth to 9.
Remesh Modifier #2: set to Voxel and Voxel Size 20 cm.
This should give you something to work with. In the end, you will probably have to accept leaving the non-linear workflow and destructively apply modifiers, then model the cave in Sculpt mode as a second phase.