Here is my personal challenge, and I encourage any and all of you to take it up: Use Blender to model and animate ice cubes dropping into a tumbler of scotch with some splashing out onto the table. :shock: (My appologies to neat Scotch drinkers but it just not as interesting)
Second challenge is even tougher:- use blender to model and animate a frosty beer being drawn from a tap, set onto the counter and foaming up over the edge with a drip and slosh over the side that dribbles down as the foam head partially clears. Yes you need a hand too and it should shake off the foam after it sets the beer down.
Funny how I’m not a huge fan of realistic modeling except this. This self challenge has been in my head for over a year now and I’m hopeful that Blender 2.6 will be up to the task. The more I think about it, the more I come to think that this probably is one of the tougher physics sims , materials and raytracing problems. Yep its much harder than fire and explosions, LOL.
So my first try points out some problems:
THe physics sim of fluids has some significant flaws (including this user’s errors!). For example, Using the tumbler as an obstacle with volume initialized as both pushes the fluid way up higher than the rim of the glass, not letting it drip off the side as if there is too much surface tension. Unfortunately I don’t see any sort of setting for shell distance. Why try both? I was hoping that the extra distance from the inside of the glass would make the scotch material look better. I also can’t figure out how to make it generate capillary action to make a meniscus (the fluid creeping up the inside of the glass at the edge).
Materials are tough, I’m getting too much “sky” reflection on the droplets of scotch on the table - I think a darker “Ceiling” will fix that, need a good HDRI bar interior. 8)
Table wood-> well it needs less nor and a smaller grain but smaller grain leads to speckles.
Layout-> I need more of a bar or drawing room like environment - that will come later.
So some progress in the sim: setting the tumbler’s init volume type to volume, there still is too much distance between the scotch and the top of the tumbler but its better than “both”. I changed the setting the plane that is the table" wood from volume to “Shell” is suggested in wiki but it makes the error for the plane huge and this shows up as shadows.
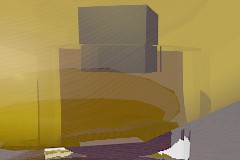
experimenting with mirror max distance for the scotch material and setting it to “fade to material color” doesn’t help with the droplets on the table’s reflections since that only turns it the color of the diffuse setting not taking alpha into account. However, 2nd pic, setting the zenith color to black is more what I want.
Still , looking through the wall of the tumbler it doesn’t look like its full of scotch, needs more adsorption.
edit: however setting filter in transparency to 1 = max makes some difference to the scotch in the tumbler, basicly it all looks darker:
I played with glass a little while ago, I think if you set the depth on the tumbler to 4 or 5 (the one under transparency), that should make it more see-through.
Looks like you figured out the problem with the fluid and the obstacle/tumbler, you always want it set to shell so that the water stays on the surface of the obstacle. Otherwise, it might go into the obstacle or completely through it. Of course even doing that, you might need to up the res to get rid of any gap.
I just got done playing with the fluid sim so, I’m not going to try and make this stuff. Takes too long on my laptop. Like the idea though. Good luck
Oh yea, think you need to set the fractal and the blend higher on the glass. Try something like 1.5 fractal and 1.25 blend. May need to play around with those until you get it to look just the way you want it.
Hey thanks for the tips, will give it a try! I shudder but it looks like I’m going to set up the calculation res to get that gap down some, sigh poor laptop, need to fire up the desktop as my render mule I guess.
The huge gap between the fluid and tumbler and table are bugging me. So I tried subdividing the plan a bunch - that did no good. However the table is a plane and 2.5 lets you use its volume calculation as volume rather than shell that’s as good as it gets I’m afraid. sigh. I also tried subdividing the fluid volume and that did nothing - interesting I wonder how Blender goes from a mesh to voxels?
I played with the wood to make it mahogany and turned off NOR and decreased fluid color absorption, still doesn’t look like scotch! I also tried moving the domain volume down but ehn the scotch intersected with the edge of the glass - so I tried lifting the table, huh, how about that, what you see is definitely not what gets rendered! still, no stupid shados around the droplets.
BTW to add a texture to worls, select world and only then can you make a texture.
By the way, its not really as bad as it looks, same settings and added a cylinder with a picture of a bar around it set to shadeless and it looks almost passable but still doesn’t look like scotch.
Need ice, better scotch material and likely will need caustics, sigh, looks like its time to break down and learn a new renderer, Yafaray? maybe I know it does caustics.
BTW has anyone gotten the world texture to map to global and have it work? everytime I try it just uses view.
Looks like I’ve run head on into another bug, guess its with the internal renderer:
The disappearing cube == put any object inside a clear one with ray tracing on and it will disappear/ the portion of it inside the object with the clear material will not be rendered. Looks like Blender internal renderer is not up to a glass of scotch!
Not sure what your material settings are but I am thinking they need adjusting.
My first thought is you have too much reflection from the bar scene, you can hardly tell the inside edge of the glass let alone the cube inside.
Even the earlier images I think you have too much reflection and not enough transparency, the fluid inside isn’t visible enough.
You are using ray transparency and not z transparency? Is the ray depth high enough to go through all the materials?
And the cube is traceable?
I’m thinking the sides of the glass should be thinner as well.
Start with a good reference photo of a glass with liquid in it and match the level of reflection and transparency in the photo.
Ray transparency because I want to use refraction with a higher IOR. Yes, I agree the scene is not anywhere close to optimized, I was trying to concentrate on combining bullet physics with liquid sim but as you can see the details of the materials settings sort of took over and now the render seems to be giving me fits, I have interactions set to 5, should be enough don’t you think? Playing with depth didn’t seem to make much difference with this particular problem above and I fiddled with depth from 0.1 to 10 just before posting this. Appreciate the ideas and will post any progress I make.
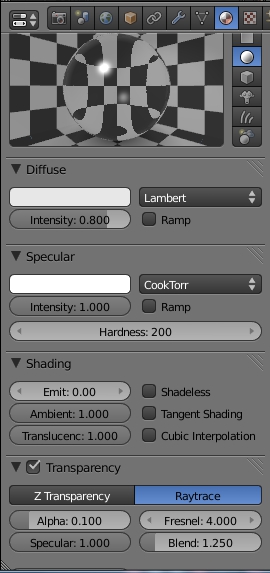
I didn’t think to have you post the blend before (I’m a noob, lol.) Anyway I ended up referencing the settings I had for a glass goblet I made a few days ago and changed your settings to resemble mine.
Look at the images below and try those settings out. Obviously the render looks bad without the textures, however, you can see the ice cube through the glass. I’d suggest putting the settings exactly how I have them and then adjusting different ones to see how they affect the render.
Notice how the preview image in the material tab looks in my screenshot, that seems to be how it should look for glass.
Like I said, I am a noob. So I can’t really explain the settings too detailed, I’ve just gone through a lot of tutorials and played around until I got the right result. Hope this helps out, I enjoy helping while I learn and I gotta say, I like this project. I’ll be watching this thread to see if I can add any assistance :yes:
Next step - does anyone know how to make a positive meniscus in the fluid sim? (that’s where the fluid climbs up the edge of the glass, like you see with most fluids, not like shown here which you see with something like mercury? I tried making the glass obstacle noslip and that is what you see here?
I’m not sure about making it actually climb the edges, however if you increase the resolution of the fluid it should at least be even with the edge. It might even calculate it to have a positive meniscus on it’s own…the fluid sim is great but, in order to get a realistic fluid, you will need a res setting of 300+ approximately. IDK about your system but, it takes forever for mine to do good fluids.
for the meniscus id say set the setting to noslip, add resolution and take compressibility way down. also use little smoothing and dont use subsurf+low res fluids.
that’s really great AdamTM, nifty render too, is that freestyle? I’m not there yet, getting there slowly.
I see you have the same silly hump in the fluid over the top of the glass as if its avoiding the glass, I will try using a control object next and see what that does, funny I don’t think I’ve ever seen a sim use one.
So I want to drop ice cubes into the glass, I assume that you use game bullet to animate the cubes to ipo’s, save that and then add the cubes as obstacles to a fluid sim. Does that seem correct? Is there any way to have the cubes interact with the fluid too and not just the fluid react to the obstacles? Sounds like the old 3 body physics problem to me, sigh.
I wonder if you could make a fluid sim where you could drop a stick into the water and have it splash, enter the water and then float to the surface?
So here is what a controller object doesin a fluid sim, it is that top ring and is set to defaults and turn off at 4 seconds. Pretty powerful -> the scotch, it, IS ALIVE! http://www.youtube.com/watch?v=u7B1HoqLBmY


 Glad it worked out, looking forward to updates and of course the finished result.
