I’m having a problem with Bezier curves using the default aligned handles. When I first create a Bezier curve, I can grab the point at the end of a handle and move it toward or away from the central control point, changing its length, without changing the length of the other handle. Later, something has changed and changing the length of the handle on one side causes a proportional change in the handle on the other side. In other words, initially I can change the length of the handle on one side independently from the handle on the other side, but later I can only change them together. I’ve read over the Bezier curve section of the Blender Reference Manual and find no mention of this.
Can anyone tell me what has changed and how I can change it back so I can change the length (influence) of the handle on one side without changing the length of the handle on the other side?
on the T panel you have options to set the handles as free/auto/vector and align
with one(or more) point selected hit v and a pop up menu lets you change them too (in case you don’t have T panel open)
Thanks for the reply. I’m aware of the option on the tool shelf, which can also be accessed by pressing ‘V’. As I mentioned in the OP, I’m only using Aligned. I’ve tried switching to Free, then back to Aligned, but that doesn’t fix the problem.
opps ~ I cant help then I just had a play in each mode and they still move independently as far as length is concerned, setting to auto or vertex will equal both sides out (as expected) or aligned will flatten the line but I can then alter length on any handle
lets hope an expert pops in to explain
The only thing i can think of is Proportional editing being on. If that’s not the case post a simple test file showing this. Hopefully settings will be saved and will be seen here.
I figured it out. What I describe in the OP appears to happen, but not really. It’s an optical illusion. As I might not be the only one caught out by this, a brief explanation may be helpful.
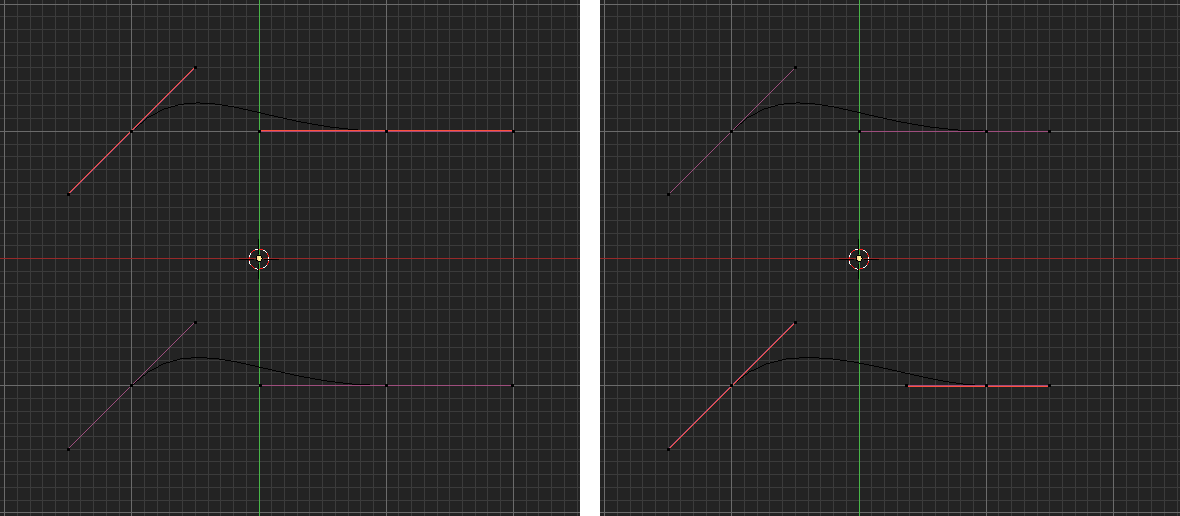
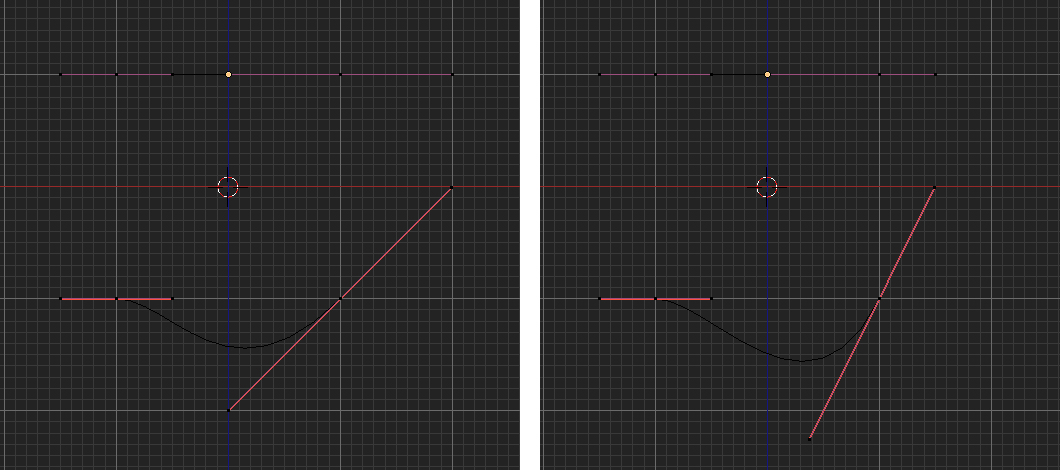
In the first image below, you see what appears to be two identical curves that are part of the same object. The second image shows the result of moving the right handle of the right control point of each curve -0.5 Blender units. The result for the top curve is what you would expect, but in the bottom curve it appears that changing the length of the right handle affected the length of the left handle. When you move a handle point in a direction that is not parallel to the control point, you also rotate it. If the control point is rotated in the plan perpendicular to the view, then moving a handle point parallel to the control point in the current view, rotates it in the perpendicular view, so the projection of the opposite handle in the current view has changed. The third image shows the curves in their original state as seen in the plane perpendicular to the view in the first two images. The last image is from the same view to the third image, showing the curves after moving the handles. I hope this is clear enough.
Have you by any chance rotated your curves in object mode?
You are using 2D curves which means that all points need to in one plane. Because of this, if you are trying to rotate the handles outside of that plane, they will simply be projected onto the plane, which can lead to “scaling” of the handles.
I wish I could understand this answer, since I am having a similar problem. In my case, it is not that there is a proportional change in the two handles, but that the two handles on either side of a vertex are completely independent. I can change the length and direction of each handle independently. Makes no sense to me unless you want a discontinuous curve! I don’t know how to tell whether proportional mode is on, whether 2d or 3d mode is on, or whether Free, Aligned, Vector, or Auto is selected! The panes only show me that Edit mode is on rather than Object mode, and that the projection is Top Orhogonal. I am lost!
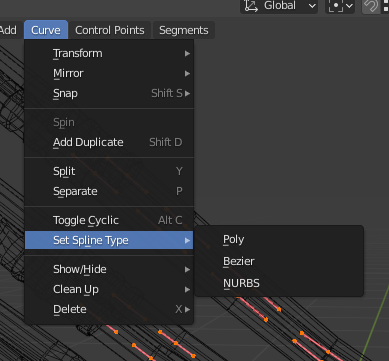
I’m not sure if this was ever solved, but I stumbled on the option in the curve edit mode to convert the spline to bezier. From personal experience, during the process of using hotkeys Blender will randomly toggle certain options on or off. Still, the amount of things hiding under Blender’s simplicity never ceases to amaze me.