New to the community and about two weeks into learning Blender. I’m a graphic designer trying to make product renders incorporating the label designs I create using the various Adobe graphics programs (Photoshop, Illustrator etc).
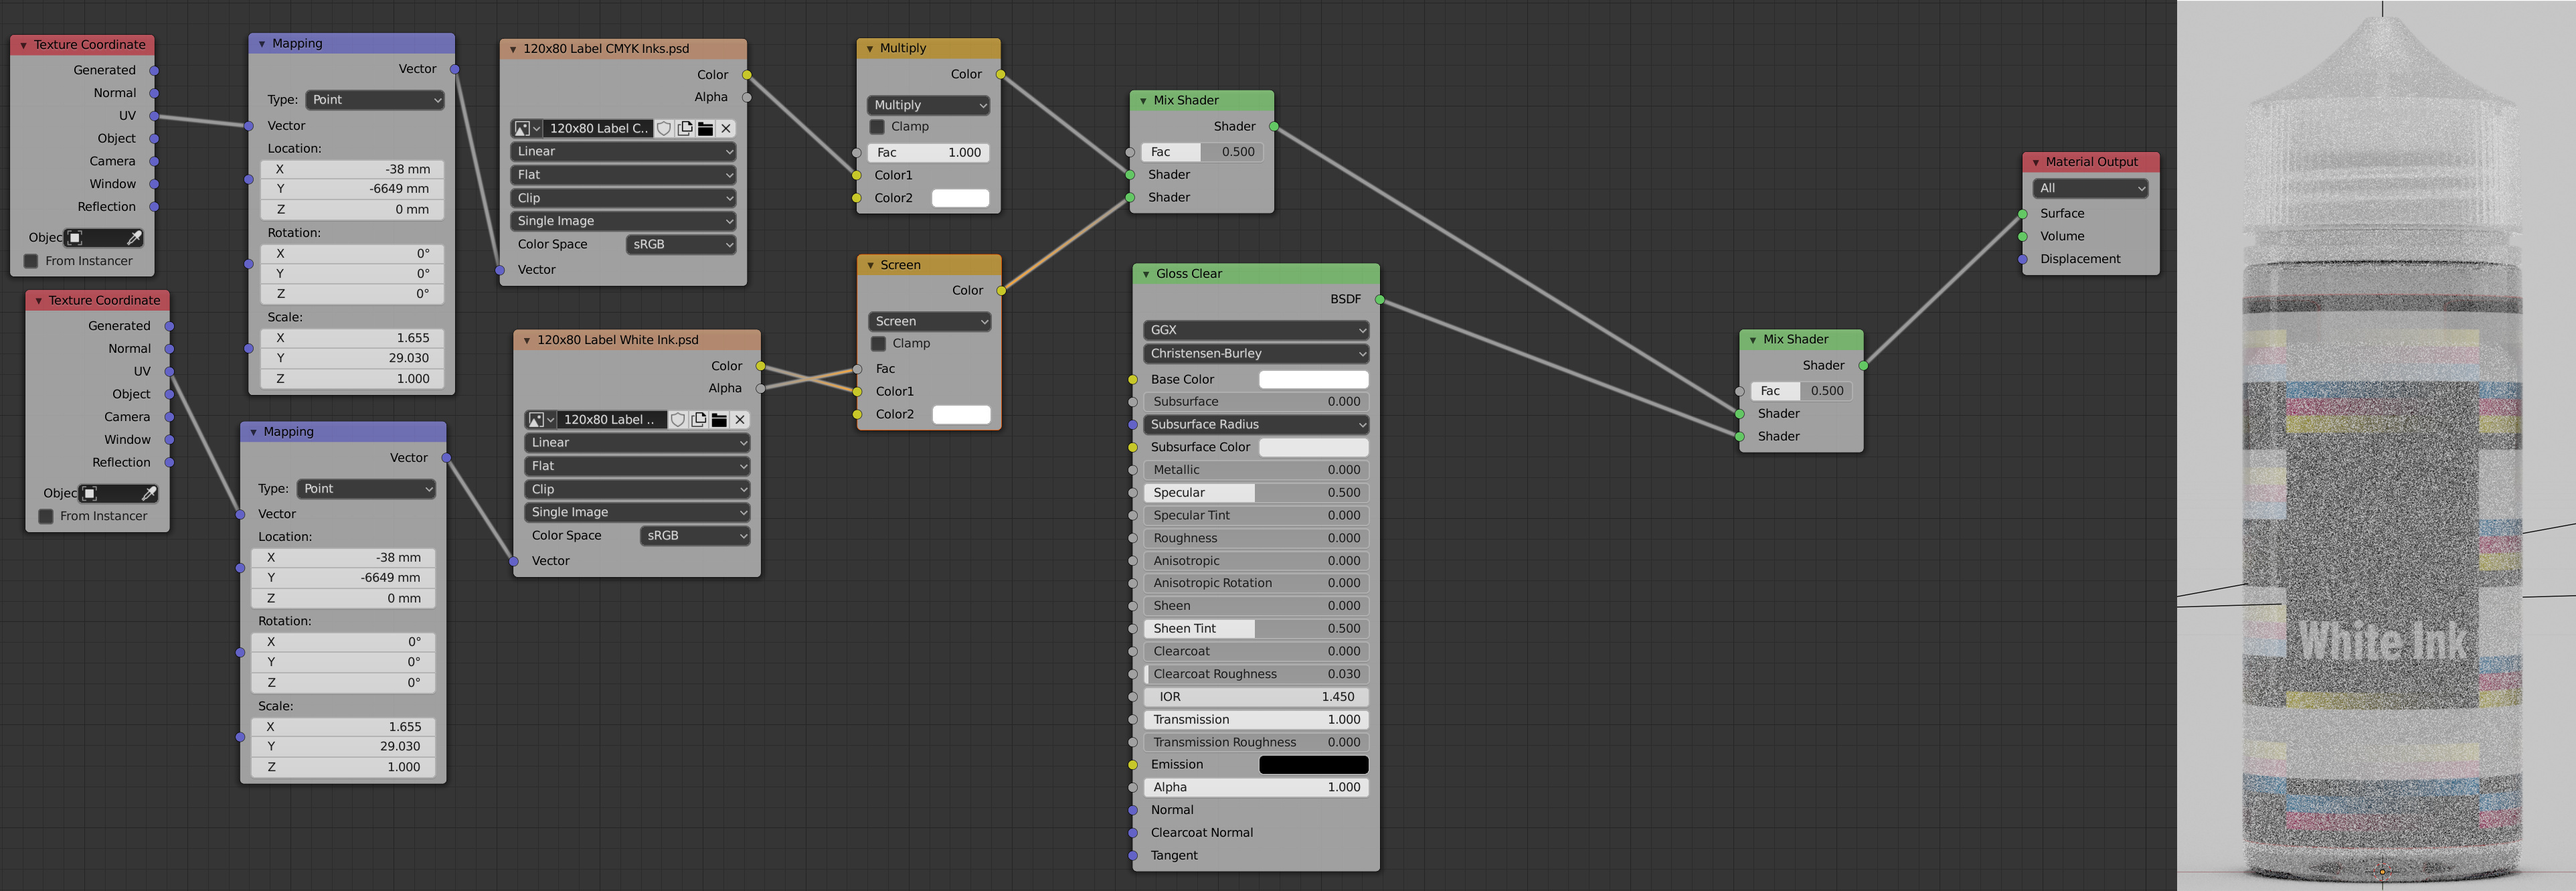
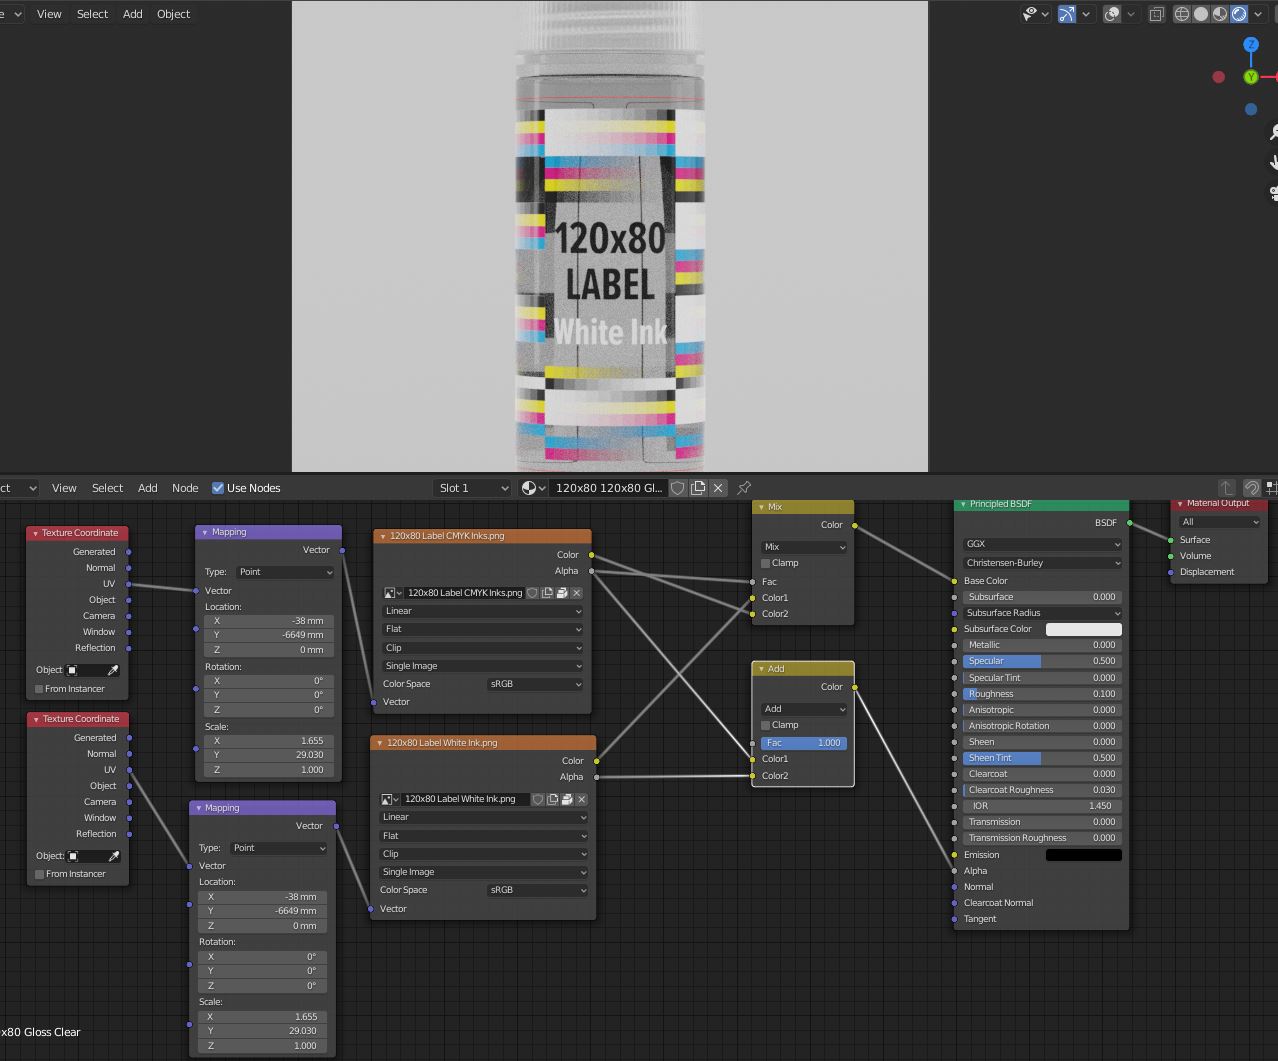
I have a mesh for the label that wraps around a clear plastic bottle. The labels I need to simulate will sometimes be opaque white, sometimes metallic silver, and in this case it will be clear. It will be printed on a label printer that prints transparent CMYK inks + an opaque white.
What I’m trying to build is a material that contains the substrate (in this case a clear polyester) at the bottom, over that an opaque white graphic (a transparent PNG with solid white areas where the white ink goes), and over those a graphic for the CMYK inks (that in Photoshop terms would Multiply over the other two). I’ve managed to mix all those three together using a bit of what I’ve learnt so far and a bit of trial and error, but I’m struggling to control the behaviour of the three element (‘multiplied’ CMYK ink over ‘screened’ white ink over clear or metallic substrate).
First a tip: Next time show us visual examples of what you’re trying to achieve. Those unfamiliar with the process you’re describing may have a hard time following the explanation without an aid to quickly dispel any doubts, making it less likely you’ll get help because they might not bother with doing the necessary back-and-forth to confirm it.
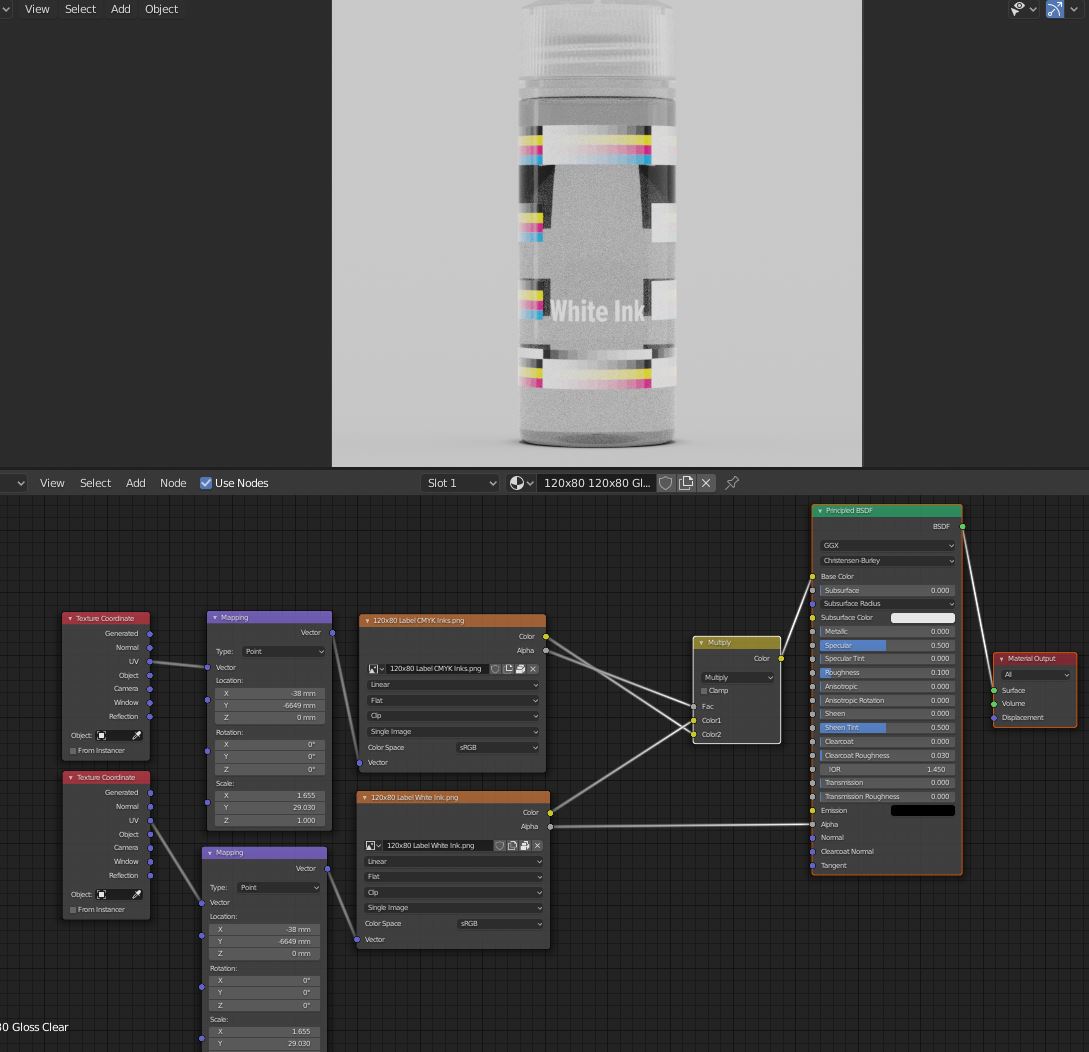
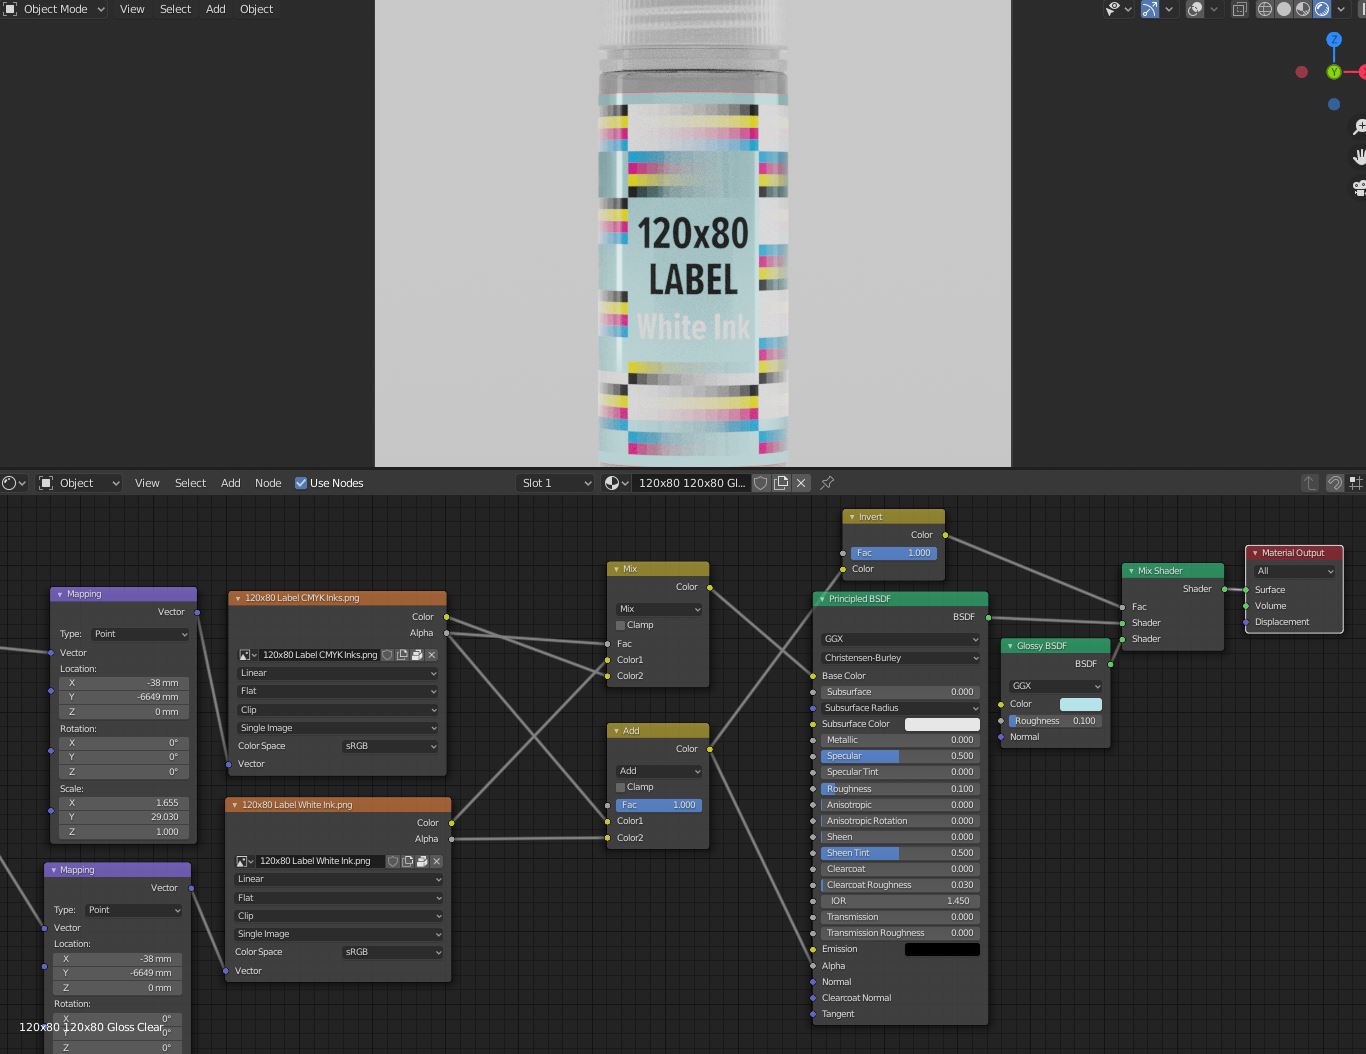
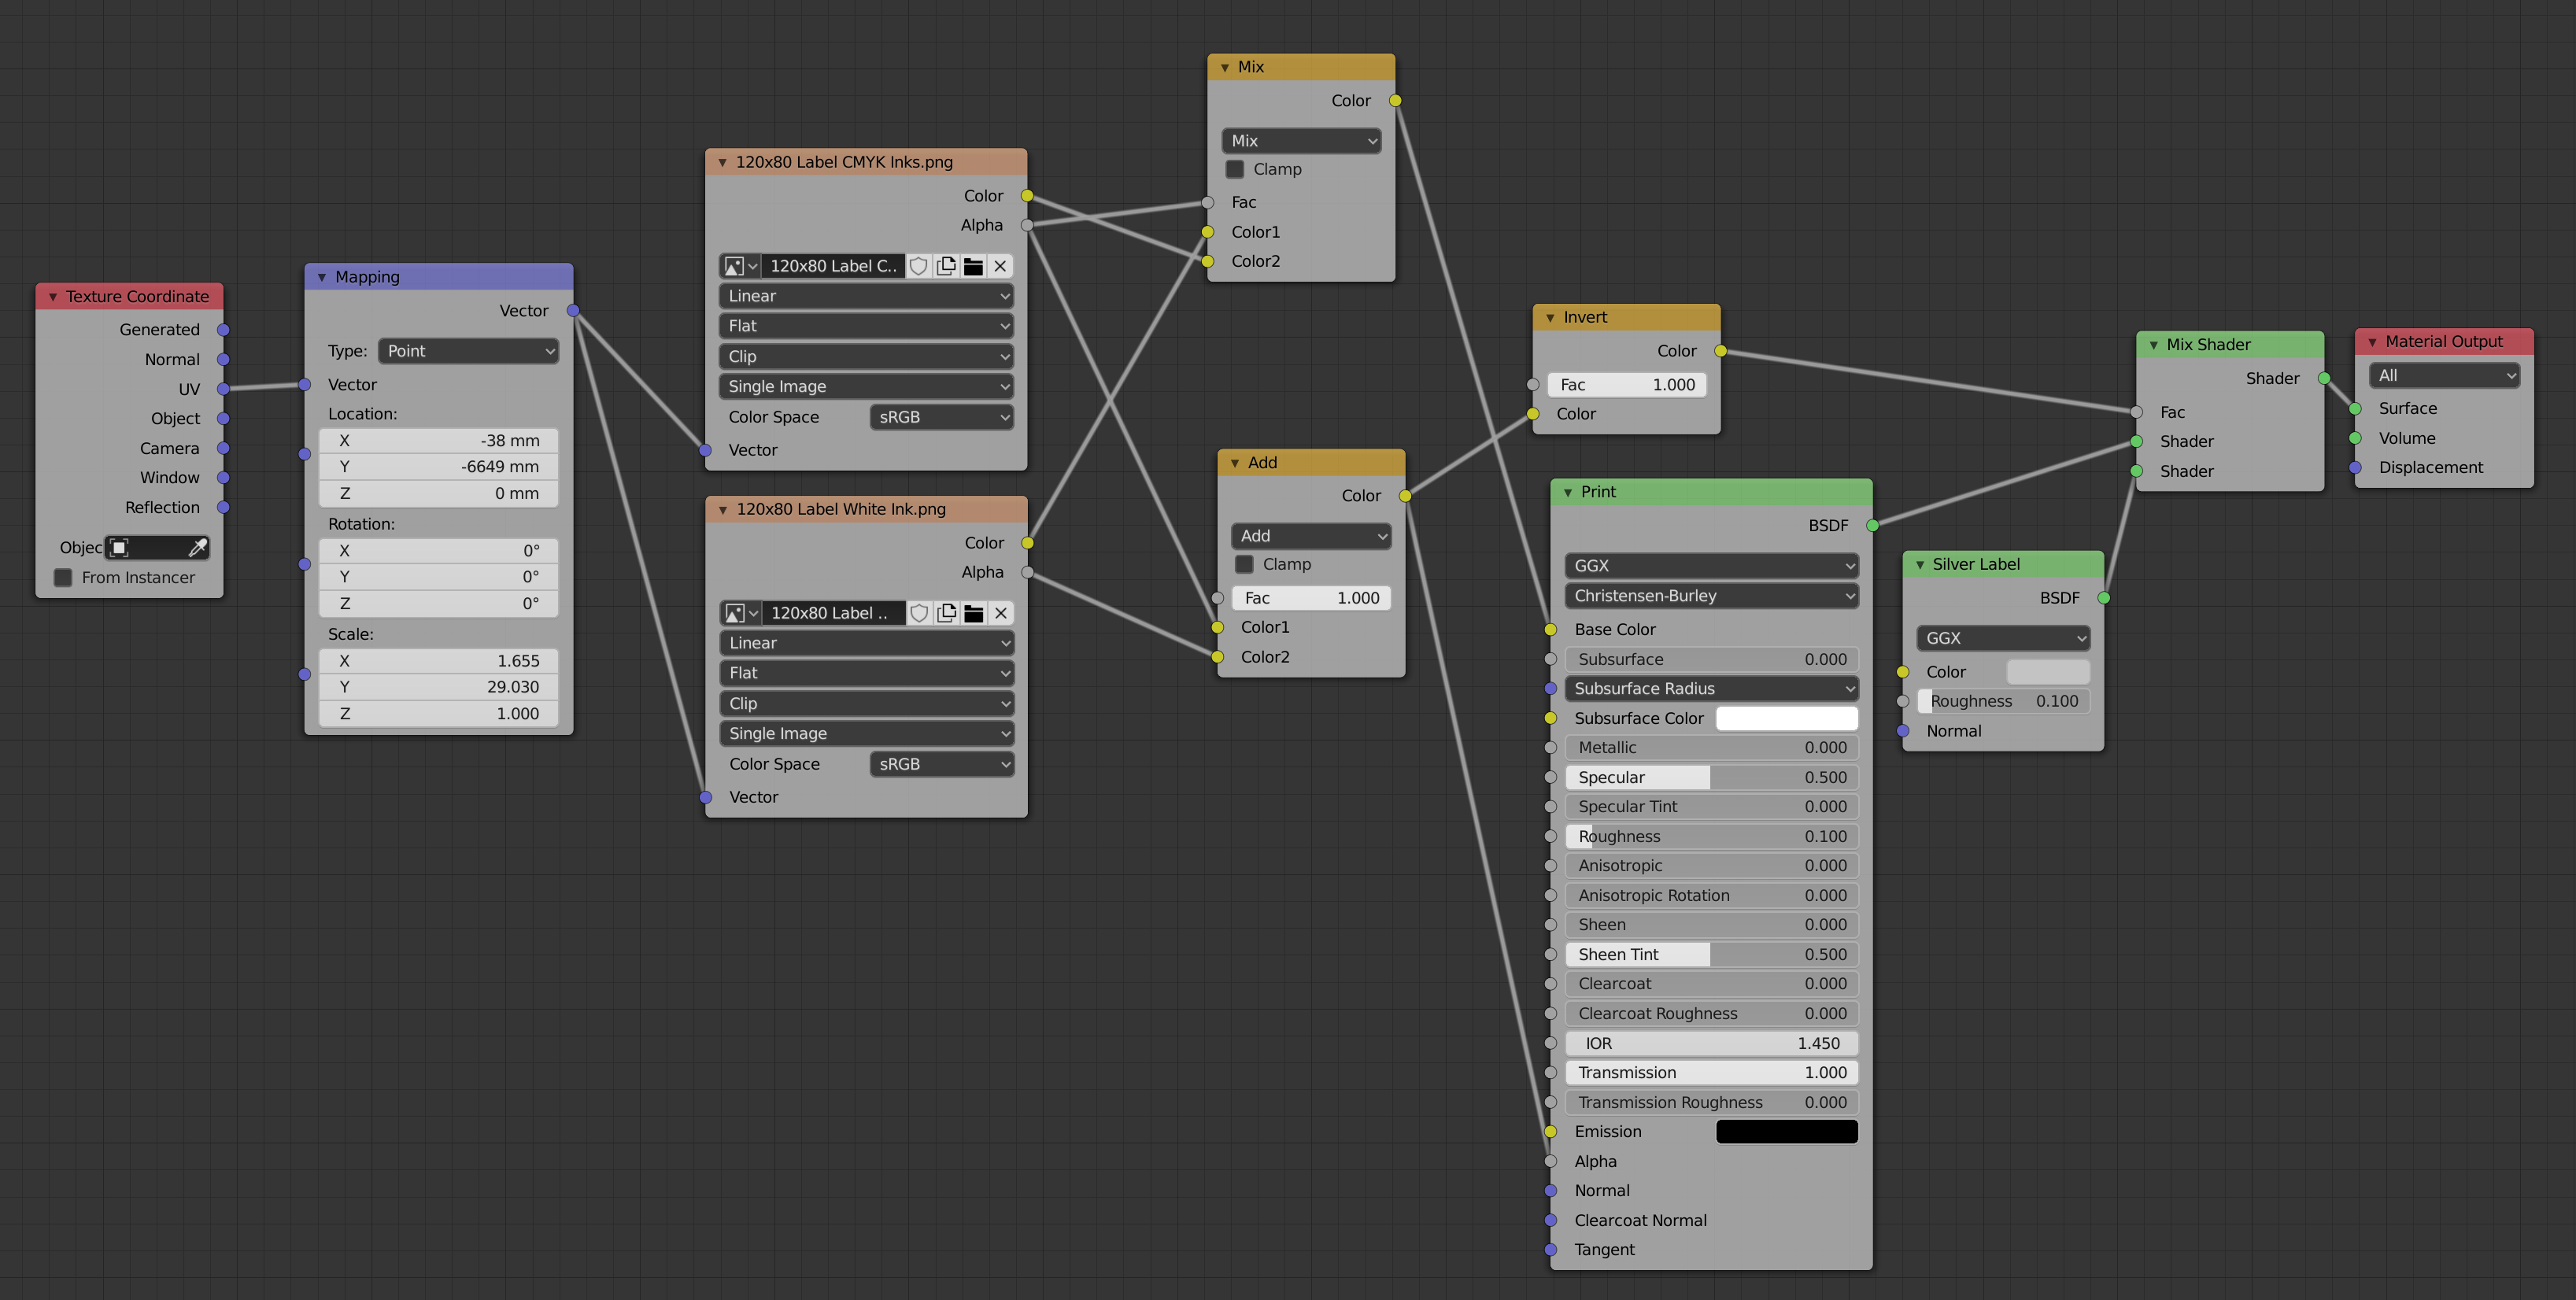
Unless the label material changes are so drastic they can’t be done in a single shader there’s no need to mix shaders when you can mix colors. Note that I turned transmission off, using alpha instead.
Using transparency means you need an alpha mask. Think of a Photoshop clipping mask, it’s the same principle.
White ink
In the described process the white ink acts as this alpha mask, thus I used the alpha channel from the white label image for this. Note that I changed its color mode to Non-Color to discard the color data, because I only need the alpha channel. You usually do this for any texture map that doesn’t change the texture color to keep the color data from inadvertently interfering with the output.
The white color is actually coming from the mix node. If you change it to red you’ll have red ink. You could duplicate the white label image, set the second to sRGB and plug the color in the white slot, but I advise against it as you could get slightly black edges where the transparency starts because:
The alpha channel contains no color data. No color data = 0 . Which color is 0,0,0? Black. Thus any alpha region, when forcibly converted to R,G,B will be a mix of these channels + black.
The color and alpha channels overlap perfectly. If your alpha mask contained only 0% or 100% alpha it’d be no issue. But it has smooth edges, pixels with other alpha %, making the situation described above true.
CMYK Inks
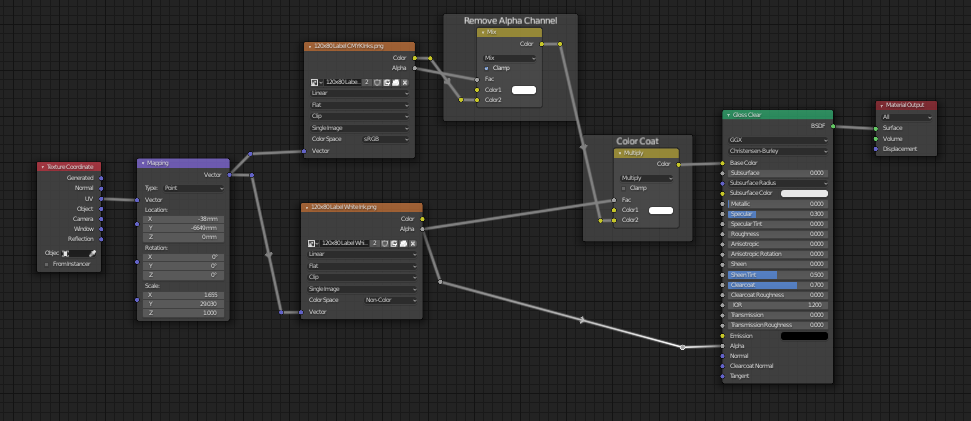
Now we have a masked base with the desired base color, you can mix the colors.
The Color Correction exists because you color map also has alpha, what is an issue here. Remember it’ll become black, and we don’t need this alpha anyway when we already have an alpha mask. I corrected it by replacing the transparency with white, making it fully opaque. It works because Blender’s multiply will act just like in Photoshop: Anything multiplied by white won’t be multiplied at all.
Notes
The specular roughness will create mirror-like reflections when you start to play with metallic maps. I suspect it’s not the intended effect and you want something more varnish-like. In this case you’ll want to mix some clearcoat in there.
I also replaced the Infinity Curve with a plain Shadow Catcher plane, as the curved plane was creating a increasing the render time by needlessly bouncing a lot of light around. If you have a good GPU you may switch the render mode to it to improve speed as well.
I understand those inks are printed straight on the bottle, right? There’s no coat of varnish over everything or plastic label to represent. If there were any then you could use transmission, plugging the (inverted) mask into the transmission socket and adjusting the IOR to realistic varnish/plastic values. You’d need to slightly resize the label so it doesn’t intersect with the bottle and add thickness to it, or the shader will interpret it as being a solid lump of plastic/varnish. A solidify modifier would quickly solve the issue. You’ll also make sure the normals are behaving or you’ll get weird black artifacts, so you’ll need to go into the edit mode and mark the label edges as Sharp Edges.
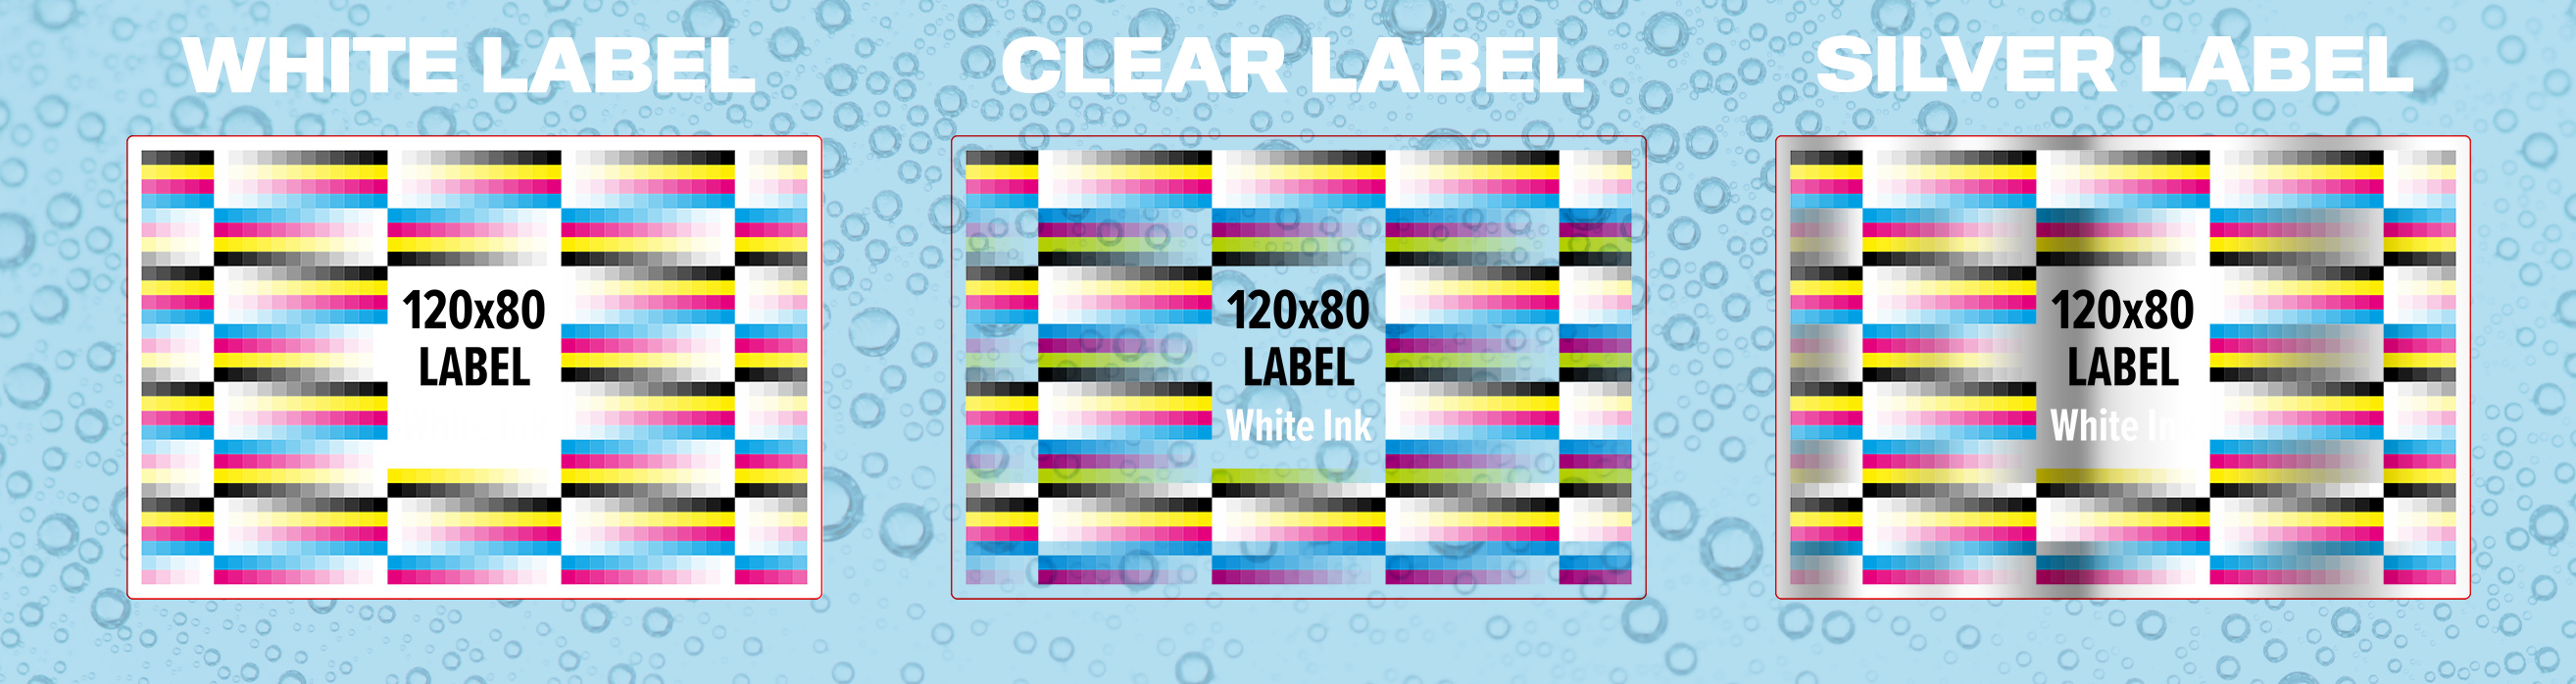
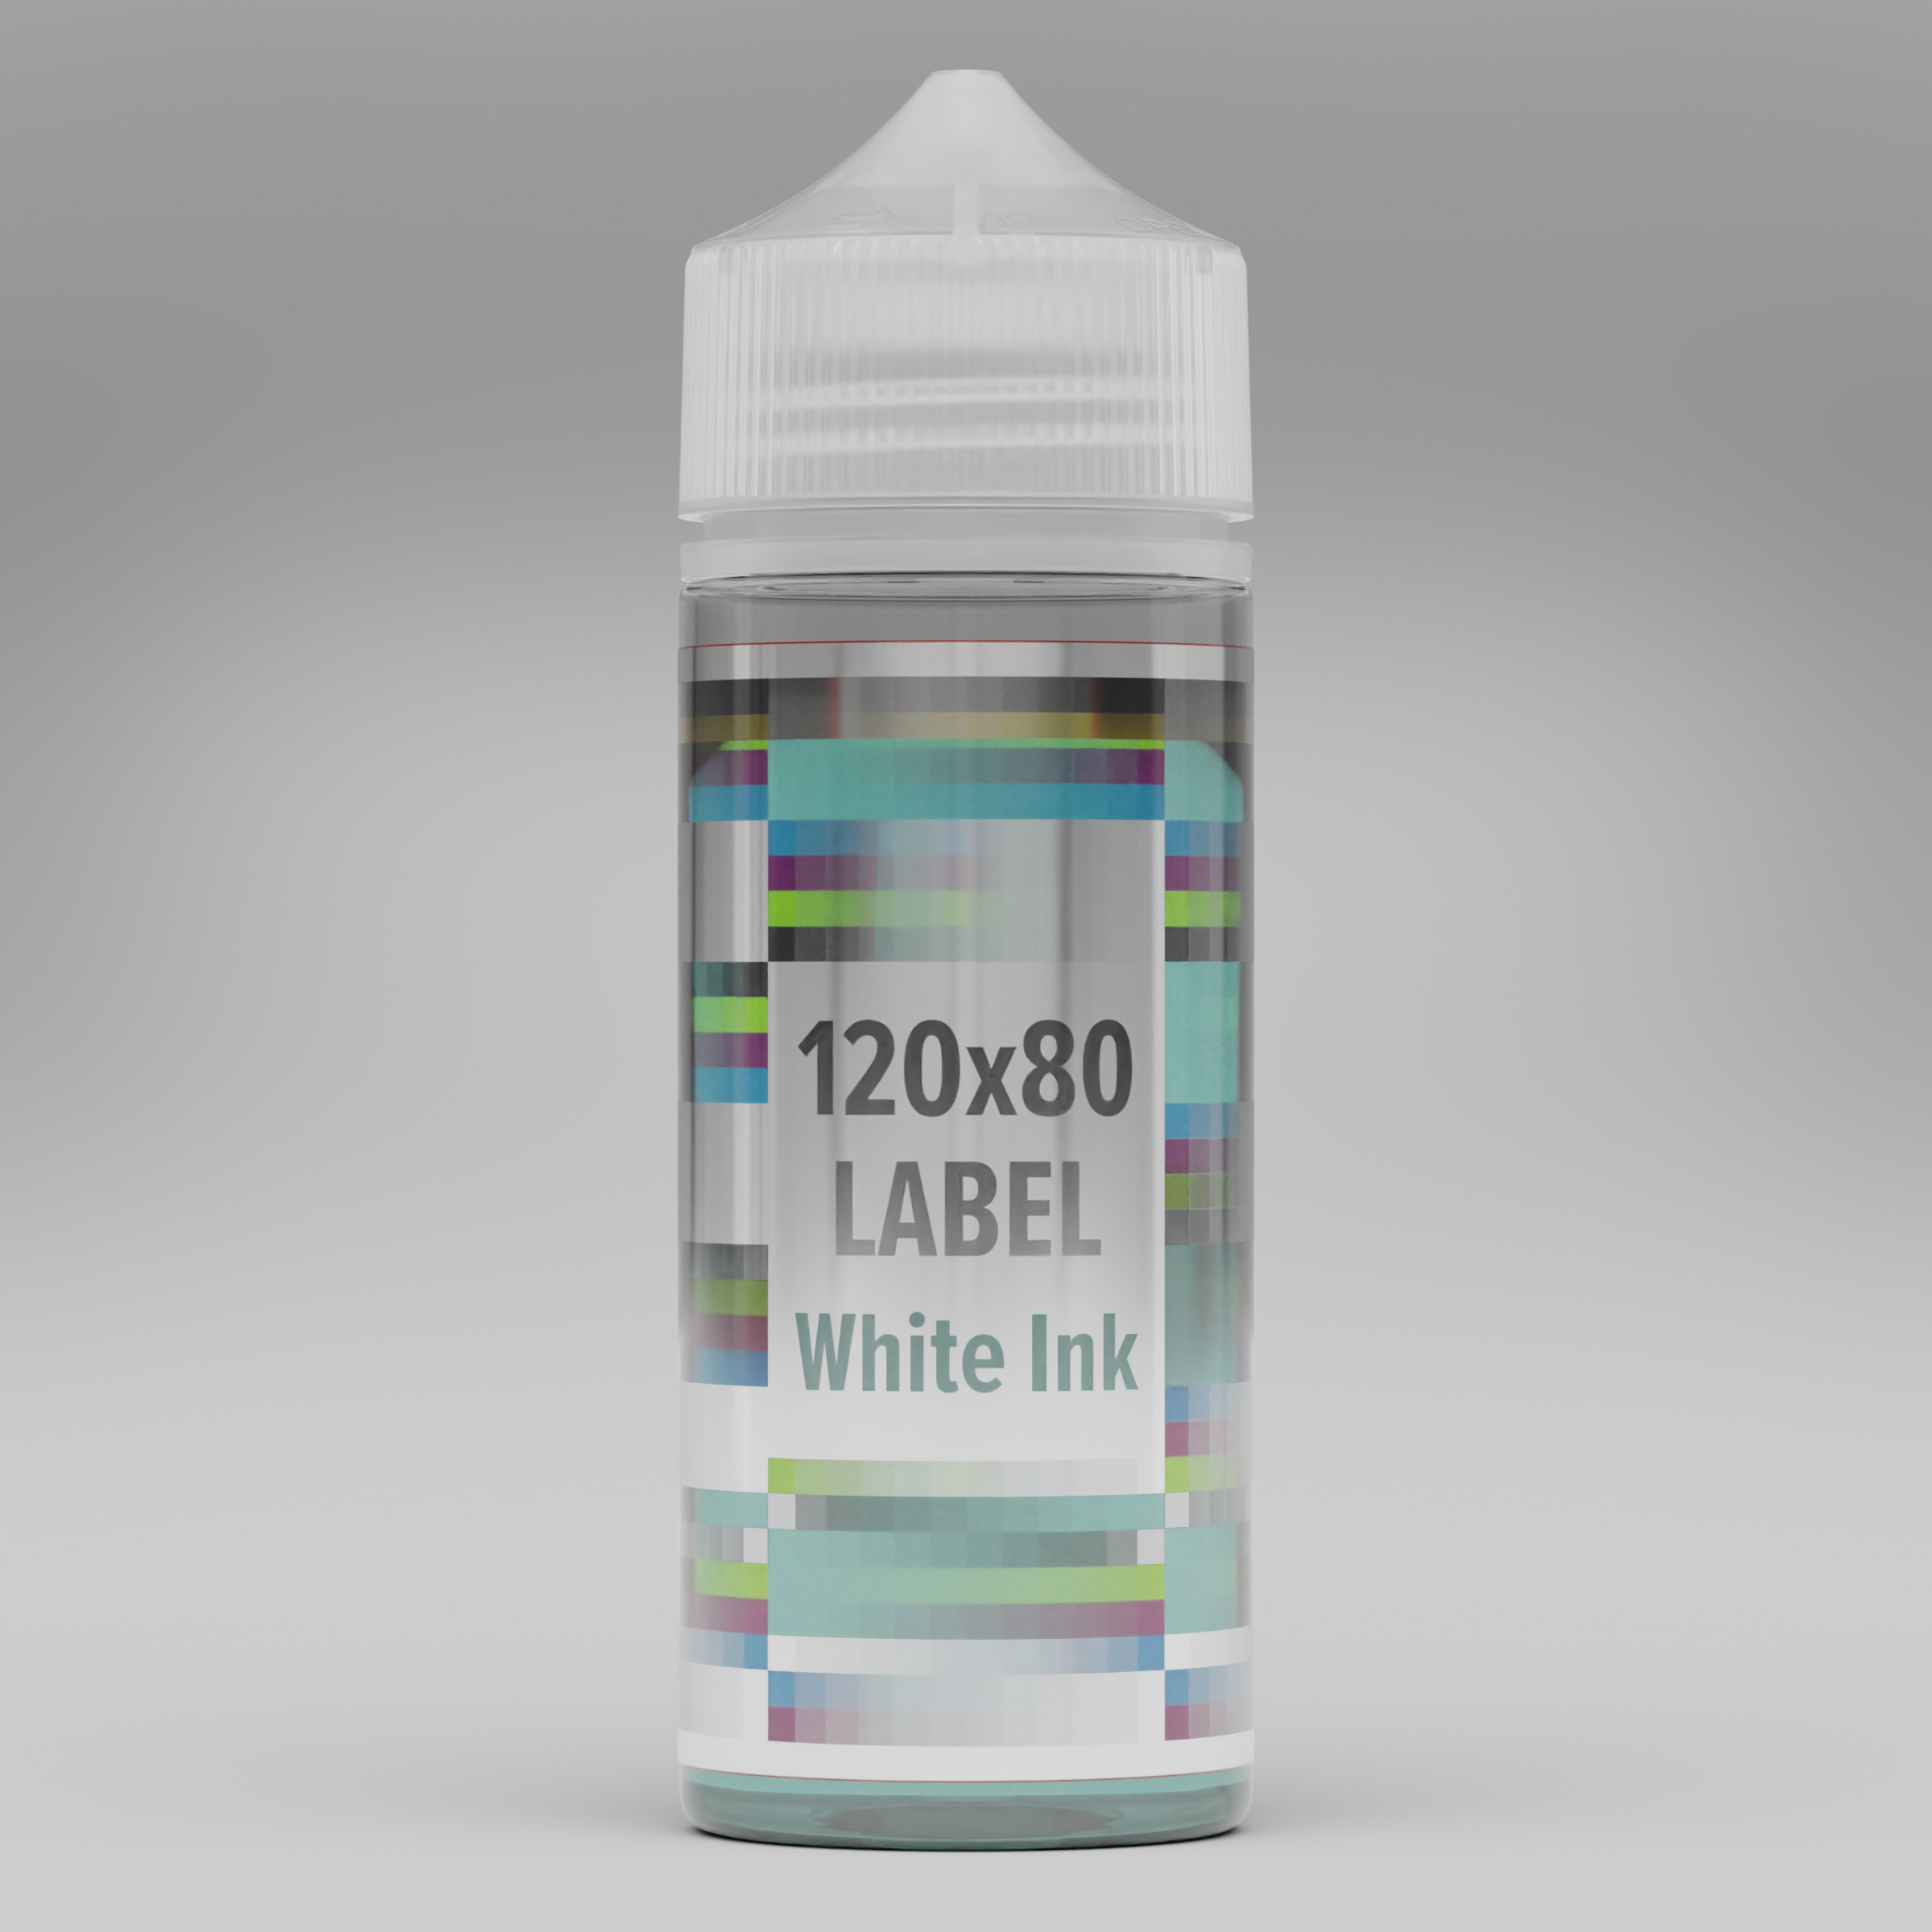
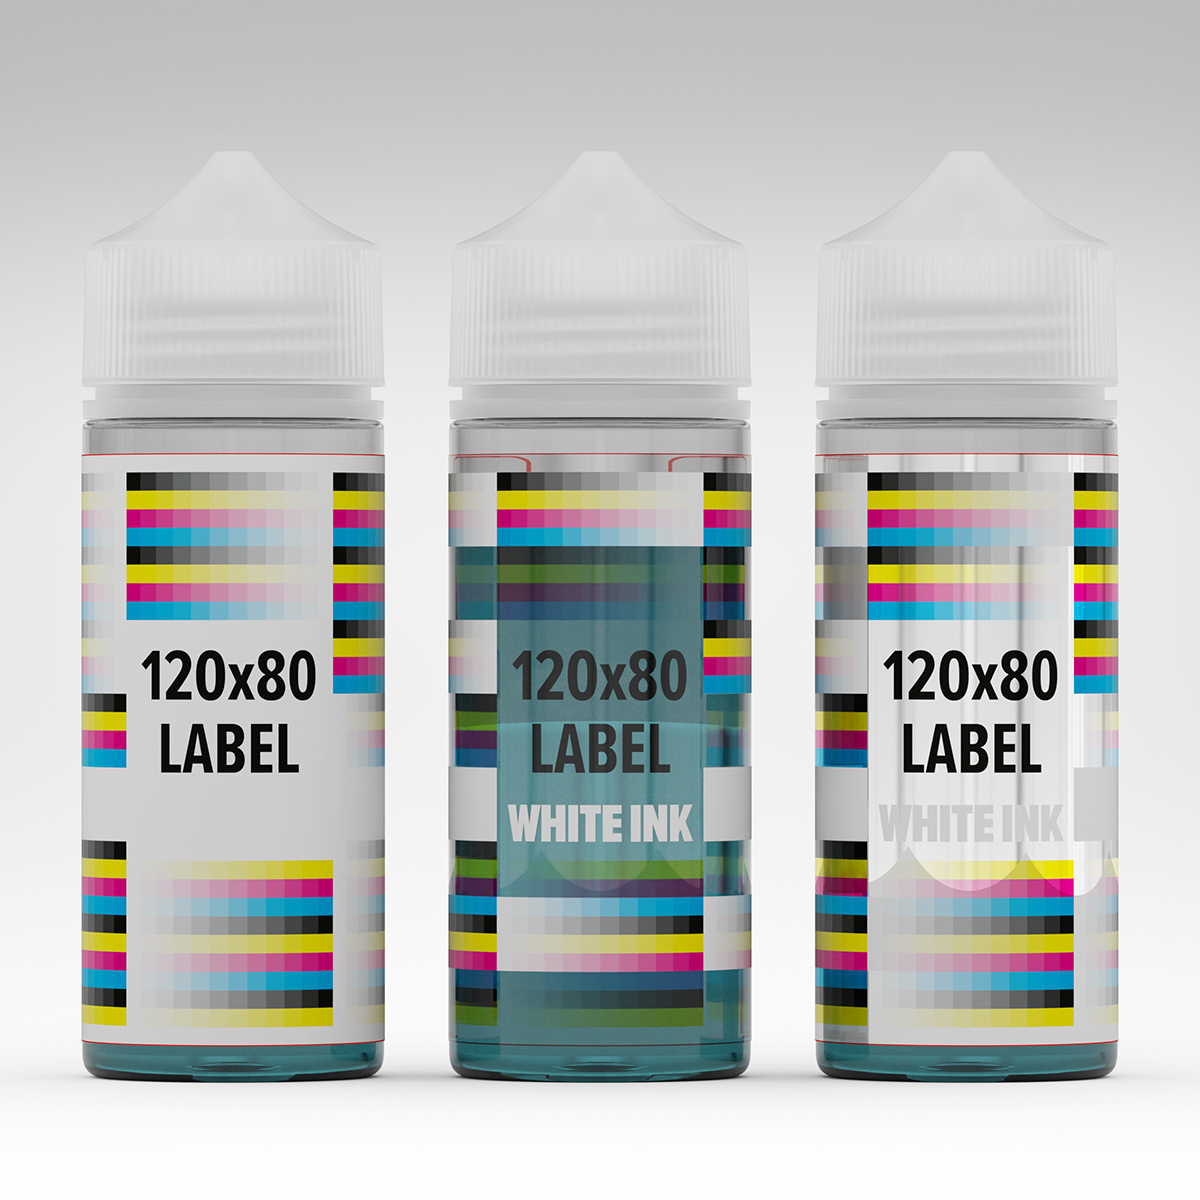
Birb - point taken about visual examples… especially in this case. I’ve tried to comp something in that hopefully explains in more detail about what I’m trying to achieve. I’ve used a mock blueish liquid effect here, as it hopefully shows the effect better.
There will be actual labels going onto the bottles - sometimes opaque matt or gloss white, sometimes foil/silver, and sometimes clear. I’ve made a mesh for the label derived from the bottle mesh, scaled up a little, then used a shrinkwrap modifier with a little offset to stop it intersecting with the bottle. I’m hoping to be able to change the label type by changing one (or more if necessary) of the nodes in the material.
What I didn’t explain properly (sorry!), is that the transparent CMYK inks will be printed in some areas of the design without the white ink behind them, effectively multiplying on top of label.
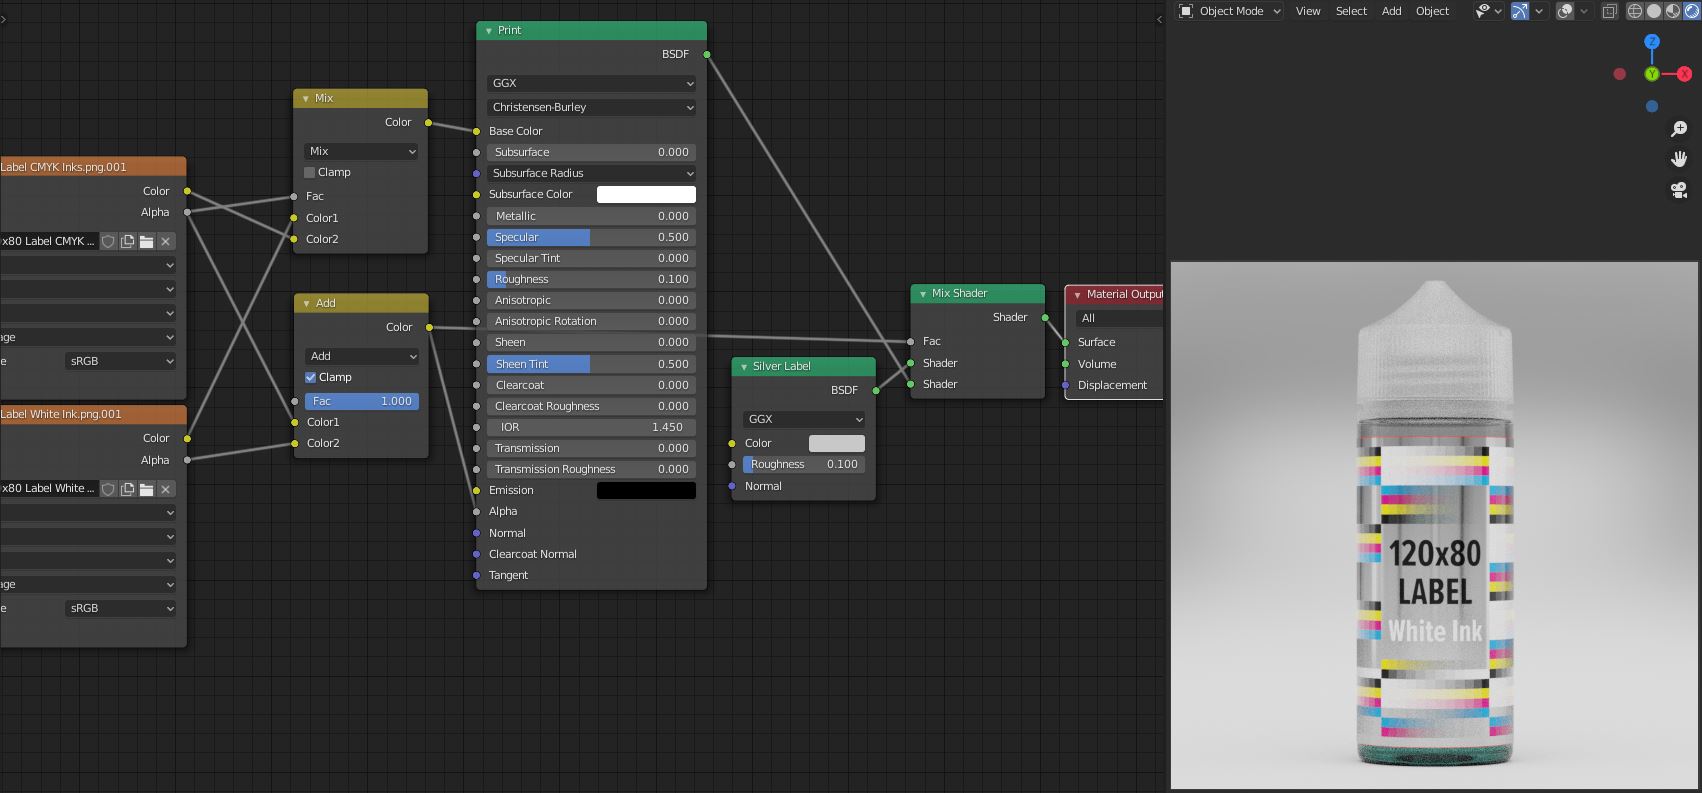
Amazing! I’ve used your settings for the silver label, used a somewhat OTT HDRI to accentuate the metallic, and a blue liquid so I can see the transparency. It’s almost exactly what I need.
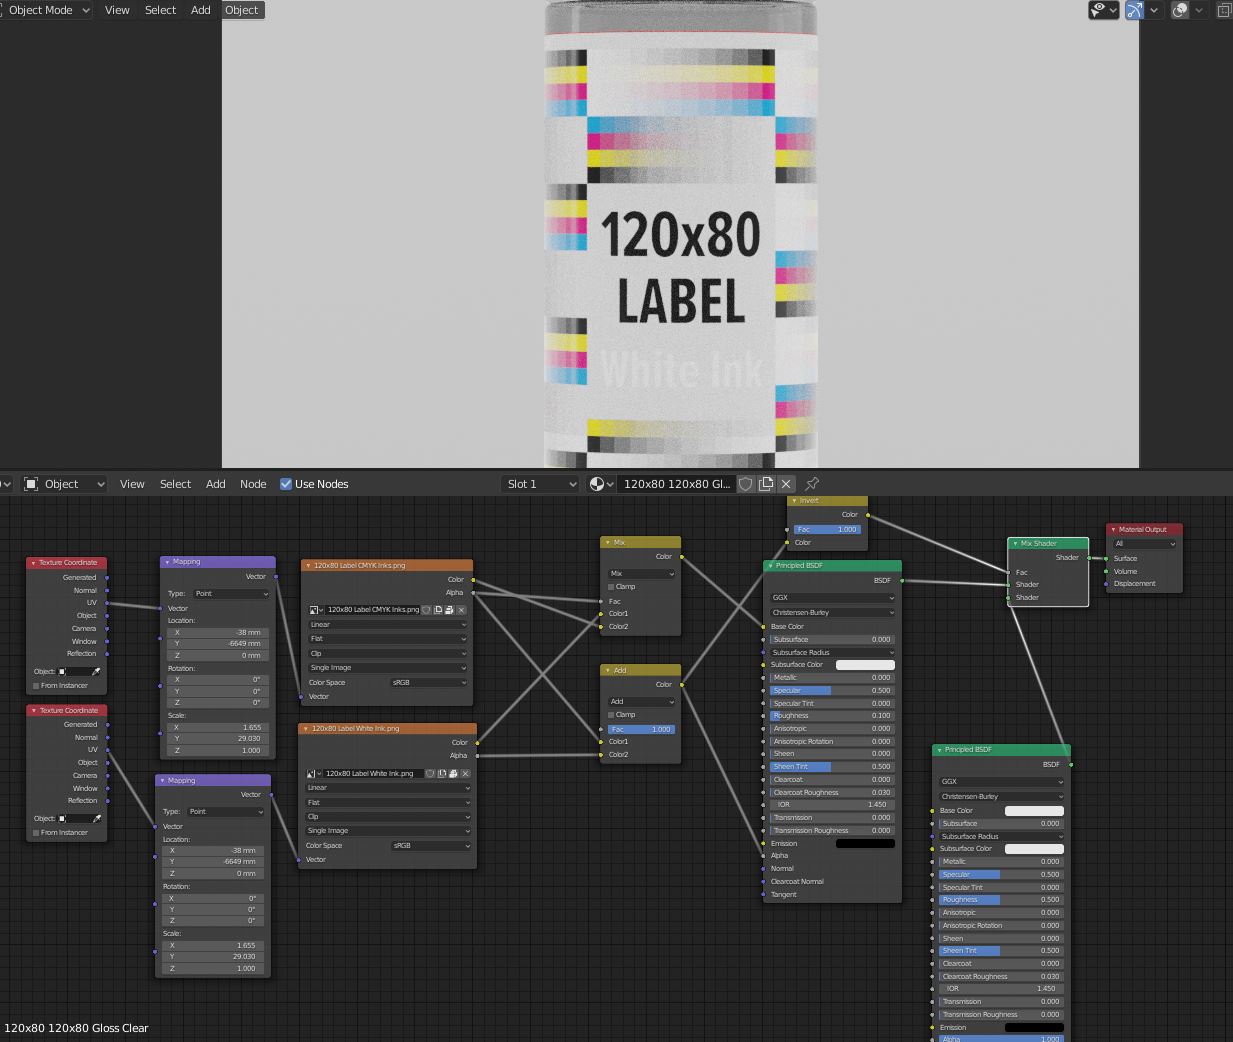
Just one thing that isn’t quite working properly - the white ink mask seems to be knocking out the label shader. On my render, you can see the blue liquid where the words ‘White Ink’ appear.
Almost there! I’ve managed to set all three materials up and they’re looking great thanks to your kind efforts.
One last little problem - the CMYK image doesn’t seem to be multiplied. It’s as if they’re opaque inks (which they aren’t, hence the need for the white ink). For instance, the solid yellow patch should still show the blue liquid through it (see image). I’ve tried playing around with a multiply mixer, but it either seems to have no effect, or it turns it into shades of grey with no colour information.
Any ideas?
And, thanks again for all your help… I think I’m starting to understand how the nodes interact, but not quite well enough yet!
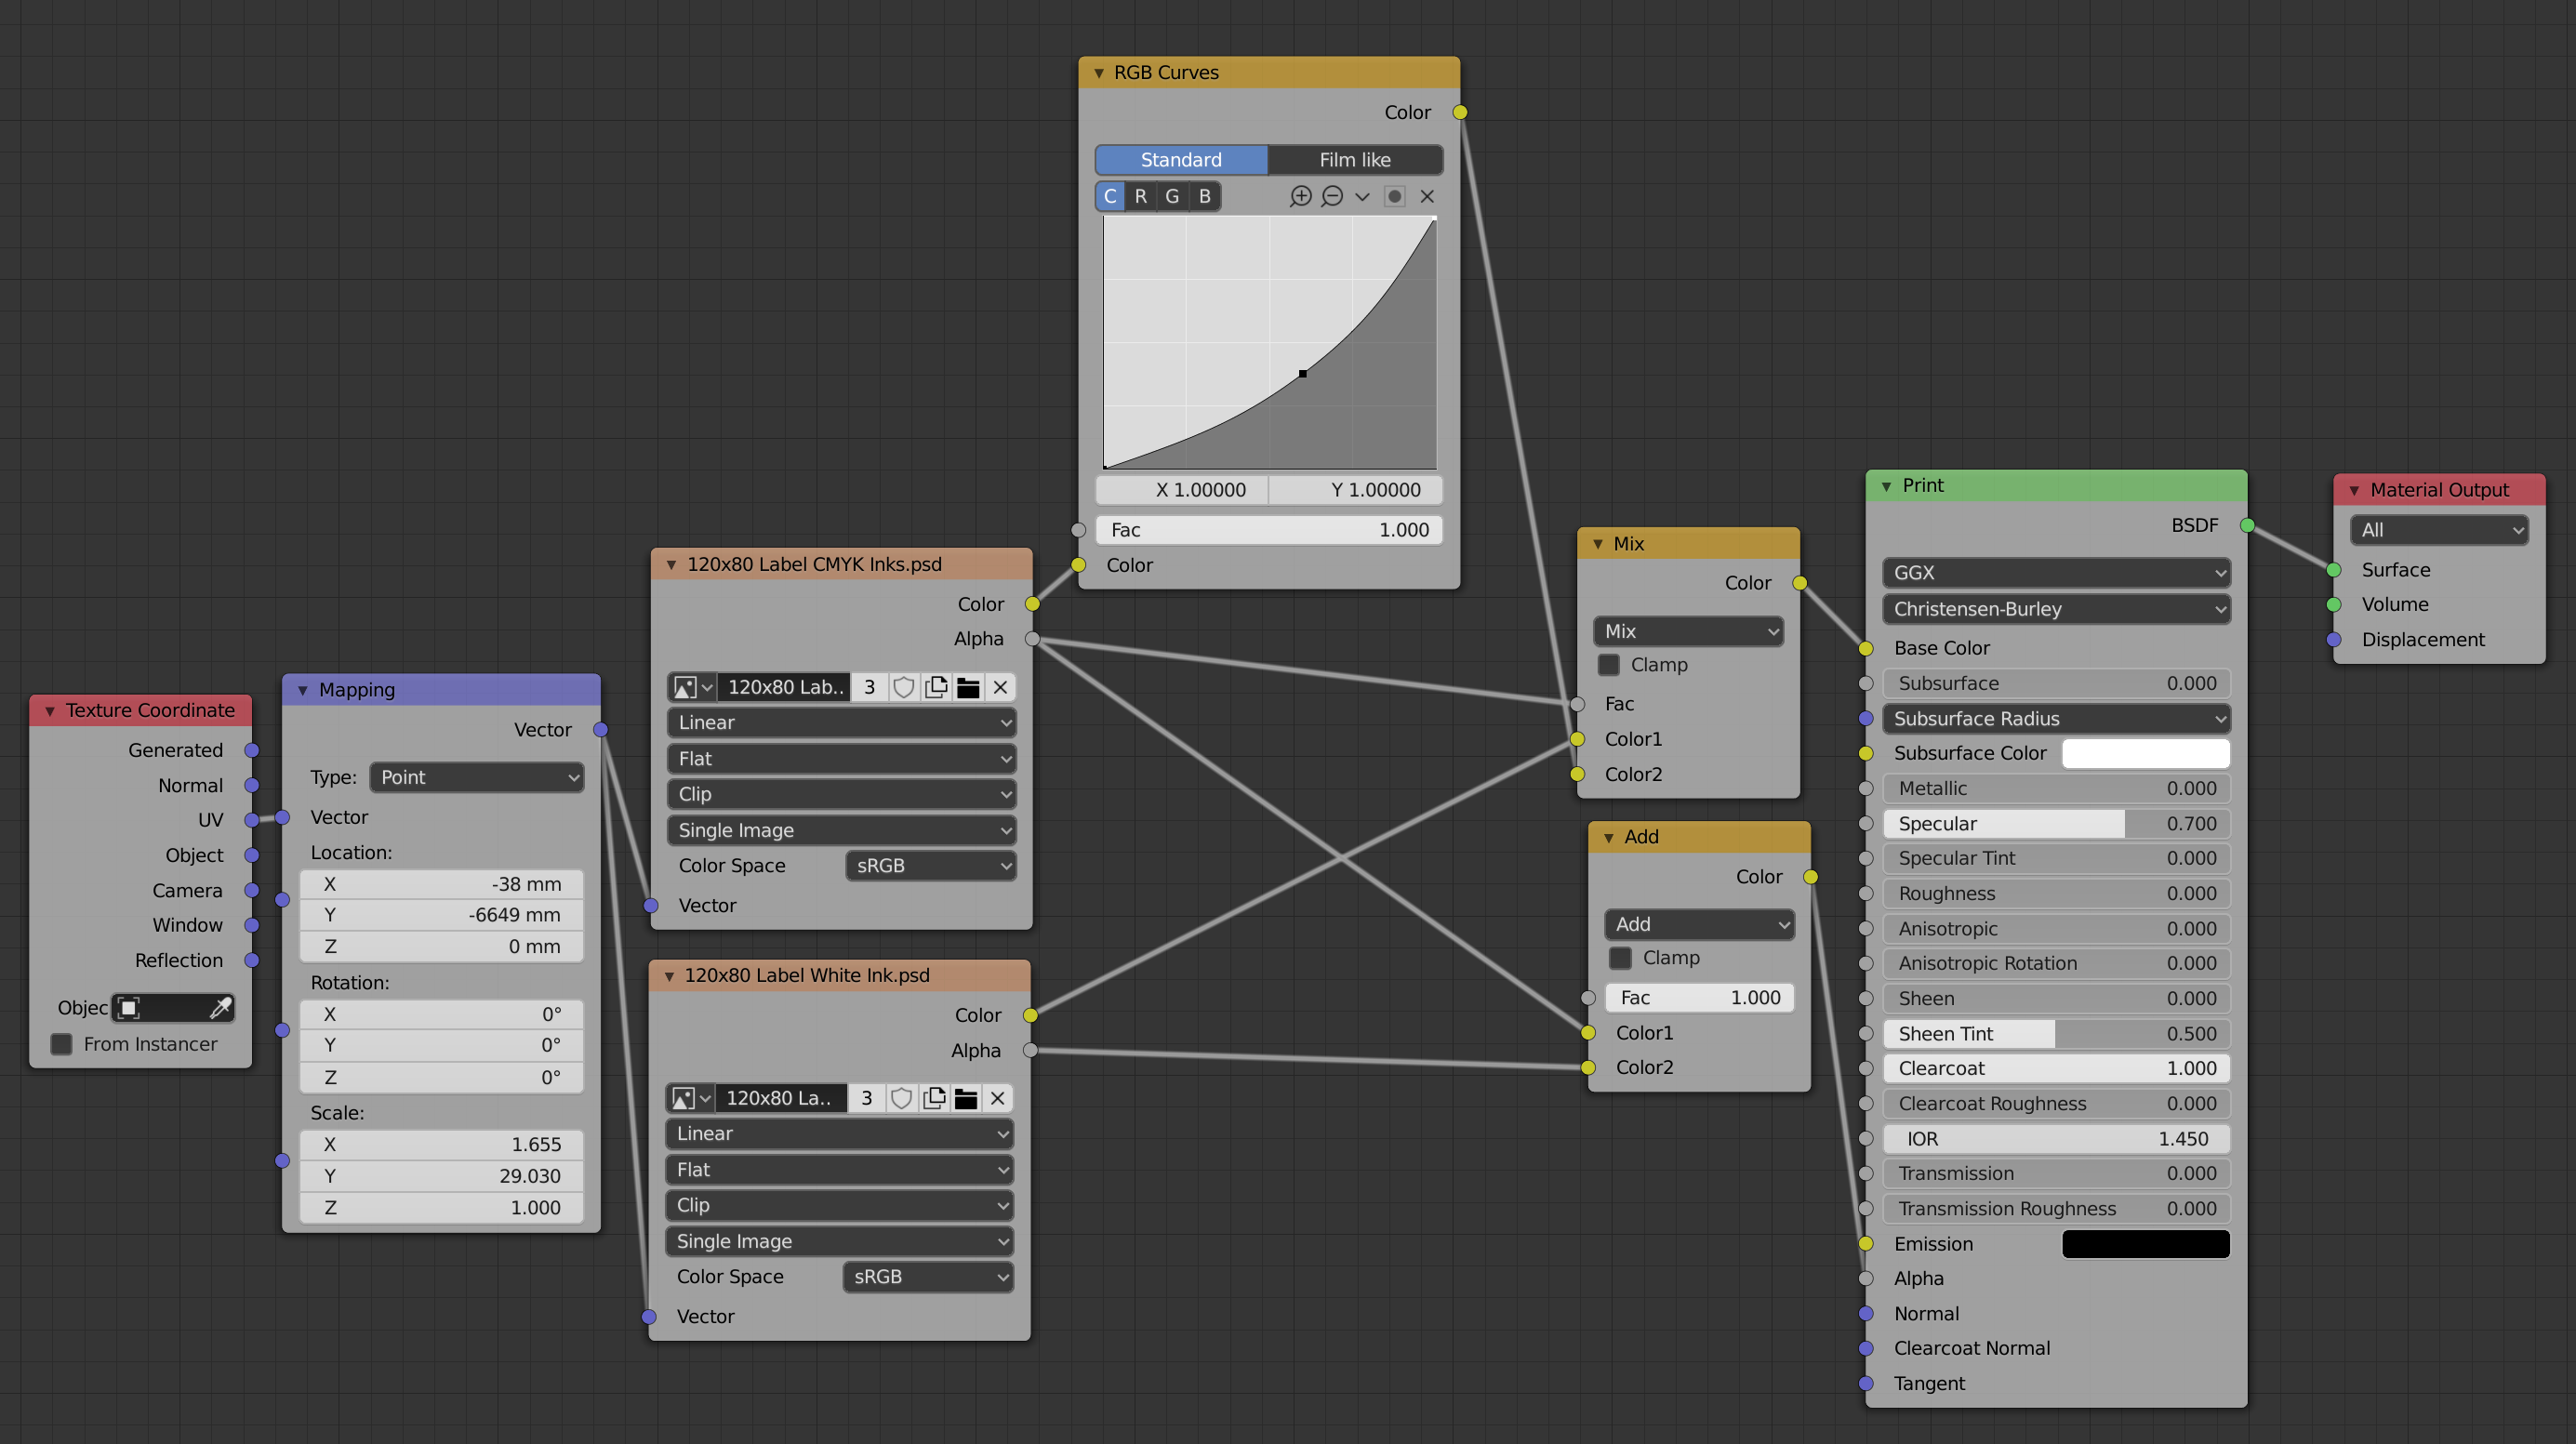
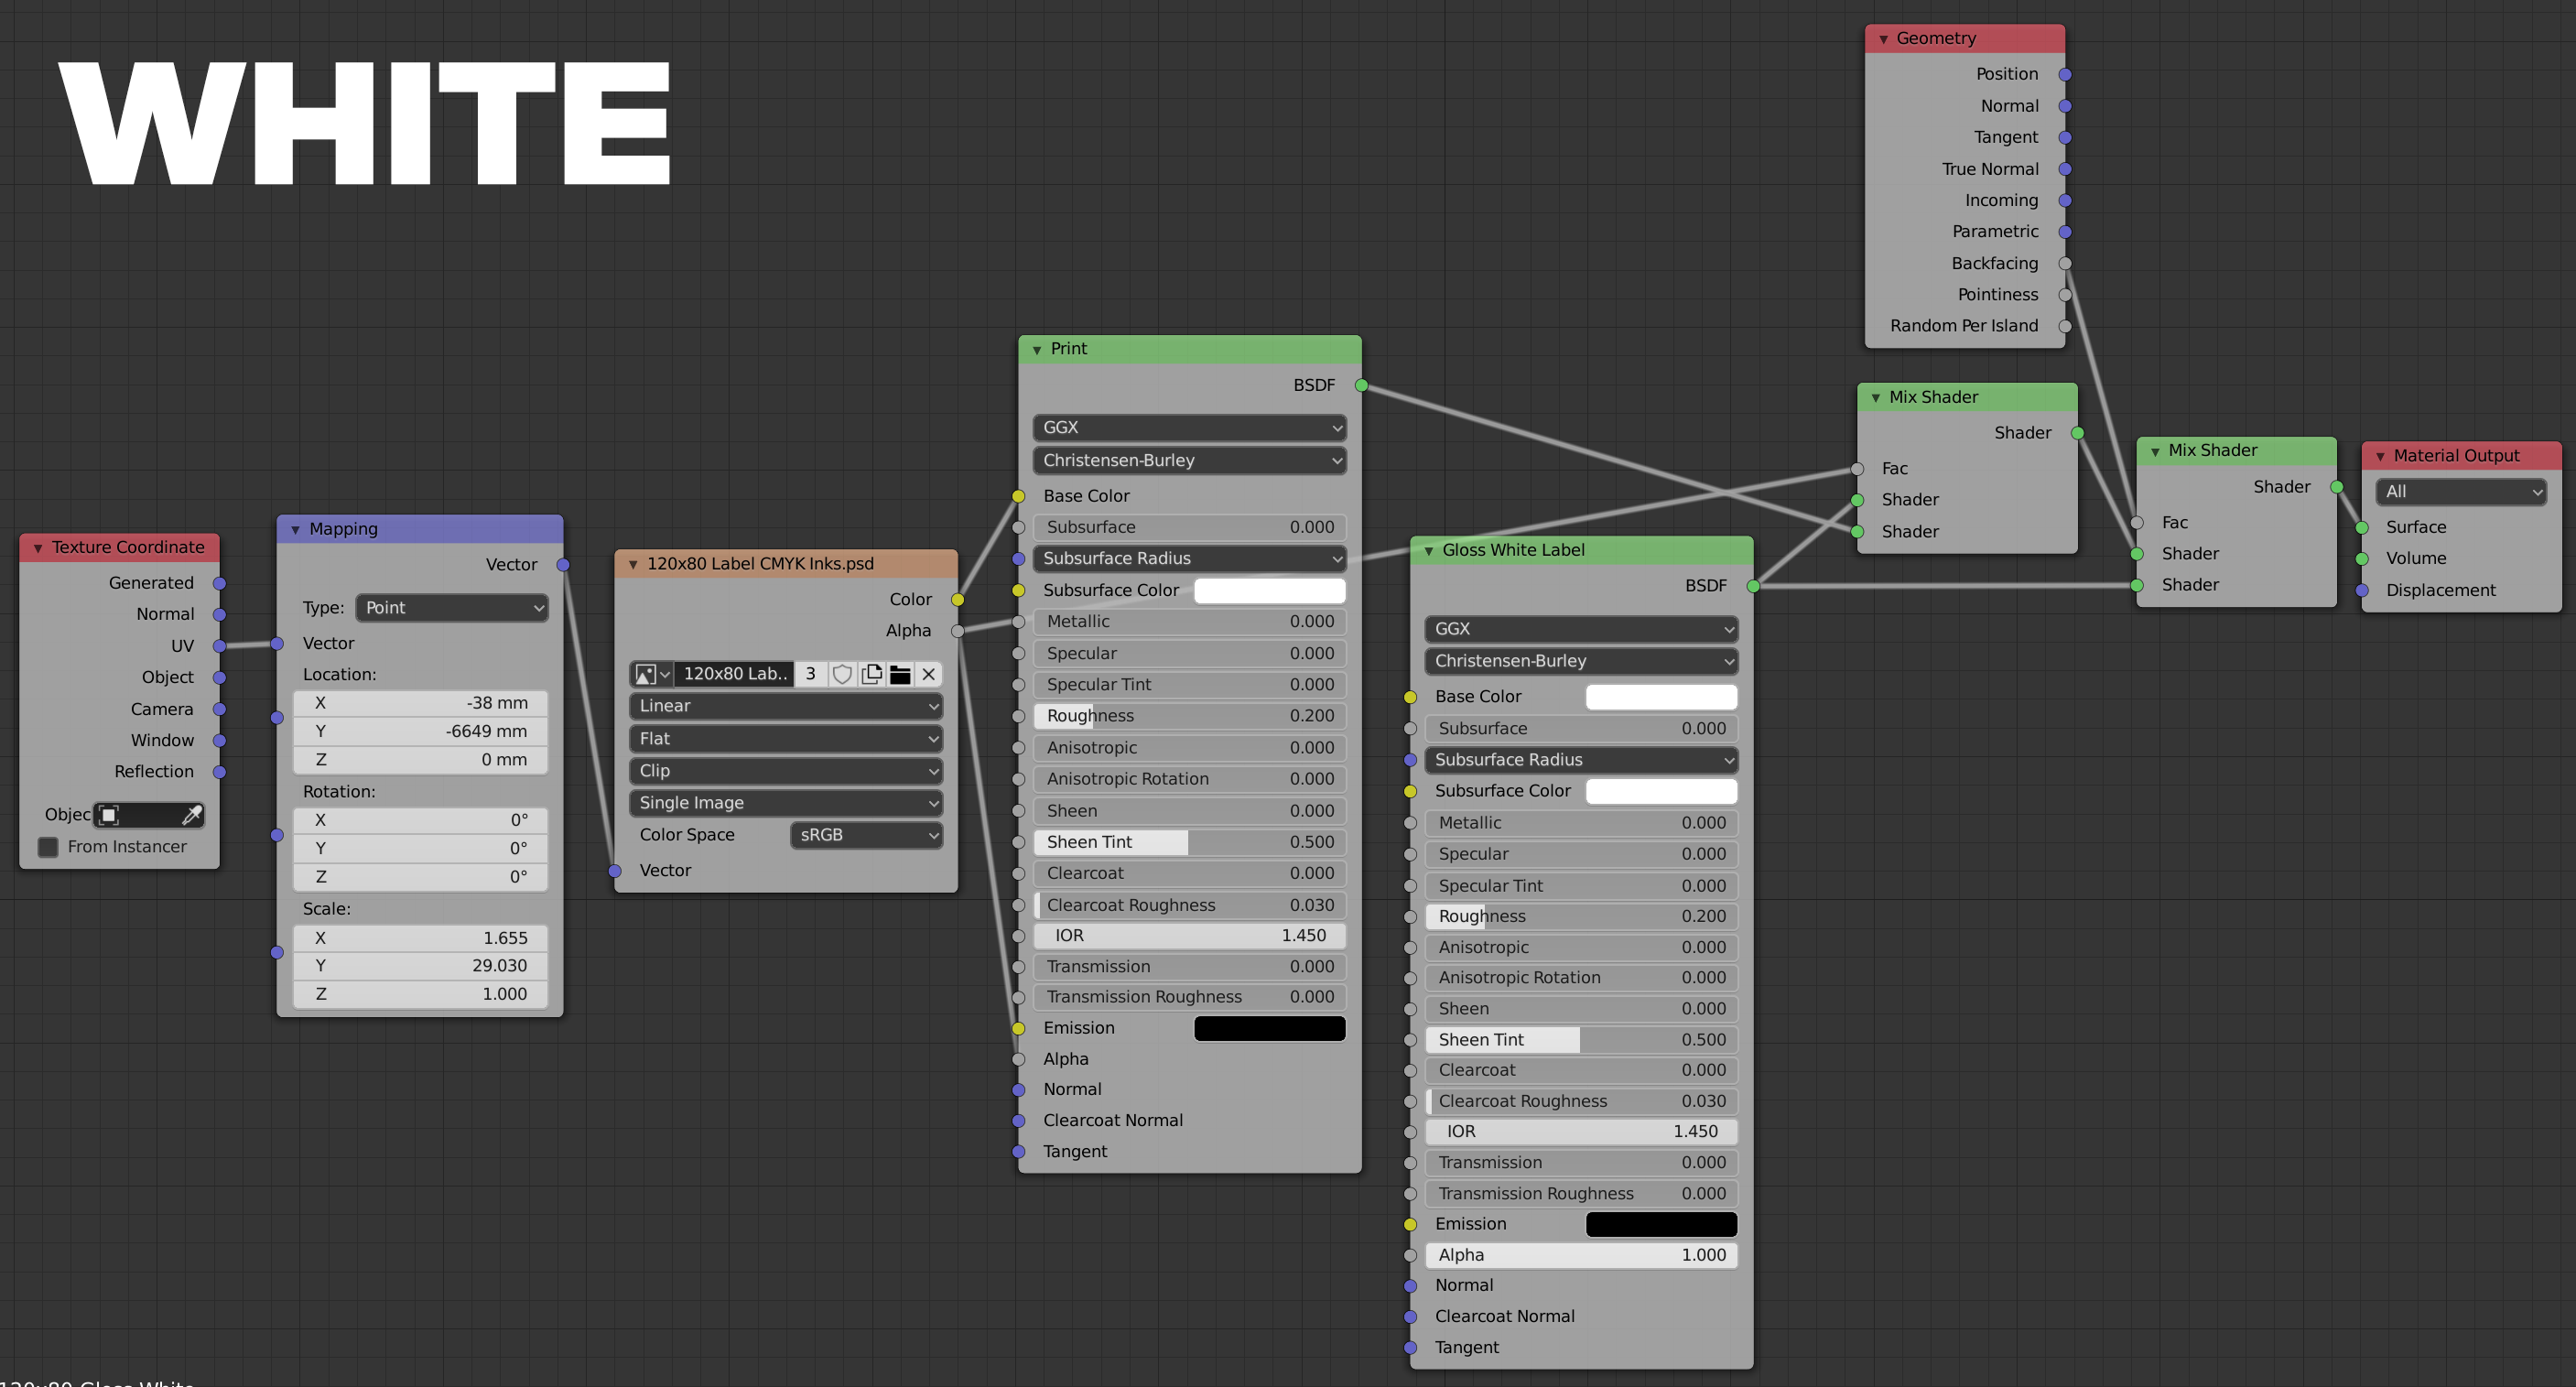
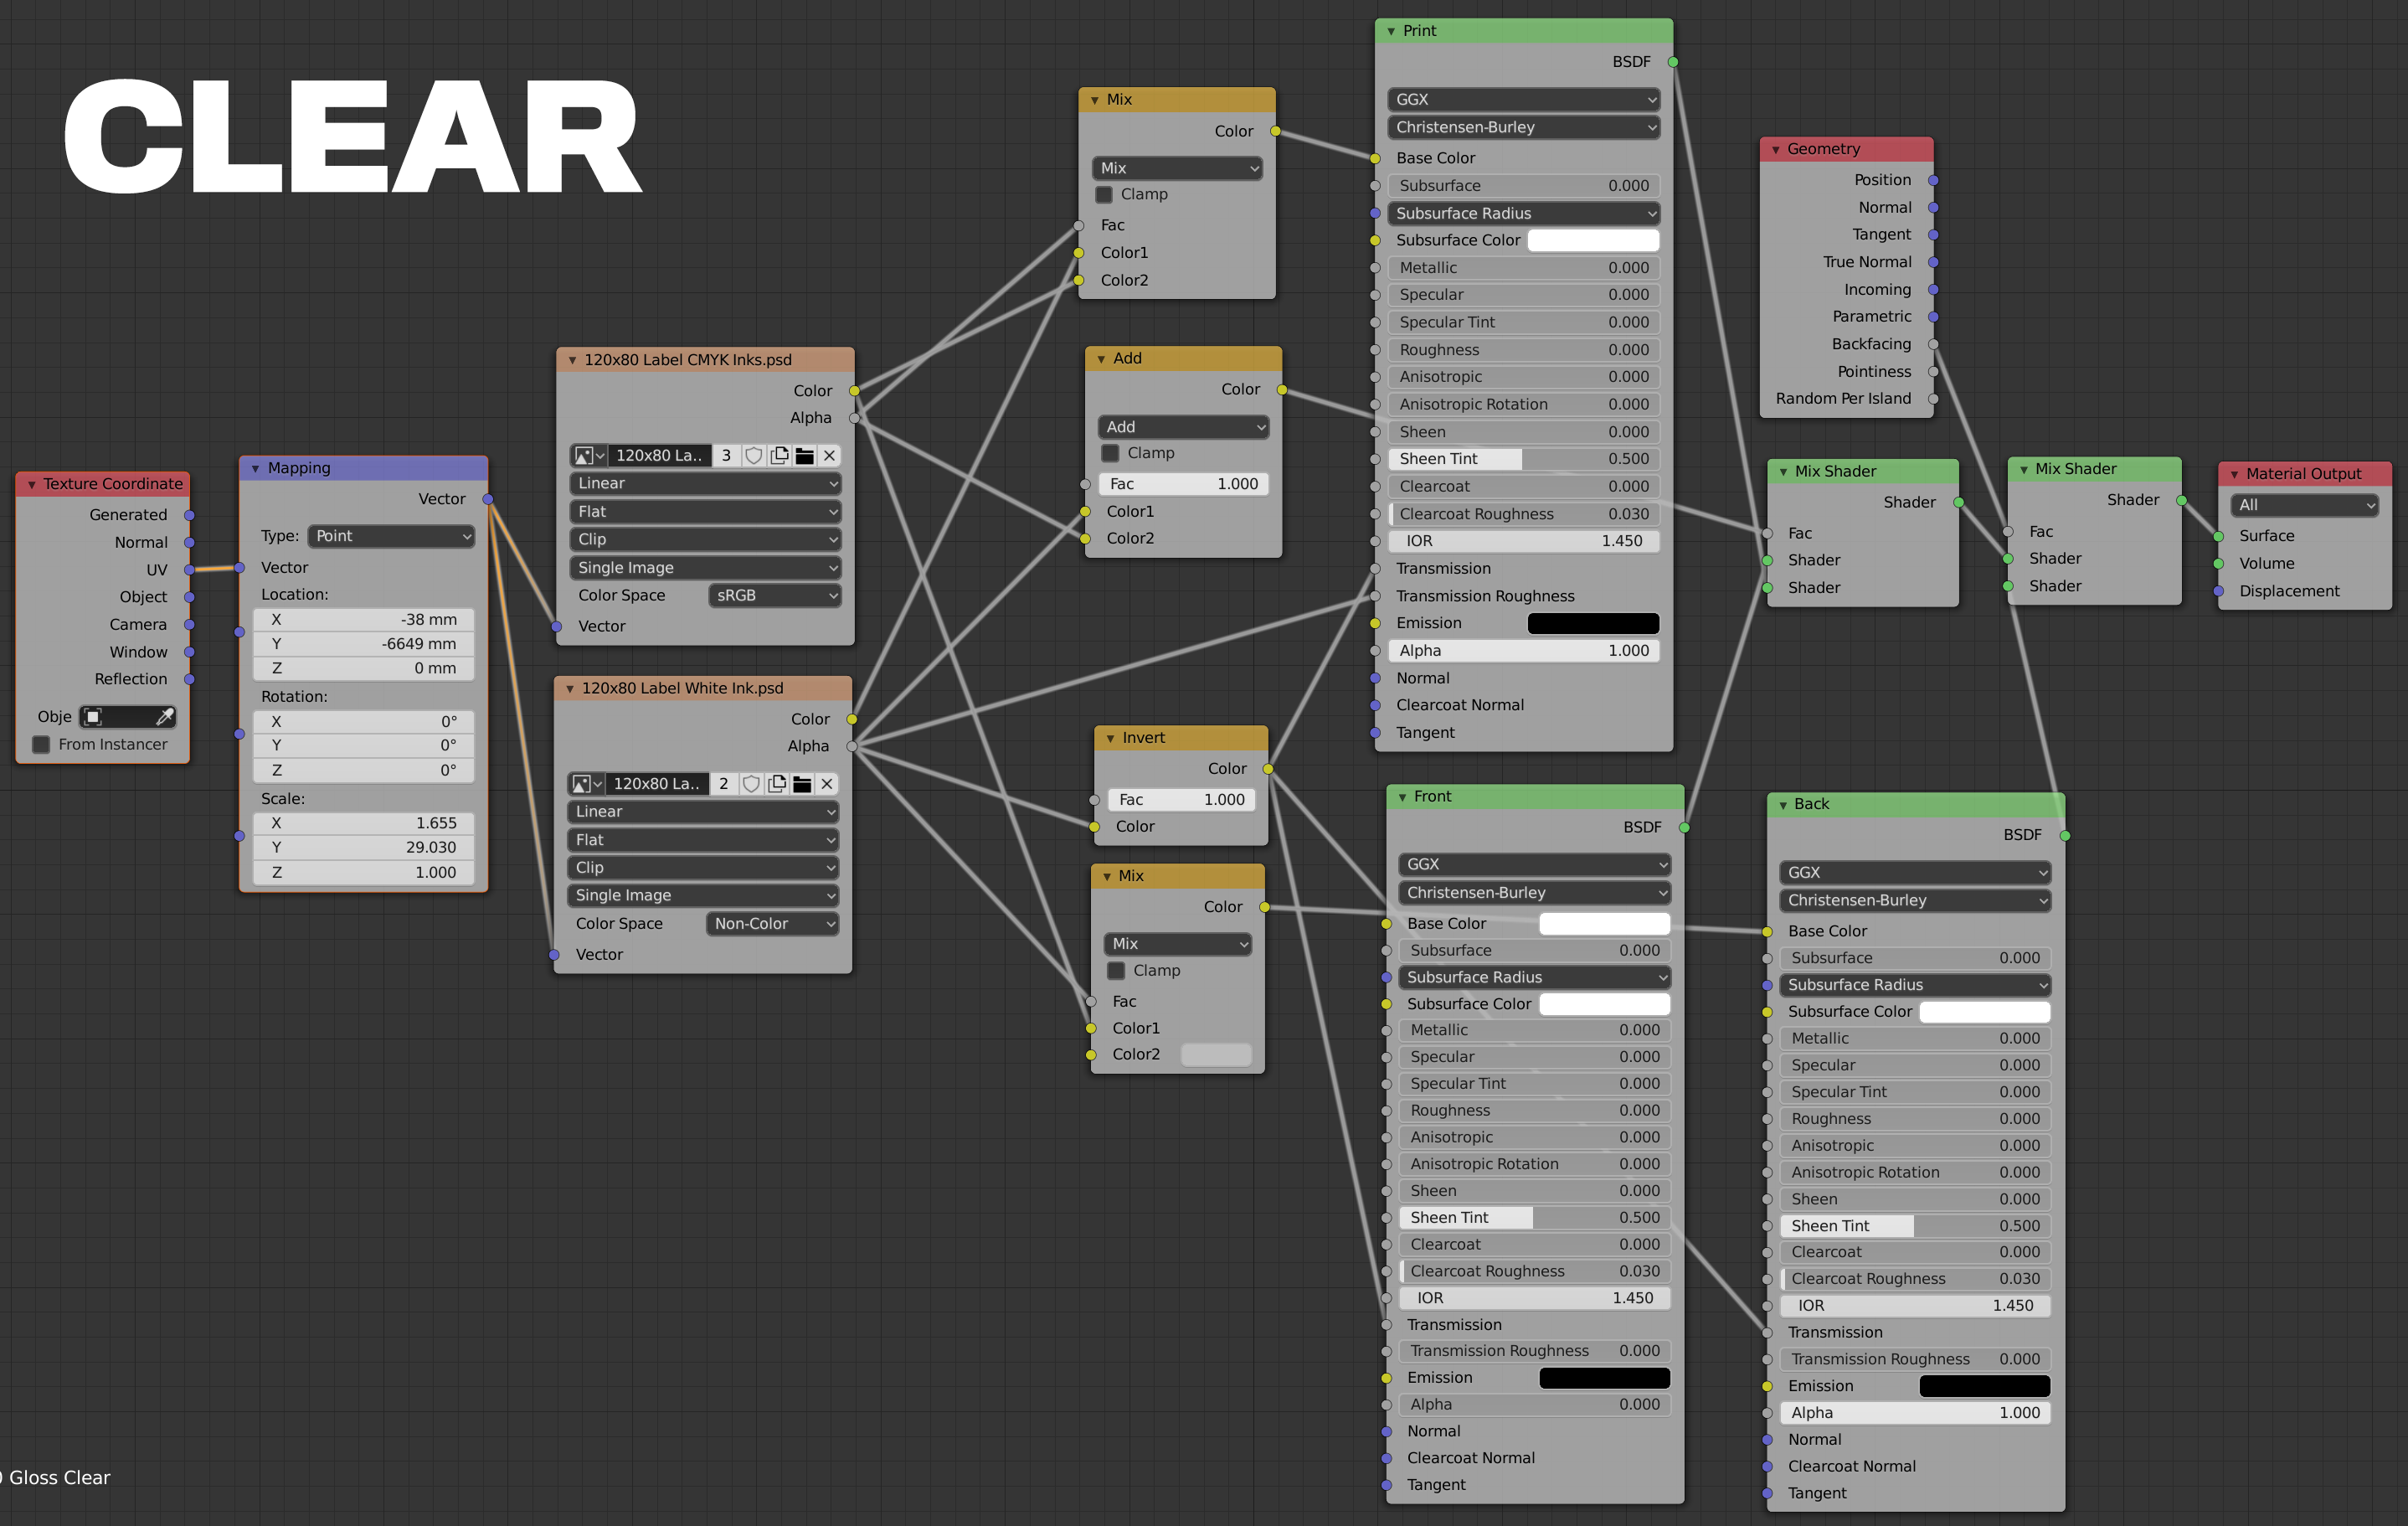
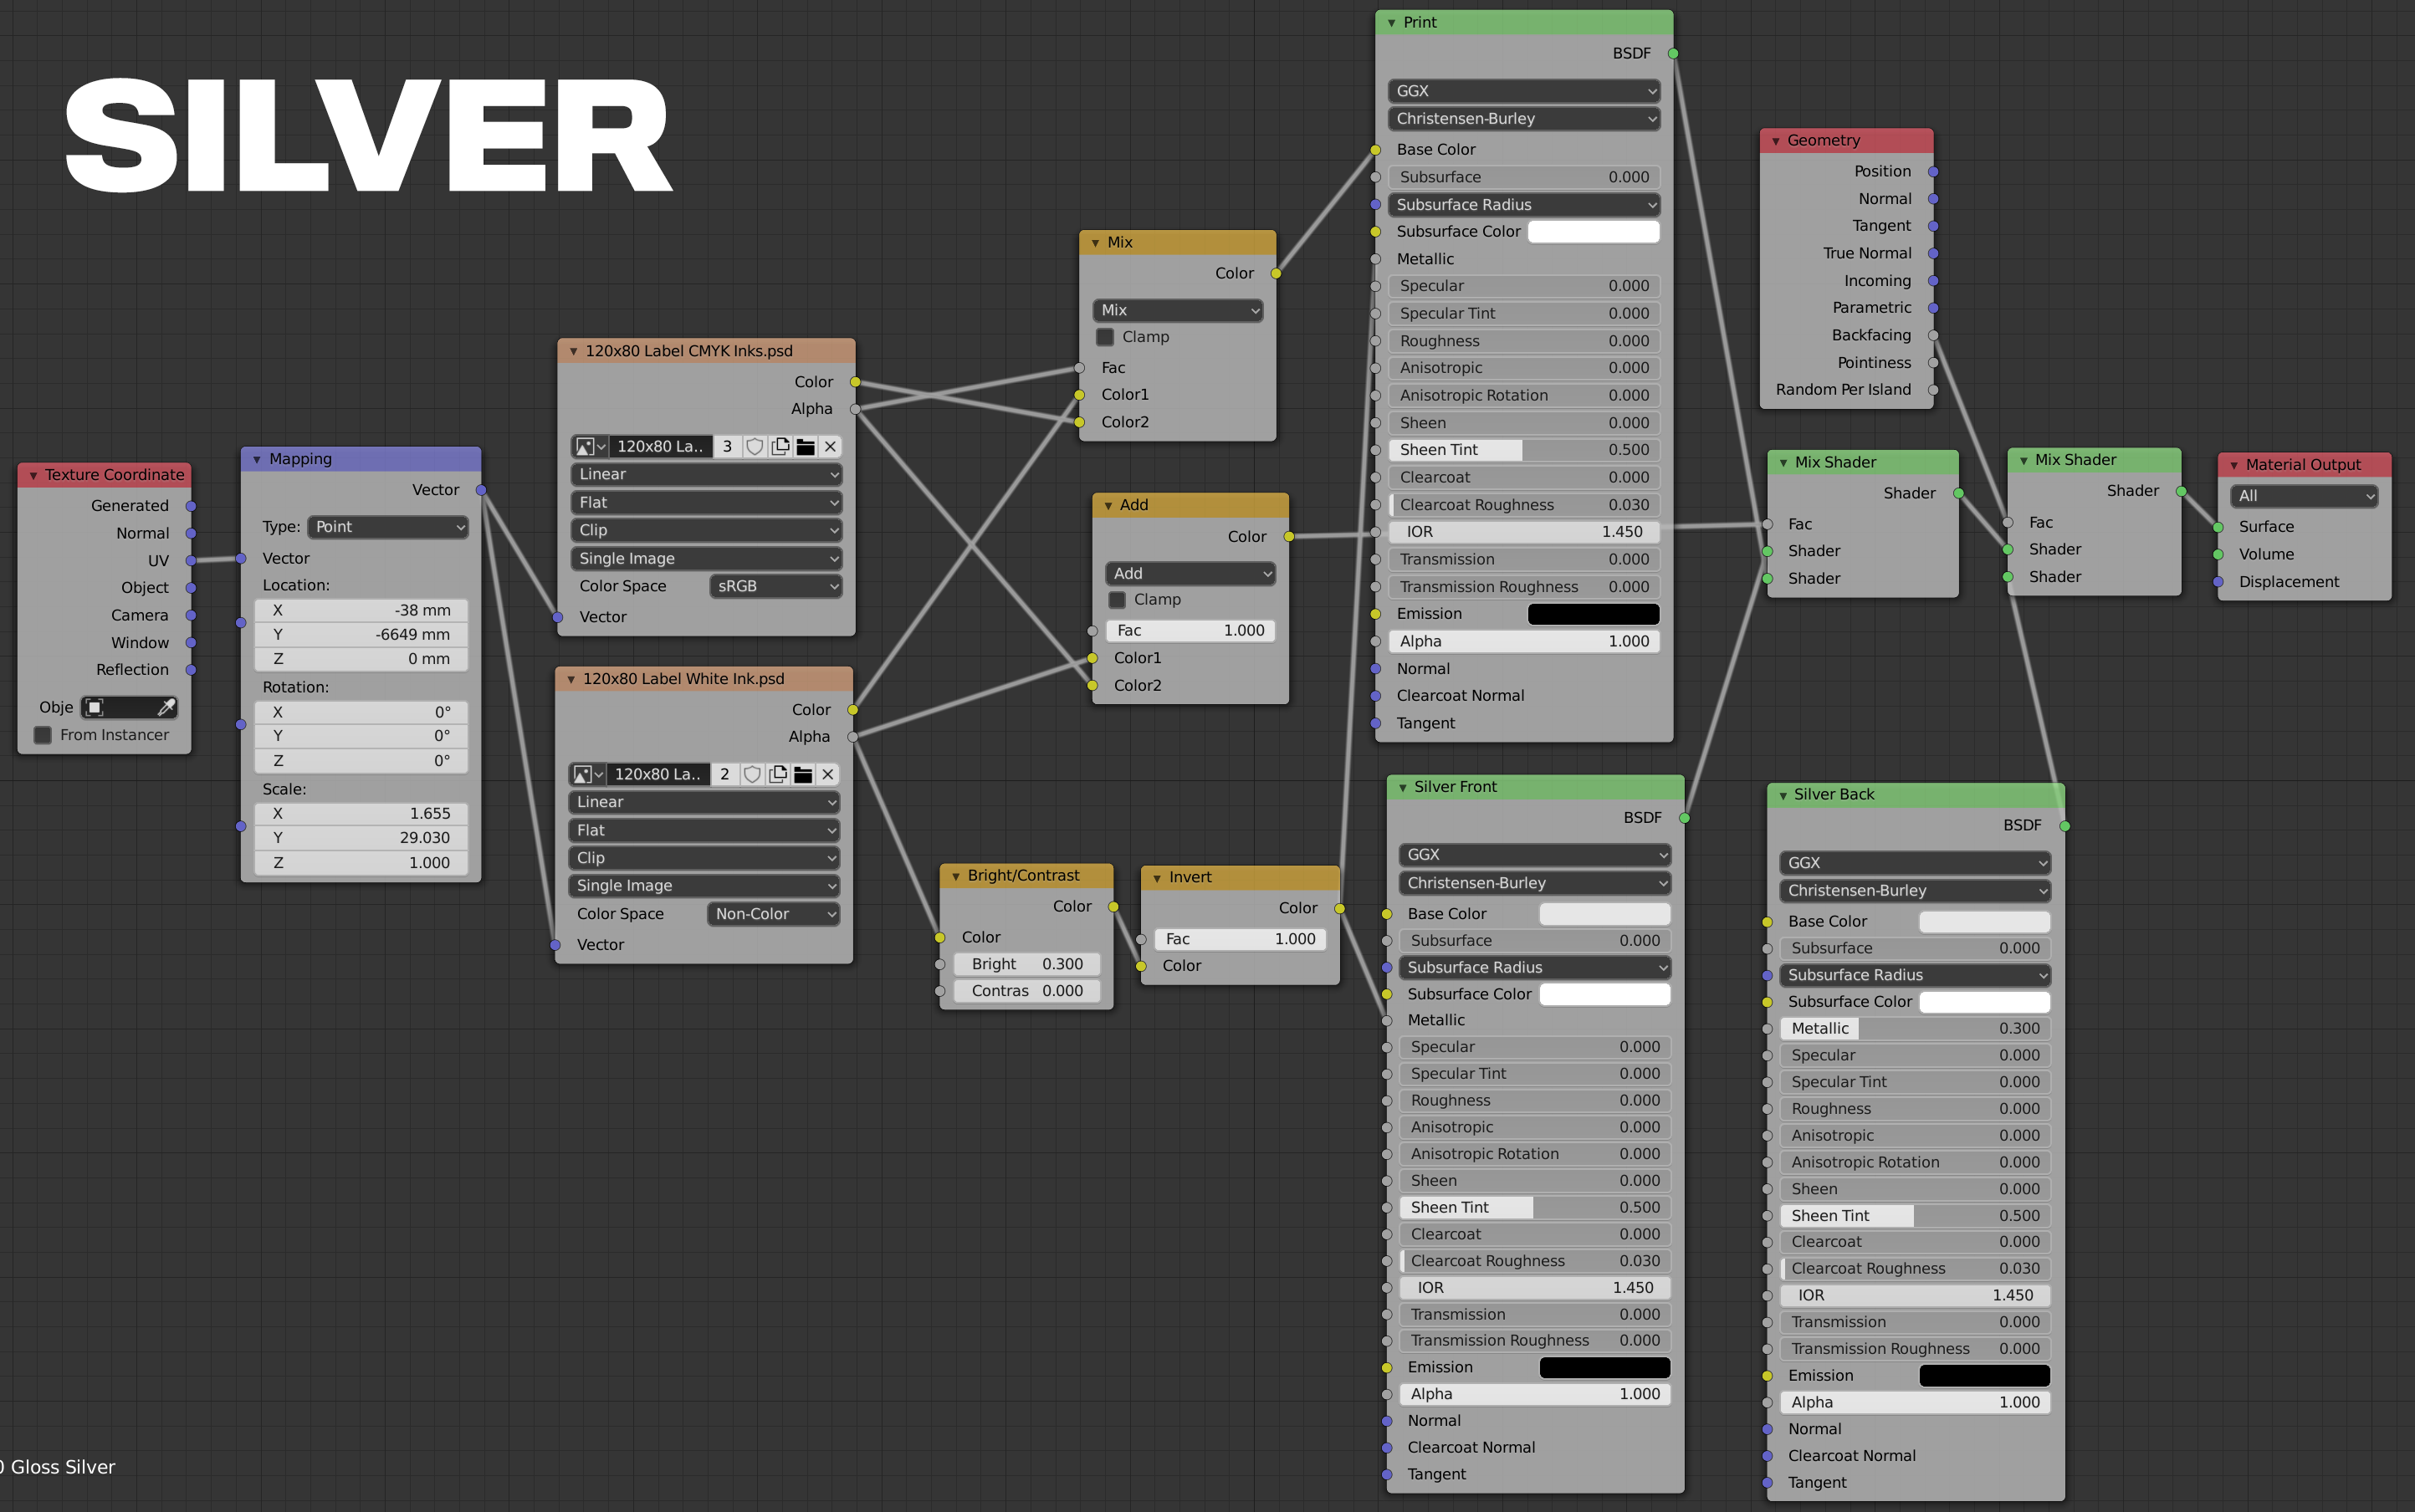
Sorry for the delayed reply. Thanks to your help, I’ve started to understand the nodes better, and I think I’m there. Here’s all three label types, and the nodes I used to achieve them: