after reading some of the threads here dealing with various ways of producing realistic clouds, I thought I might also give it a shot. The technique is based on the findings of http://ofb.net/%7Eeggplant/clouds/ (thanks Kernon ;))
It’s still a rather rough approach, no generally working solution. But I’ve only messed with it for about half an hour, so there is still room for improvement.
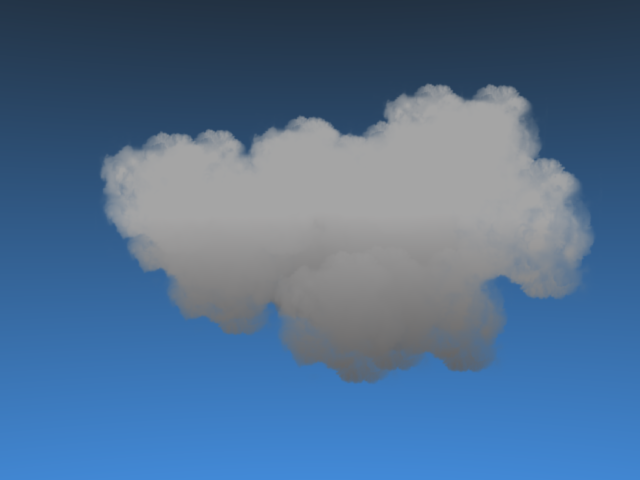
Still frame is here (full view plz, thumbnail looks sucky), animation will be posted when it has finished rendering (about 2.5 seconds per frame at 640x480)
C&C welcome!
Greets,
Tobi
edit: I also used only a single image as texture for the sprites, so forgive the sometimes repeating patterns
Wow, that’s awesome! Someone suggested this to me in my cloud topic but I dismissed the idea as needing way too many textures for the average Joe to come up with (I watched that video too). To my surprise, this looks really awesome with just one! I’m going to have to try this, but I would like to know how you did your shading. A color ramp maybe?
That is cool, I did notice though that when you are flying thru the cloud you can see some pixelation. I guess it would need a higher rez image to avoid that. But overall it seems really nice! Good job!
This is very nice. I am really surprised by the speed of rendering for animation, 2.5 seconds per frame is really great. To be honest I still do not get how you did this in blender, I thought sprites can fake only 2d clouds not 3d. Would you be so kind to describe your work flow in some detail or even post some very basic blend. Thank you very much in advance.
My basic workflow is as follows: I made a few planes, constrained them to always face the camera, took one of the textures described in the video (I found them here: http://jgt.akpeters.com/papers/Wang04/fig6.jpg) and mapped them to the planes.
I also took a ramp shader (using global coordinates) to achieve the darkening on the bottom of the cloud.
NOTE: Up till now, this is just a quick test, it does not work with different light colors etc. But I will keep looking into it, using different textures and fixing the shading model to take different lighting conditions into account. Maybe even a python script to work as described in the video, so it would be possible to model the cloud with boxes and convert them to planes with the script.
Keep me updated on your progress with it, if anyone takes a shot on it!
Best wishes,
Tobi
UPDATE: Updated the .blend file, different light colors now work… Still needs lot of tweaking
UPDATE 2: Updated once again, the Ramp for darkening the bottom of the clouds now takes an empty as input for the coordinates… slowly getting there
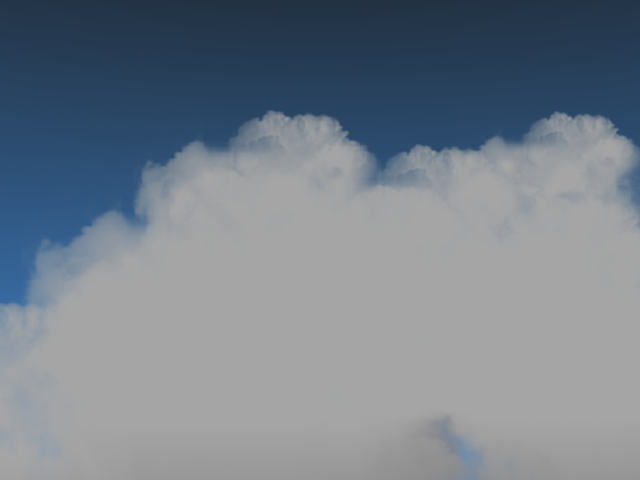
Ok, I’m a little stuck now. The shading is pretty ok when the sun is behind the camera. But as soon as it comes from the front, the shading totally messes up - it’s way too dark. I just can’t think of a way to shade the planes correctly in all situations. HELP! :o
The planes closer to the sun have to be brighter than those obscured by other ones.
Example: If you watch a cloud from the side, and the sun is on the left, there should be a gradient ranging from bright on the left to darker on the right. But I don’t know how to implement this. I tried constraining an Empties rotation to the sun and use its coordinate space to place a ramp texture, but that didn’t work.
Feel free to download the .blend file at http://www.overmind-studios.de/media/sprite_cloud.blend and try for yourselves. Just put the camera on the other side of the cloud to see what I mean. If anyone could come up with a solution, it would be greatly apprechiated.
EDIT: Another update, I packed the sprite texture into the .blend file
thank you very much for your examples. (Packing was not totally correct but no problem I made my own cloud texture from linked cloud examples.).
I have been playing with it for some time and I suppose that sun light had to be tweaked quite extensively. In fact I suppose that it seems better to use one light source as the sun on a separate layer and some other light sources to affect the clouds on another layer. Back light sun (from the perspective of clouds) does not work for me. But using more lights as I have mentioned here above brings more freedom for me.
I may post more after another experimenting. It may be interesting to combine sprite clouds with particle ones as described here: http://www.cogfilms.com/CQTs-5.html
What you need is another texture to warp the Blend texture (warp button is in the corner of texture options panel in the material panels). Or even a second texture set to subtract to give the appearence of more depth in shading.
And also, you need to find a way to reduce the huge wash out at one point in the video.
For more texture variation, set a procedural clouds texture with alpha instead of images.
@ JiriH: Thanks for your tests and recommendations, I think the idea of putting some lights for illuminating the clouds on a different layer is cool, I will certainly try that out too…
Cogfilm’s way of doing it with particles works pretty well in still images for me, but there is too much movement in animations. I also want to keep render times as low as possible (rendering an overcast sky with the cogfilm technique takes pretty long).
@ Cyborg Dragon: the Blend texture in the current .blend file is warped by a procedural texture, so the line where darkening begins shouldn’t be that defined anymore. I also have no concerns with the texture variation, because up till now only one texture is used, and it doesn’t look so bad. When four or more are used (probably even with different rotations to the sprites), this shouldn’t be a problem.
I’ll do some more testing tomorrow and post the results… keep me updated on your progresses
Hey, that’s really great. Funny thing is that it’s actually better than any of the SSS examples of so called volumetric cloud tests I’ve seen posted here.
Perhaps it wouldn’t work as well in the case of objects interacting with the cloud, but in the case of providing clouds for a ground based piece with moving clouds in the background, this is probably the best example I’ve seen of photo real clouds.
Maybe when getting the texture blend to track the sun you need to rotate the texture orientation, like having it track 90 degrees offset. I don’t know, maybe you did that already, I’ve not checked the blend file yet.
Only problem is that you need to have to work harder to set the light source, and I don’t know if that will work for long thin clouds going in loop-de-loops or something like that. Plus I did mention it may not work fully for clouds casting shadows on clouds. (look at the flight sim video, no shadows on the ground)
Have you tried using the vector nodes in the node editor with this? It’ll allow you finer manipulation of the light on the clouds.

