Colored Shadows *on* objects (not cast shadows)

I have learned how to create colored shadows cast by objects, but I can’t make the shadows on the objects themselves to be the same color.

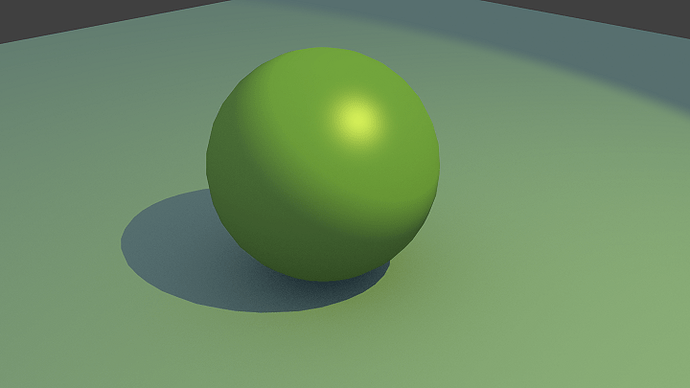
This is what I can get Blender to do:


Ugly, ugly, ugly! Looks like a giant pea. And the different colored shadows make it look like it’s not in sync with the rest of the environment.

This is the result I want to achieve (this was painted by hand):


MUCH better. Strong, blue shadows on both the surface and the object, and the colors of both the surface and object are modified by the yellow color of the light. The object looks like its actually part of the environment.

The question is: is there a way to apply shading on objects that will achieve this?

Thanks!

The issue here is that what you call “shadows” in case of the ball are NOT shadows.
I understand that in many cases we don’t want to use techniques based on physics, but fake things.
It’s fine, but in such cases we often come across problems you are facing right now.

Let’s answer a few questions:

  1. WHAT IS SHADOW?
    Shadow is strictly “linked” with a light source. Every light source has its “own” shadows.
    Shadows of the LIGHT 1 are the areas where the light from LIGHT 1 is blocked by some object.
    It’s the area not lit by LIGHT 1 because the light is occluded.

  2. WHAT IS “COLORED” SHADOW?
    In fact there is no such thing. Shadows have no colors.
    So why do we see shadows as if they have colors?
    Only because the area that for one light source is “shadowed” is at the same time lit by other light source.
    Blue shadow? Well… Imagine we have one “physical” light source. Some area is shadowed, but has a blue tint. Why? Because it’s lit by the sky (sky is a light source. Exactly like any other light source). When sky is blue - shadows of other light sources will be blue

Coloring the shadows the way you do can be done, but in order to get nice results, your technique should be used subtly.
It should just help a little. It shouldn’t be the only source of the color of the shadows.
Much better results may be achieved when you use blue sky. It will simply color all areas not lit by other light sources.

  1. WHY DARK AREA OF THE BALL IS NOT SHADOW?
    This area is dark not because the light from your lamp is occluded. It’s dark because it’s not facing this light. Even if it was not occluded by any object - the light of your lamp wouldn’t light it at all.
    That’s why coloring the shadows will not at all change the color of dark area of your ball.

The solution I am proposing works with cycles.
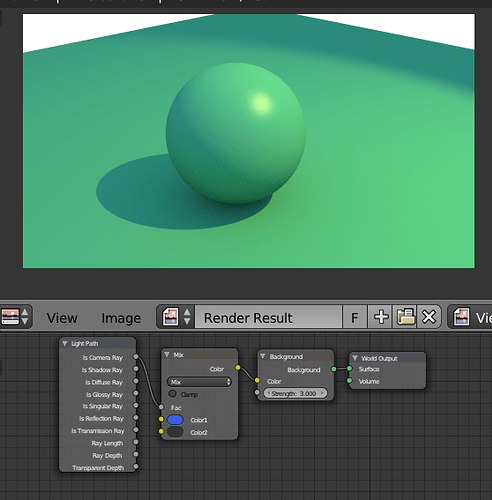
Please take a look at the attachment. This is a very simple scene, one spot light placed I think roughly like yours, floor has diffuse shader and ball diffuse with a bit of glossiness, plus I have a sky that is blue.
No fake colors for the shadows, but anyway we see that they are tinted blue.
Take a look at my world setup. Just so that the sky is seen as gray by the camera I used “Light Path” trick. The color used for lighting the scene is blue.

Would you consider using some more “physical” setups? Maybe the results would be nicer and easier to achieve? Just a suggestion.


>.<

… Well, good on physics. If that’s the theory of shadow being coded into 3D programs, I now understand why everything that’s not photorealistic looks so plast-icky and flat. However, in COLOR THEORY, shadows on objects have a hue either complementary to the object or to the light source. See here:

www.youtube.com/watch?v=WYZWDEmLR90
http://startstudioarts.si.edu/2011/02/mixing-colors-for-shadows.html

So, no, I’m not faking it. I’m also not aiming for realism here. What I’m trying to do is use the toon settings in the Blender render engine’s materials tab to generate cell-shaded flats that I can then use as a base painting for a comic. This style does require a single shadow color for all cast shadows and object shading. For example, here are the layers of my current work in progress (collaboration with Rudy Vasquez on DeviantArt):

[Note I’m not using a complementary color for the shadows here; I’m using analogic colors (green, blue, purple) for both the flats and light/shadow colors - more advanced color theory stuff - but you can see how colored shadows work.]


Black lineart + flats + purple shadows + blue lighting from above/green lighting from below =


Which brings us back to my question: Is there a way of manipulating the color of the shadow (and yes, in color theory it is called shadow) on the objects to be the same hue as the cast shadows?

Hey,

The problem here may be that unfortunately what shadows are in color theory may not be considered as “shadows” by renderer.
That’s why we may have problems setting what we humans understand as shadows by manipulating “shadows” in the meaning of renderer.
This is exactly what happens with the dark (not lit) area of the sphere. It’s simply not lit, because it’s not facing the lamp, not because the light is occluded, so those areas are not considered to be shadows by renderer.

I’m sorry that I couldn’t be helpful.

Bartek: Your pea looks like his pea, so I think you were helpful. Thank you for your tutorials. You are a genius.

The classical “can this be done” question answered by “you shouldn’t, it’s not real”, is it? :slight_smile: Seems to me he wants to mix classical painting tricks with toon, not what I typically associate with rendering for realism. If you want a (relatively) physically correct render engine to perform stuff it’s not designed to do (I hit the wall myself a lot on this), I feel it’s asking for problems and some out of the box thinking is required, if possible at all.

Sorry, I can’t really help, but I would like to know how the experts would think, how to approach the problem, if challenged with it. I’m thinking passes, material id’s, and compositing, but I’m not experienced enough to try to give any advice on the matter.

Okay, with the helpful comments of a couple YouTube viewers, I figured out how to do it. I’m posting here in case anyone else has the same question. WAY easier than I expected, once I knew what settings I was looking for a tutorial on.

I’m not sure how to do this in Cycles. I’m sticking with Blender Render engine till I get the hang of things because the settings are easier. But if you understand all the complicated Cycles nodes stuff, this should be easy to adapt.


Under the Materials tab for your object, select the following settings:

Diffuse: Lambert
Base Color: Base color of object (in this case, green)
Intensity: 1.00
Ramp: Check! <— THIS IS THE IMPORTANT PART!

RAMP SETTINGS
Type: Linear
Color 1 (position 0): Shadow color (blue) at 50%
Position of Color 1: 0.33 (one third of the way up the ramp)
Color 2 (position 1): Base color of object (green) at 50%
Position of Color 2: 1.00 (top of the ramp)
Input: Result <— ALSO VERY IMPORTANT!

Specular: Cook-Tor
Color: Color of your main light source (in this case, yellow)
Intensity: 0.50
Hardness: 25
(Intensity and hardness will of course change with the material of your object; numbers for skin will be lower, metal will be higher, but 0.50/25 is a good starting point.)

(Another possibly easier option is to completely turn Specular off [Intensity = 0.00] so that your object’s tone is altered by the color and brightness of your light source, but there are no defined highlights. Then you can go in and paint the highlights according to your own style. Upside is less settings to worry about and more control over the color when painting the highlight in; downside could be that you still need to understand how to paint materials [metal vs. skin vs. fabric, etc] to reproduce the correct specularity by hand. I didn’t do this in the example below, but by the end I wished I had. I wasn’t happy with the highlight on the sphere.)

Translucency (under ‘Shading’): 0.50 <— THIRD SUPER IMPORTANT THING

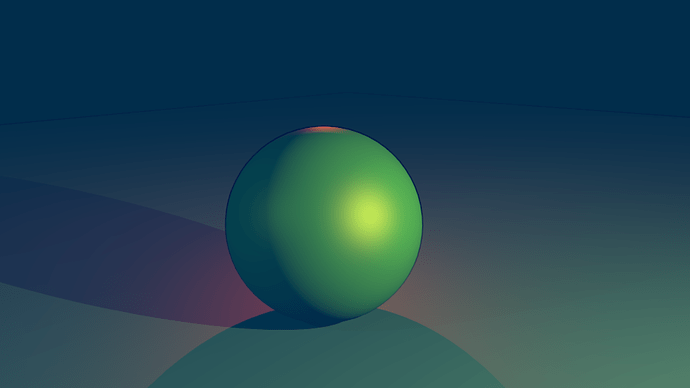
Here is the final render with edges and a yellow main light, a blue fill light, and a red rim light. (If you aren’t sure what these terms mean, look up tutorials on “3 point lighting system.”)


And here is the final painting:


Never say it can’t be done. :slight_smile:

1 Like