Hi there,
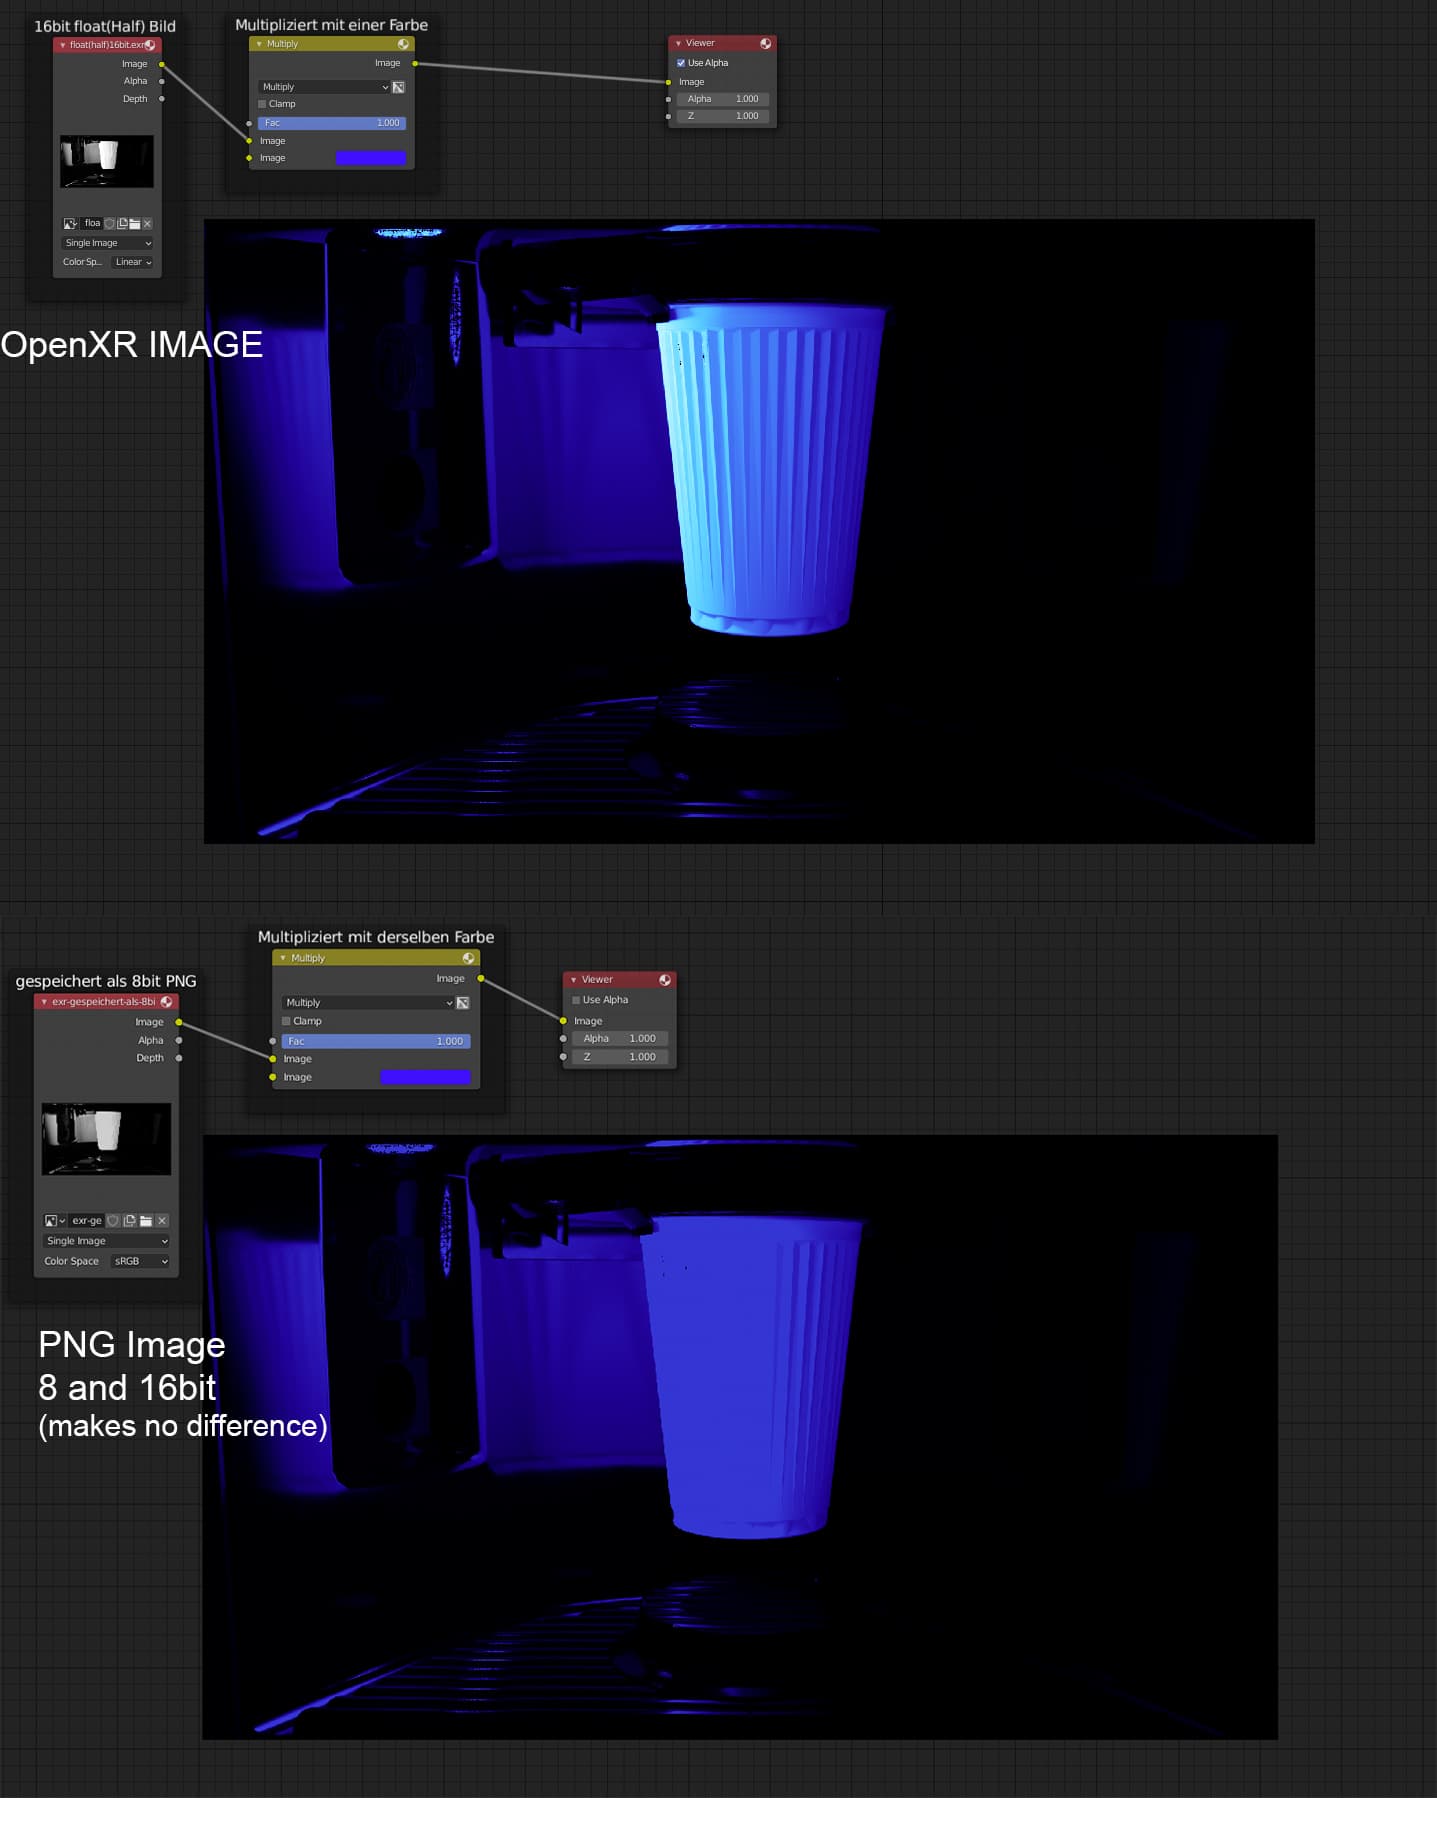
For my compositing I rendered a black and white Image and saved it in OpenEXR half Float.
When I do my composition step with it, which is multiplying a color, it looks beautiful.
When I save the EXR to a 8bit PNG and do the same step it looks not so good.
First I thought the problem is the 8 bit so I saved it to a 16bit png ( I disabled “Save as Render” both times) but I already tried every possible Setting while saving and as colorspace when opening the image in a node.
Can anyone tell me, where the beautiful effect (the rich blue color gradient) is coming from when using the OpenEXR image?
I need to know that because I want to do my compositing using a shader in obs (Open Broadcaster Software) in realtime using its shaderplugin. Long story short: The Video will only have 8bit color depth per channel.
How can I get a similar looking result of the multiplication with an 8bit image?
How does it need to be saved?
What is the reason for the difference?
If you open up the Color Management tab at the bottom of Render Properties and set View Transform from Filmic to Standard in your compositing scene, I beleve your problem will be solved.
I just tried this. But sadly it just made the image just look a little bit darker. It made almost no difference.
You can try it yourself. I uploaded the exr file to my server: platz.uber.space/share/colormask0045.exr
Probably related to EXR storing more datas about colours and maybe lightning.
“OpenEXR provides the specification and reference implementation of the EXR file format, the professional-grade image storage format of the motion picture industry. The purpose of format is to accurately and efficiently represent high-dynamic-range scene-linear image data and associated metadata, with strong support for multi-part, multi-channel use cases.” https://www.openexr.com/
Not sure but i believe that png does not save anything higher than brightness 1 wheras exr does. The limitation of half float exr is that it loses precision if you have very bright areas. The in betweens can get destroyed.
Full float exr on the orlther hand is several thousand times more precise and should be used when you need to avoid any kind of data loss.
Thank you so much @RobWu . Tonemapping was a keyword which helped me to find a solution.
I just tried around with the tonemapping node and then I added a Math->power node and multiplied this width 65.535 like this I could as close as possible and even use that step to colorgrade my image.
I also saved the output of the tonemap to a png, loaded it et voilá - > it works!
Your highlights values are higher than 1. You need to adjust exposure from your lightning setup or use a tonemap node in compositor or use filmic in color managment.
False color, in color managment, will help with exposure adjustment.
Okay. This is working,
But Do you think it is also possible to simulate Filmic look in my shader compositing in OBS (Open Broadcaster Software)
It has the following Colo Management options:
sRGB, 709 and 601.
Can I somehow prepare the data so they look the same as what i see in blender through filmic in sRGB?
I just saw your file, for that case it’s better to revise your lightning. You have pixels of 0 value and some above 50. Use false color to check for burned pixels, keep your image between magenta/blue and yellow/orange. Black color means that there is no data in that pixel, must be avoided. You can ‘cheat’ with additional lights to get a better image.
OBS will record/display exactly what you’re seeing.
Oh yes, its my first blender rendering, but i already rendered alot of frames. Good hint if there is a next time.
I came a step further with the view transform filmic in my shader
I found a shader function which i implemented here
// Applies the filmic curve from John Hable's presentation
float3 ToneMapFilmicALU(in float3 color)
{
    color = max(0, color - 0.004f);
    color = (color * (6.2f * color + 0.5f)) / (color * (6.2f * color + 1.7f)+ 0.06f);
    return color;
}
This gives me a result which look exactly the same as when I set blender to ‘Filmic Log’.
This makes me hope that the step to make it look like when I set Blender to Filmic is not too big.
Is it obvious for anyone what needs to be done to that function or its output to get the Filmic result?
Edit: On this website one can buy LUT Files Do you think it will help getting the function to get the Filmic result?
Edit:
I am trying around with shader code I found using google but I am not there. If anyone understands anything (more than me) please let me know what I could try to get that look the same as in blender when view Transform is set to Filmic. When i set Blender to View Transform Standard, thats how it looks in the shader when I just repeat the pow(color,1.990) * 65.535 step which is also happening in the blender compositor.
// https://github.com/TheRealMJP/BakingLab/blob/master/BakingLab/ToneMapping.hlsl
// Looks similar to Blender's 'Filmic' View Transform
float3 ToneMapFilmicALU(in float3 x)
{
		const float a = 2.51;
    const float b = 0.03;
    const float c = 2.43;
    const float d = 0.59;
    const float e = 0.14;
    return clamp((x * (a * x + b)) / (x * (c * x + d ) + e), 0.0, 1.0);
}

float3 LinearTosRGB(in float3 color)
{
    float3 x = color * 12.92f;
    float3 y = 1.055f * pow(saturate(color), 1.0f / 2.4f) - 0.055f;

    float3 clr = color;
    clr.r = color.r < 0.0031308f ? x.r : y.r;
    clr.g = color.g < 0.0031308f ? x.g : y.g;
    clr.b = color.b < 0.0031308f ? x.b : y.b;

    return clr;
}

float3 SRGBToLinear(in float3 color)
{
    float3 x = color / 12.92f;
    float3 y = pow(max((color + 0.055f) / 1.055f, 0.0f), 2.4f);

    float3 clr = color;
    clr.r = color.r <= 0.04045f ? x.r : y.r;
    clr.g = color.g <= 0.04045f ? x.g : y.g;
    clr.b = color.b <= 0.04045f ? x.b : y.b;

    return clr;
}

float4 mainImage(VertData v_in) : TARGET
{
        // Thats the color of a pixel in format rgba
	float4 rgba = image.Sample(textureSampler, v_in.uv);

        // This repeats the composition in Blender Compositor
	float intensity = pow(rgba.r, 1.990)* 65.535;
rgba = color *  intensity;

        // Convert to Filmic
	float3 rgb;
	rgb.r = rgba.r;
	rgb.g = rgba.g;
	rgb.b = rgba.b;

	rgb = ToneMapFilmicALU(rgb);

	// Set output
	rgba.r = rgb.r;
	rgba.g = rgb.g;
	rgba.b = rgb.b;

	return rgba;
}
.EXR is a data-file format, while .PNG is a image-file format.
“Entirely different purposes.”
EXR was created by Industrial Light & Magic(!) expressly for this purpose. And they tell me that the Blender Foundation(!!) was the original origin of the “multi-layer” extension to the format, which of course was immediately adopted into the standard.
Carry your entire process through to the very end using only “[MultiLayer] OpenEXR,” and do not compromise on the size of the floats in order to “save bytes.”
Your sole purpose is to convey the entire stream of floating-point numbers from the very beginning to the very end, without loss or damage. “Disk file size” is no longer a legitimate concern.
Only start to concern yourself with "deliverable-file concerns" when you actually have a “deliverable file” to produce … from your “pristine OpenEXR masters.”
The exact process for producing each deliverable is distinct and might very well be different for each. Specifically target the hardware/software that will be used to display it, dealing with issues such as compression, color gamut, precalculation and so-on only at this time and in a target-specific way.
Good stuff, I say the same thing to folks on another forum. full float exr is the way to go when you know for a fact that you really want/need all of the data that you can get.
[External, SSD] disk space – now measured in terabytes – is “dirt cheap” at any office supply store, and EXR files compress quite nicely into “ZIP” archives. I also know of some folks who use SD-cards for storage … “64 gigabytes for about 30 bucks.”
At the end of the day, your render consists of numbers. Lots of them. Every “visualization” of them is a process of conversion that is targeted for a specific device – including your computer screen’s viewport. When you are compositing, you are mathematically combining numbers. The final work product becomes “a viewable file” only in the very last step(s).
Formats like JPG and PNG are designed to make photos look good on possibly-very-cheap hardware. Image quality need be no greater than what the target device can support, but file-size is important.
OpenEXR is exactly the opposite: it exists to store data. In the case of “MultiLayer OpenEXR,” multiple named layers of related data. The only file-size reduction is “lossless.” Although Blender can display them, that is not the point. The point is that the data that goes in, is exactly what comes out. File size is not important.
I had the same issue. Fixed it using the openColorIO in AfterEffects for the .exr sequence.
PROBLEM:
EXR does not contain any color management values and is used for a linear workflow. So the color comes out really over saturated and not according to what you planned out in blender.