Connecting the edges of two perpendicular faces

Hello!

Ehm, this is my very first comment and thread here, and I don’t really know what should or shouldn’t tell about myself. I think the most important is that I want to apologize for every grammar and linguistic mistake, error I make, as I’m not a native English speaker. I am happy for finding this ‘‘little’’ community, and want to say thank you for the opportunity to be here.

I have some troubles with something I can’t really explain in a sentence, I will try to do it with help of some pictures.
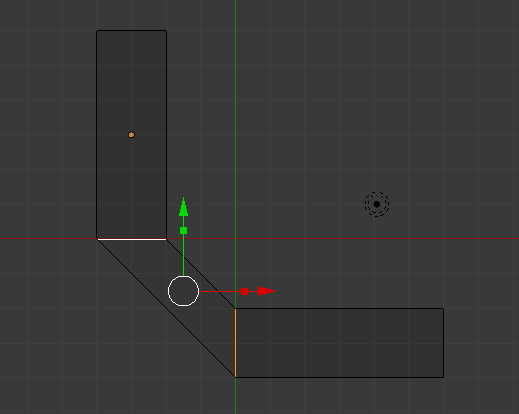
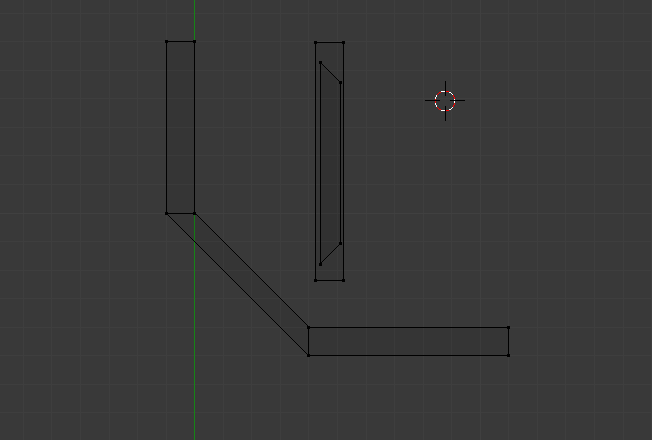
I would like to connect these two edges to make a new face:


When I simply selected the 4 vertices and made a new face, I noticed something, and I know I should had expected this: the new face’s width is not the same as the two others’:

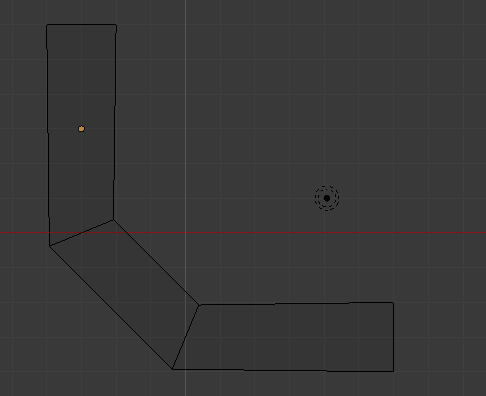
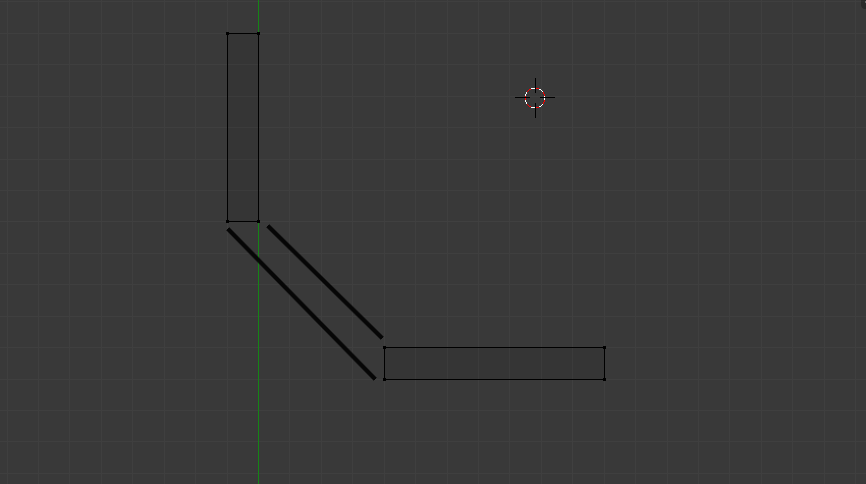
I believe this comes from the fact that if we connected all the vertices, they wouldn’t meet each other in exactly one point, like in this picture: ( I achieved what I wanted by two 8-sided cylinders )


Yes, my problem is solved, but at what cost? I had to create a two cylinders, delete the overlapping vertices, some faces, accidentally removed a vertice I shouldn’t have. And what if my plan is not to make 45 degree turns but 5? I would need to create a 72 sided cylinder. That would be even worse :(.

I would be really thankful and would appreciate the help if someone suggested me an easier and quicker method.
Thank you very much!
hi,
Some time ago I also ran into the same problem. I did however find a solution:


The selected edges should be rotated half of the total angle; in this case the total angle is 45 degrees so you’ll have to rotate the edge 22.5 degrees. (You can do this manually but typing in values will give you the best result).


Now, You’ll probably notice that it still isn’t quite right yet.


To solve this, you should size up the edges slightly. This I often do manually because you’ll need to do quite some calculating to get the right value for this.

Inset - I key should do this: make one face initially and draw your walls or whatever using Inset on this face.

Thank you appie.123!

I think I might have done something incorrectly. How do you calculate your coordinates of the points? I got strange results, here is a pic:


With my first method the thickness of the plane was 70.6% of the expected size ( 1 unit ), with your it was method before the resizing it was 92.5%, and with your method and after resizing as you said it was 97.87%, which is very close, but still not the most accurate.

I believe this is my fault, would you explain me please how do resize them to get the perfect 100%?
Thank you very much!

Okay,

I’ll explain, how to calculate this, (manually you’ll indeed never get the exact value.)
This is quite a bit of math, so I hope you’re good at maths… :stuck_out_tongue:

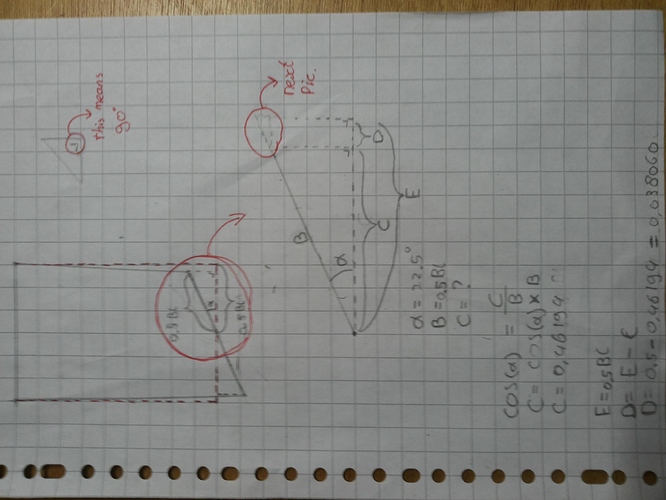
I added my caluclations but you’ll need to read this text along with it.

In the upper drawing you see the two situations, the red dotted line is the square before rotating the edge, the pencil drawed pared is after the rotation.
As you can see some things change. Most important for us is that the rotated edge ‘sets of’ from the original square, a small gap will appear right of the right vertice of the rotated edge.
First we want to calculate this distance.

The triangle is enlarged in the picture below.
angle a we know (we rotated the edge) : it’s 22.5 degrees.
side B is half of the rotated edge —> 1/2 = 0.5 Bl (blender units)

With cosine (cos) you can calculate C. (cos can be used to calculate unknown sides of triangle if you know a angle and a other side)

Originally E was the unrotated edge, therefor its 1 Bl

Now we know that D is 0.038060 Bl

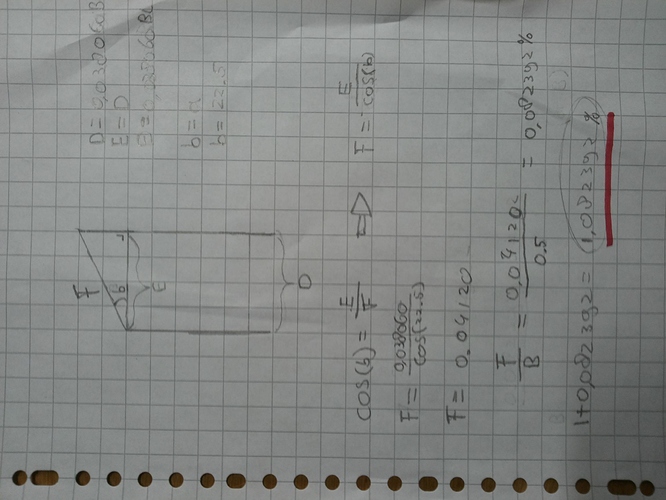
SECOND PICTURE

Now will use the cosine again but now to calculate the longest side (F), instead of the adjacent side which we calculated earlier.

You’ll find that F is 0.04120 Bl
This is what you’ll have to add to the rotated side to get a right figure and to fit in with the original square again.

But we will need a percentage to scale it up.
F is 0.082392 % of B
Ad them together and you’ll have you’re scale factor :slight_smile:

OF coarse the factor you calculated can’t have an infinate amount of decimal numbres, so exactly you’ll never be able to type in the scale factor, but you’ll be reeeaaally close.
It helps when calculating to keep numbers in your calculater and not tiping them in again. Your calculator namely does have infinate decimals (however it can’t display them), then you’ll only round your answer off at the very end.

If you did not know about cosine yet, this might be to hard to understand, in that case I advise you to either try to get to know more about it and learn it, or simply size your edge up manually. :slight_smile:

Attachments


@appie.123 Thank you very much for your explanation and help. I wouldn’t think someone would take his time and draw it on paper for me, that’s really kind of you. I appreciate it. To be honest it wasn’t easy for me to understand.

I am a bit slow in aspect of mathematics, but after some long minutes I was able to. And later I could do it myself in Blender too / maybe half an hour later /, your method is really precise.

You were right, the thickness is very very close to 1 Blender Unit. Maybe I just wanted to be a perfectionist, while it is not required. We are talking about smaller differences than 0.001 units, that’s enough to create anything without noticing the error.

@eppo Thank you too eppo, this worked for me too. I didn’t know about the Inset Tool, so that’s a big help now. The Inset Tool is better when working with more sides. I also had to use the Knife Tool and apply some Boolean Modifiers depending on the situation, but the idea works.

I will change this thread to [SOLVED]. Thank you both for your help again! :yes:

No problem for explaining,

I have asked many questions myself and am happy to do something for someone else as well.