Control bones for bendy bones and attachement to mesh

Hello!

I am new to Blender, I am using Blender 3.2.1.

I would like to create mimic for a character using bendy bones. In other words, I want to create bendy bones, create control bones for the bendy bones, connect them to a character mesh. I have encountered a few problems while trying to find out solution myself.

What i have tried:

  1. I tried following this tutorial ( Blender #EasyRigging for Animators - Facial Rig (proof of concept) on Vimeo).

I made the bendybones themselves by importing a single bone, then, in «Object data proprieties» of armature in viewport display i changed settings to “Display as B-Bone”, and in «bone properties» I set 10 segments and size for the bendy bone.

Auto_bone_controller (https://github.com/Antonioya/blender/tree/master/auto_bone_controller) was required, but when I am in Edit mode and I add an sphere-empty, set shape for controllers to «Empty», select the bendy bone I’ve made and press «Add» in the addon, Blender reports an error. (picture 1)

  1. I have tried ti di the same steps (the ones above) in the finished file below the vimeo tutorial, but it produced an error. A different error. (picture 2)

  2. I tried to find the tutorial mentioned in the vimeo video in order to make control bones manually, but I couldn’t find it. If you have a link to it, please send it to me.

  3. On this website I found a similar question (Bendy bones problem - auto_bone_controller - Support / Animation and Rigging - Blender Artists Community) but according to a small demo provided, it only makes bendy bones, but mot the control bones for them. It is not what I am looking for.

  4. I tried bendy bones handles addon (GitHub - gnastacast/bendy_bone_handles: Blender add on to add a new bendy bone object with handles.), but just like in 3, it does not create control bones.

  5. I tried to make a bendy bone following this video ((19) Bendy Bones “Slug” Rig in Blender - YouTube). What was in this video 100% worked for me. But when I parent the bendy bone to the mesh twists terribly (picture 3).


    It turns out that weight paint zone for the bendy bone is covering the whole mesh. I cleaned everything with removing weight paint from vertex groups and painted only eyebrow. But as I paint, the painted area gets twisted. (picture 4)

Links to the files

Weightpaint issue https://cloud.mail.ru/public/xDYi/Z2kjRhE8J

Auto bone controller issue https://cloud.mail.ru/public/Vosb/2aHhWwxpg

Could you please tell me how can I make control bones for the bendy bones and parent them to me mesh correctly?

I would appreciate a link to a Nimble blog video on rigging with bendy bones too.

I will be grateful for any help

Hi;

So far, I understand that Facial Rig with Bendy Bones in Blender is plausible and interesting solution; however, there is currently a lack of accessible, more in-depth and step-by-step tutorials on the subject.

There are 2 problematics in Bendy Bones that bugs me:

  1. On a “sequence” of Sets of Bendy Bones, it tends to become extremely more complicated to set up a Rig; but when we only require 1 Bendy Bone Set, separately, it’s fairly simpler to solve curvy problems (in analogy to a ‘bezier curve’, it would be that we get the just the 2 extreme ‘control points’ and that already allows a lot of possibilities for that curve only; of course, sometimes this is just not good enough, and we need to add more ‘control points’);
  2. Often it’s not intuitive to directly to Pose/control the curve from its ‘control points’ on the extremities, as there is no direct input to the middle region
 I find this particularly frustrating, this is why those middle ‘control points’ are so relevant I think (but then, method(s) for establishing them feels pretty awkward to me).

A few months ago I tried to address Bendy Bones for Facial Rig but wasn’t very successful. On the other hand, more recently, I was successful at making curvy Facial Rig features similarly to Bendy Bones in a quite satisfactory way using Spline IK Bone Constraint (that uses Curve Objects, which contains Splines) and I even made a tutorial on this subject (I have it in the Support section: Tutorials, Tips and Tricks) if you are interested.

However, I still would like to reproduce a proper Bendy Bone method for Facial Rig at some point. I believe it’s a very relevant topic.

So, I tested the Auto Bone Controller Addon in Blender 3.2.2.

Apparently, it’s just that the Auto Custom Shapes feature (Shapes) and the Auto Bone Groups feature (Use color for controllers) is bugged.
If you leave both Shapes at No custom shape and Uncheck Use color for controllers it will work out without the Error message apparently; on occasion, I was able to get single a Custom Shape automated
 for no apparent reason and in a very dirty process. I guess the Addon requires a few updating, for those particular automated features; which are the least important part I guess —so no that bad actually imo.

This is all I got for now, as you have multiple very specific questions, but I’ll keep investigating at least on the global Bendy Bone Facial Rig approach.

This video shows some ideas regarding Bendy Bones Facial Rig, taking same reference artist as you did originally; even though I’ve use both references, I wasn’t able to solve all the Facial Rig issues I was having, but at least is good to know there is more content on the subject:

This next artist seems to get an advanced workflow with Bendy Bones, even though it’s not specific to Facial Rig with Bendy Bones unfortunately. In this point of the following video, this is the kind of feature (that middle control point in-between 2 Sets of Bendy Bones) that I find extremely complicated to develop with Bendy Bones Rig (I believe that problematic would be similar to the snail tutorial you’ve mentioned).

2 Likes

Hello Pxy-Gnomes!
Thanks for you reply!
I tried following the video “Facial rigging with bendy bones” which you suggested. But the addon produces an error


Does that addon work for you?

Just as you suggest, i chose “No custom shape” and unticked the “use color for controllers” button, but it still results in an error and a mess. If i understood you correctly, by saying " If you leave both Shapes at No custom shape and Uncheck Use color for controllers it will work out without the Error message apparentlyy; on occasion, I was able to get single a Custom Shape automated
" you mean that the addon does not work properly every time, am i right? (I’m trying to figure out if it does not work just for me or in general)

Hi, again;

Welcome; So, I’ve entirely watched the Snail tutorial and I like it very much. That setup using Tangent, for the middle ‘control points’ in-between Bendy Bone Sets (I call a Bendy Bone Set each set composed of 1 Bendy Bone and 2 Controller Bones on each extremity), seems to be relatively reliable for some bending wavy organic Deformations for Facial Rig
 Yes
 I think this will be good enough; actually, I believe I’ll be able to make an experiment and if it works, later on I could create a complete Tutorial on this subject (Facial Rig with Bendy Bones Rig).

So, I’ve realized that the Snail tutorial uses the “middle control point” in a versatile way. If you know how to reproduce this Bendy Bone feature, then what you might have realized already (and that I’ve just realized by checking back on that other Bendy Bone Facial Rig tutorial I’ve sent), is that there are no “middle control points”, at least on most facial features including the Eyes. This means that if you keep reproducing that it won’t give you the exceptional “middle control points” that makes Posing the Facial Expressions a more intuitive process, and also you’ll get lesser Expressions on curvy shapes, as you be more limited on the bending possibilities.

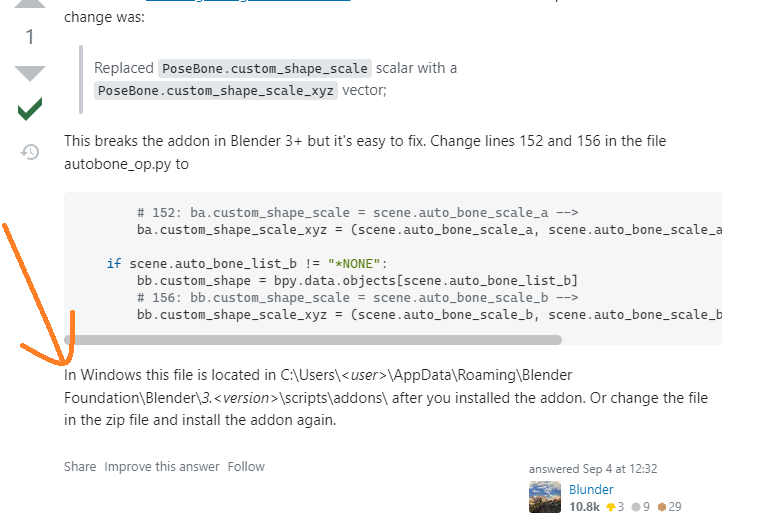
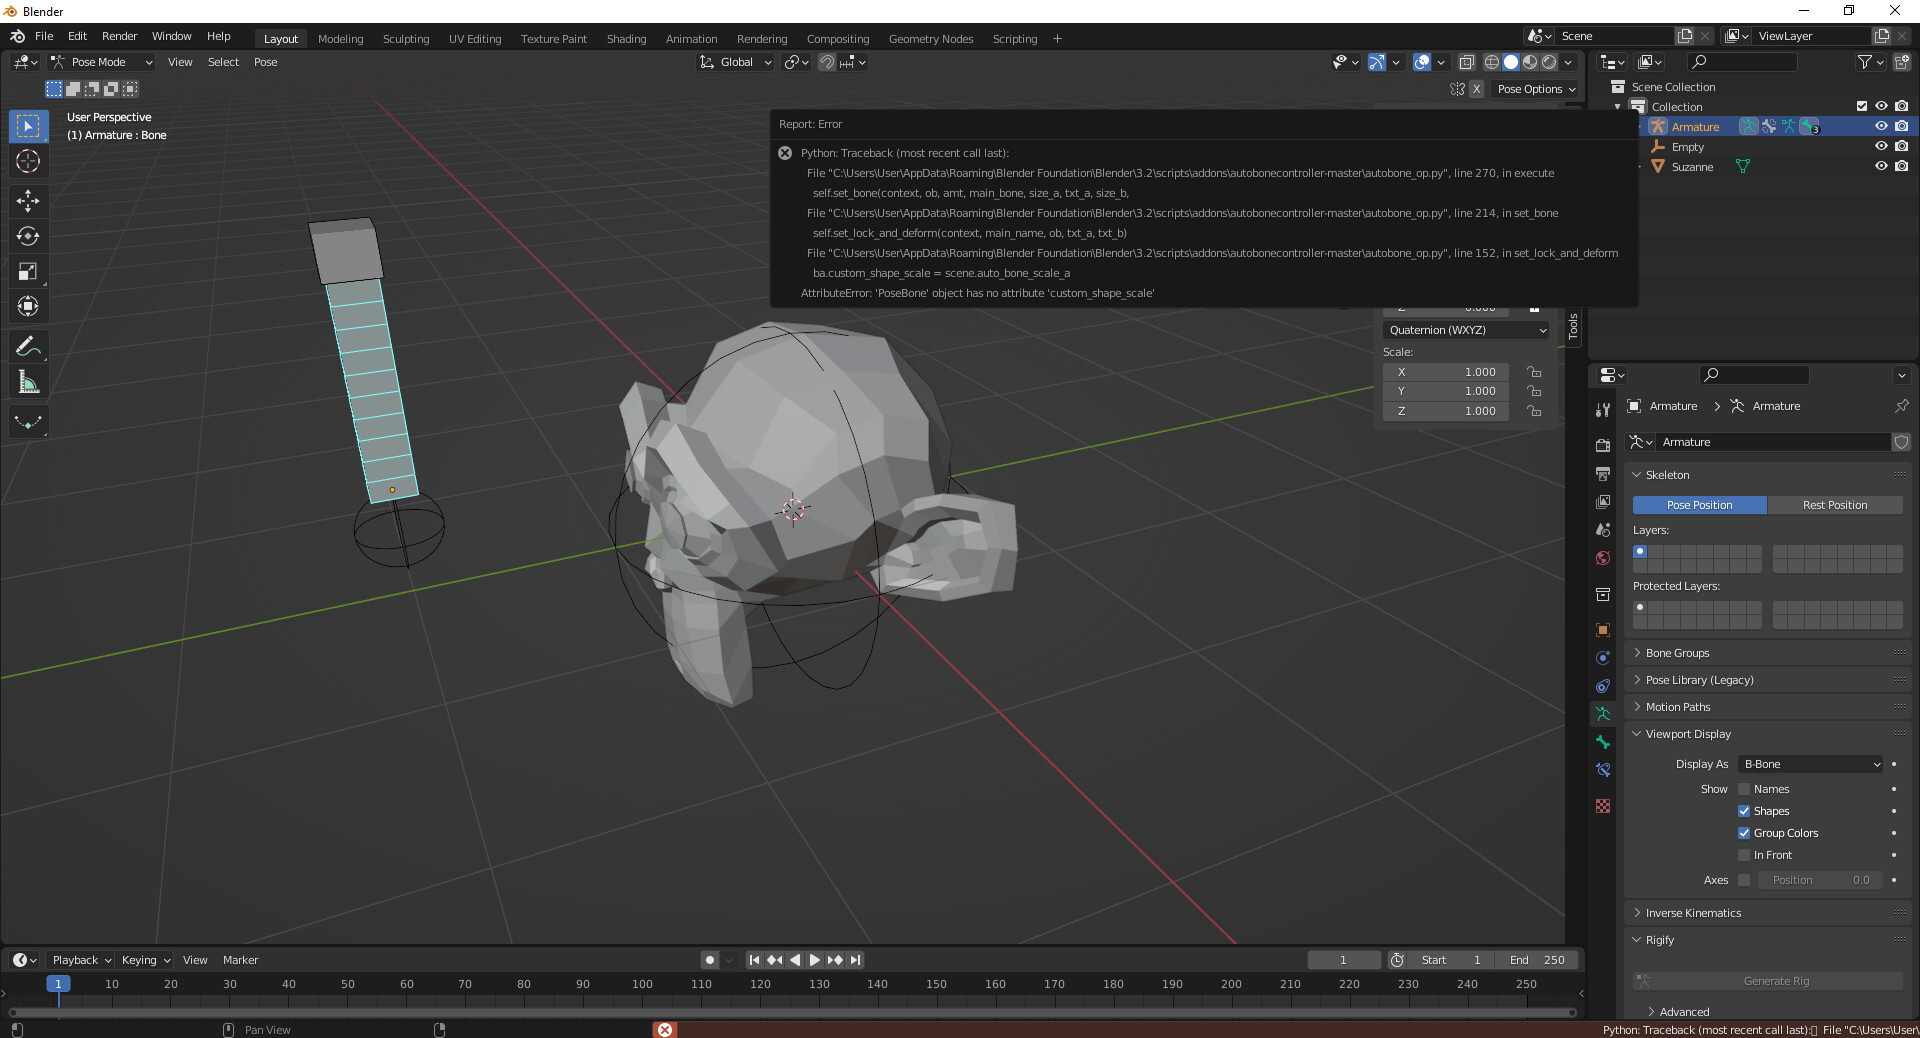
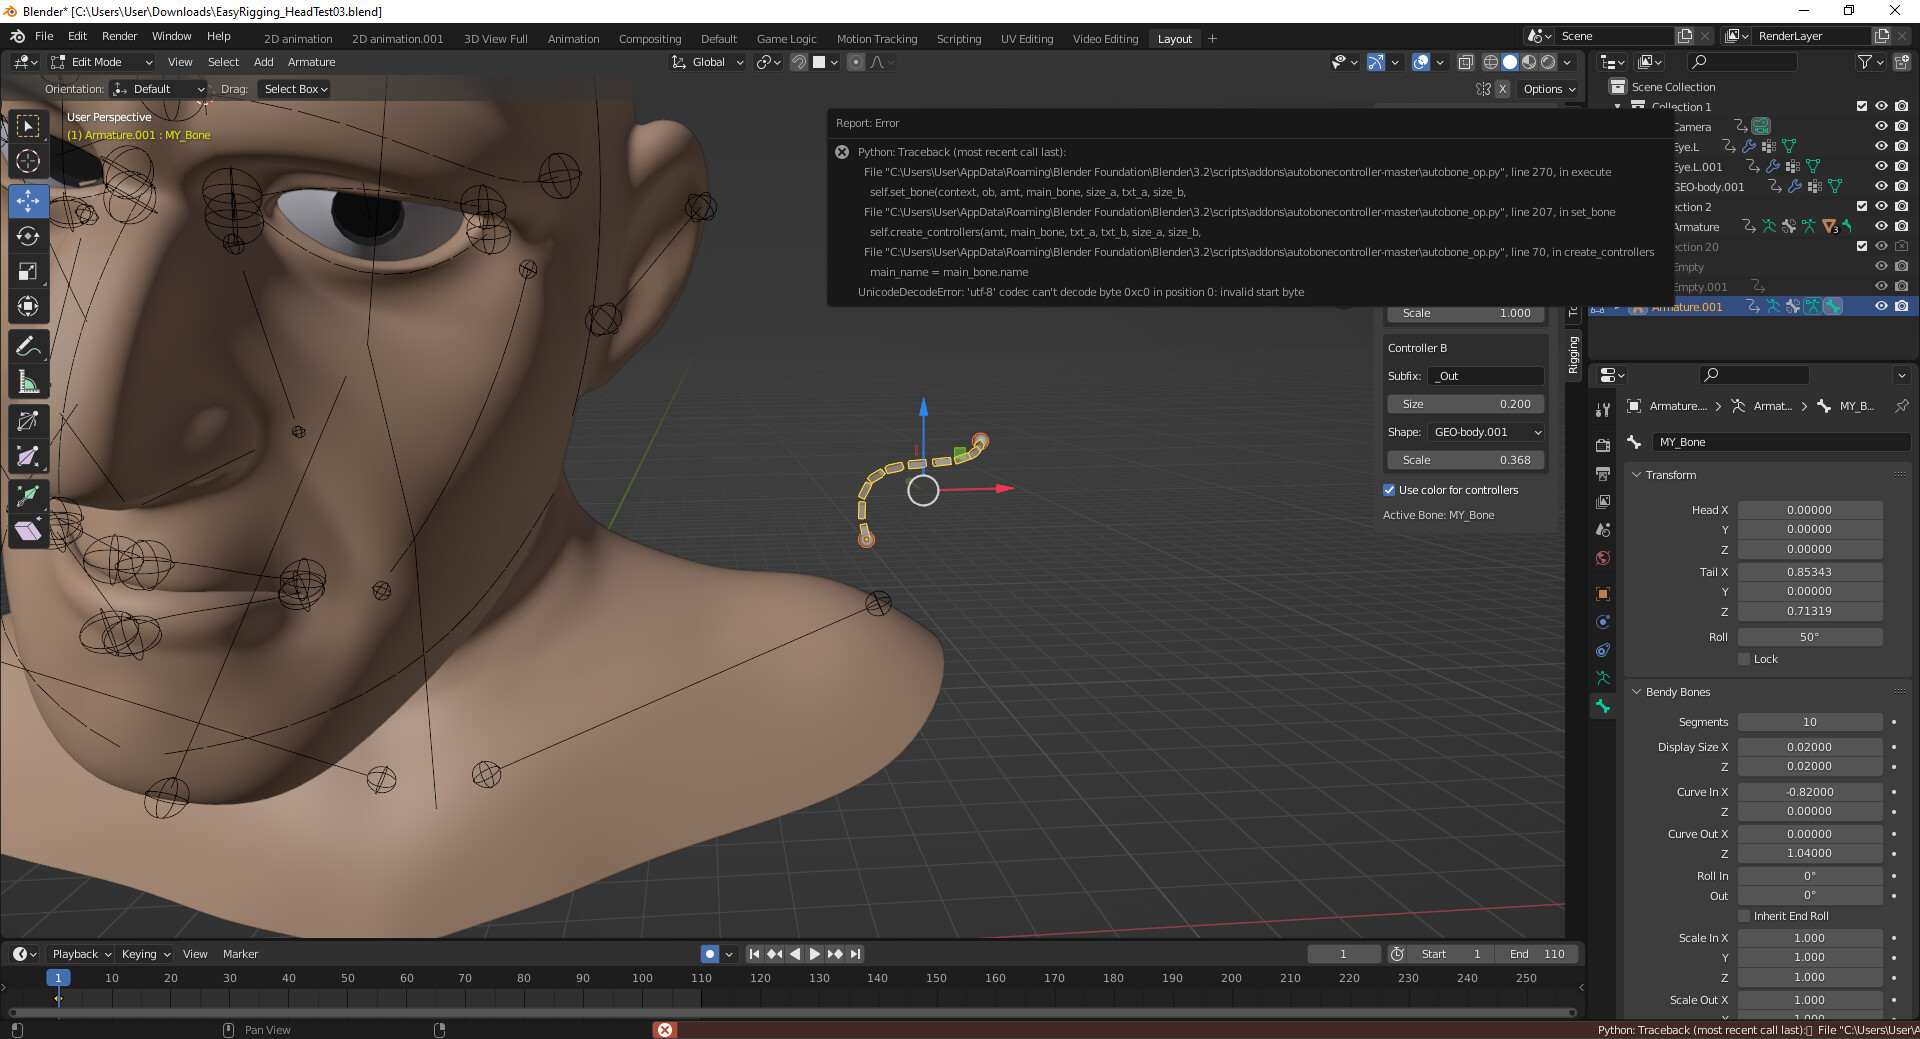
This said, I think you are just giving too much attention to those optimization Addons (that unfortunately are failing more or less on our more recent Blender versions), and should focus on:
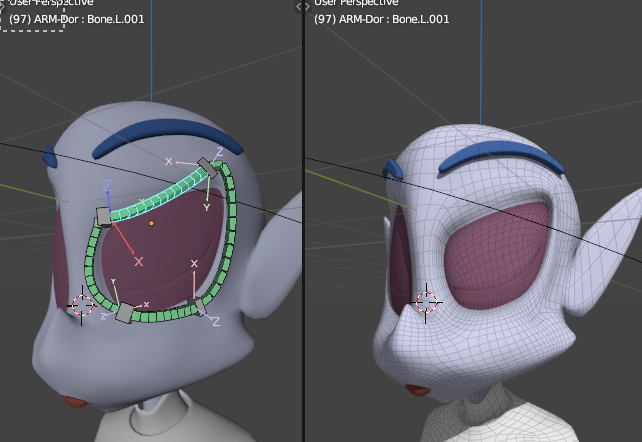
‱ Recreating the Snail “middle control point” on the Eye Top overall curve. This would give you for example, 2 Sets of Bendy Bones, with 3 control points (1 on the left, 1 on the top and 1 on the right). Then, you make this Snail tutorial approach to the Eye Bottom overall curve; this will give you, again 2 Sets of Bendy Bones. In the end, for a single Eye, you’ll get 4 Sets of Bendy Bones, except that 2 are for the Eye Top and the other 2 for the Eye Bottom; it is
 plausible, yes, to make at least a continuous FK Chain for the Deform Bendy Bones, but not a cyclic Loop (since you cannot make a Cyclic Parenting in Blender), but this doesn’t mean the first Controller Bone for a ‘starting’ Bendy Bone Set cannot be reused as well as the last Controller Bone for a ‘last’ Bendy Bone Set —so like trying to make a cyclic loop around the Eye.
What you must make sure, is that the Controller Bones, all of them, gets firmly locked to some sort of ‘invisible curve surface object’, so then when you Pose them they will always be travelling on top of that surface Object; this can be achieved with a Shrinkwrap Bone Constraint on each of the Controller Bones. The invisible surface Object can be made as a (Add » Curve Object, to the Scene) NURBS Surface Curve Object, then you Edit it giving a proper shape, and then Mesh Menu » Convert » (Curve to) Mesh, than you Target the Bone Controllers’ Shrinkrwap Bone Constraints to that Mesh Object and then you just Hide it from Displaying on the 3D Viewport Editor.

With the Bendy Bones’ Controller Bones sliding onto that curve surface (somewhere slightly in front, further away from the curve surface of the real Eye of Susane the Monkey), this should offer a proper Location for the Controllers Bones so that they won’t disrupt the curve of the Bendy Bones on this Global Y Axis (forward/backward), and focus more on the XZ (left/right, top/down Transformation orientations for the Deform Bendy Bones).

The amount of Sets each Facial feature should have is a question to investigate. I don’t think really Expressive Eyebrow for example can ‘survive’ with just 1 Set; there would be need of at least 2 Sets, perhaps even 3 Sets. As in the Spline IK Rig that I know a bit more about (instead of “Bendy Bone Sets” there’s “Splines” as an equivalent group), the “size” or Length of the Bendy Bone on a Set is very important: some Sets might require to be very small in size, while others might require to be larger, because the start and ending of each Set (as with a Spline) indicate ‘middle control points’, which guarantie better Expressive, quality control on the curve.

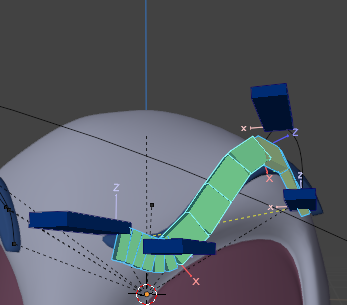
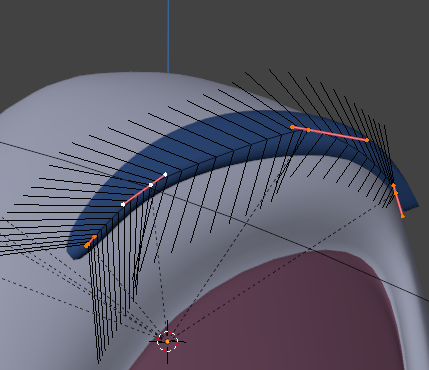
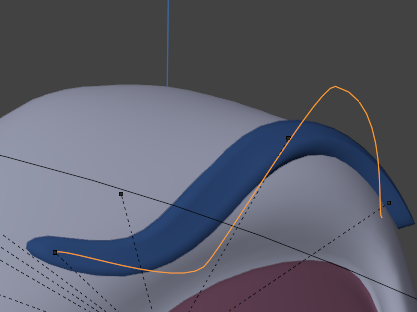
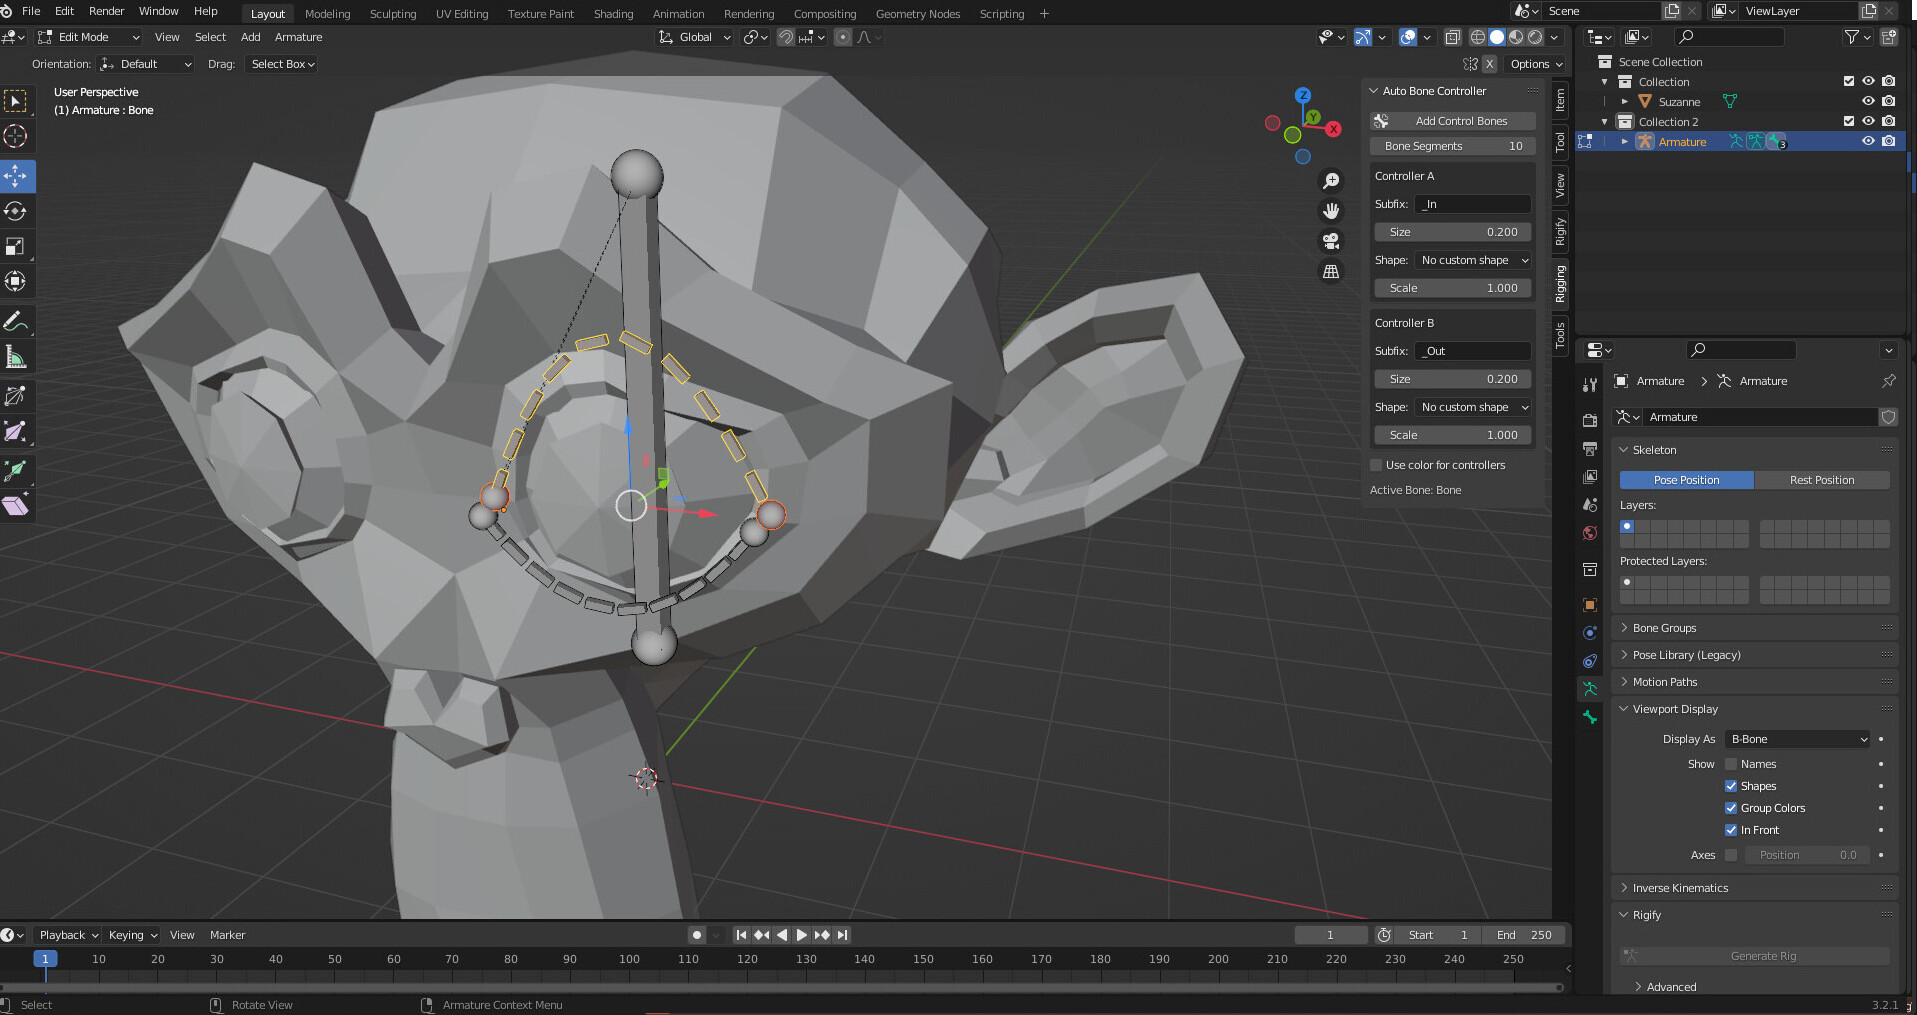
I would like to have an example for Bendy Bone Sets (this is Facial Rig I’ve made using Spline IK Bone Constraint), on the Eyebrow, the Eyelid and the Eye Contour. Pay attention to the Posing of the Eyebrow:
I have 4 Controller Bones (indicating 4 legit Control Points [it’s a technical name for one element of Curve], for 3 Segments; so in total 3 Splines [‘sets of curves’], on the Curve Object there); the Spline to the WEST is very small (if that was a Bendy Bone Set, I believe it should be also a pretty small one, because the Curve shape there need to suffer a high angle change on a very small Segment)

Captura de tela_2022-09-04_08-36-20
Captura de tela_2022-09-04_08-36-46
Captura de tela_2022-09-04_08-37-01
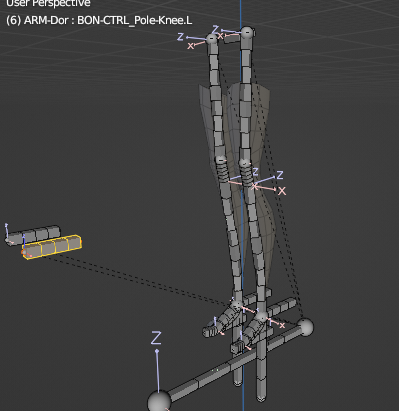
I’m using Spline IK Rig as a reference not simply because it’s just what I’ve got presently, but mainly believe it’s pretty analogue to a Bendy Bones Rig problematic; I suspect it is plausible to obtain nice organic Deformations on Facial Rig using Bendy Bone Sets, but I wasn’t successful —I need to try it again, so thanks for bringing up the topic with new some references.

The kind of bendy Deformation that I’ve seen on the Snail tutorial, strongly suggests that with that Bendy Bone approach, for the creating of those ‘middle control points’, already lots of curvy Expressive potentials are available on a Bendy Bone for Facial Rig; it might actually be much easier than I was thinking originally.

2 Likes

Hi!
Thenk you for your advice. I am afraid pulling off the trick with surface curve object since i do not have enough knowledge of Blender to understand the detail you wrote.

Though i became interested in the Spline IK you have mentoned. You say that you have made the eyelids with them. I live the way it works in youe video. I looked for tutorials about it, and they show examples only on tube-like objects (for example fish or hands like here https://youtu.be/Bv4TQIxXoZY?t=2224). But you manage to control eyelids that are rether flat with your Sline IK. How do you do it? Maybe you came across a tutorial about it?

In this chapter of this short tutorial, there is the Adding of a new NURBS Curve and further Editing of it (on Edit Mode), a bit like a Mesh is Edited, and then you can create points (Vertices), lines (Edges) and surfaces (Faces) on that NURBS Curve
 then you can Convert it to a Mesh. Of course you can just do directly as a Mesh Object anyways, but starting from a NURBS Curve will just help in making the final Mesh Object really smooth (although that’s not really necessary); then another challenge is how to switch the Visibility of such Mesh Object beyond Hide/Unhide; one way is to go to the Outliner (top left corner of UI), and getting the Filter Button at the Header up there to show up other Visibility Options, such as “Viewport”, and Render is already by default).

I’ve also reproduced this particular process (with Add » Surface » NURBS Surface Object + Editing + Converting to Mesh Object) in this section of this tutorial of mine (it’s pretty simple):

I’ve been learning about Rigify Addon to see if there is a way to automate Spline IK Rigs; and apparently there is, in some experimental Feature Set. If you know something about Rigify Addon, then maybe you could get further in this thing:

Of course, the tutorial I’ve made is like making the Spline IK Rig from scratch (which is a bit tedious, time consuuming but not too complicated). In comparison, Bendy Bones Sets are much easier to set up
 except that I am not 100% convinced of the quality on those ‘middle control points’, but with my current expierence with Spline Skinning, I should be able to compare both Rigs, if I make an experiment with Bendy Bones Facial Rig nowadays.

There are still some important matters on Facial Rigging I’m still experimenting with Spline IK Bone Constraint though, but overall it is very consistent with some sorts of expressive Stretch & Squash Deformations. I believe Bendy Bones Rig, if properly made, could have very similarly results, but I’d need to retake that research.

The whole Eyelids Mesh is on a Vertex Group, making part of the Body Mesh Object, but that is Shrinkwrapped (Object Modifier) to the Eye Surface right below it (which is another Mesh Object), and then the Eyelids Mesh Vertex Groups also is Target of other sequential Object Modifiers, such as Solidify and Suvdivision Surface; there are limitations to this approach of course, but I find it very useful because of the requirements of this kind of stylized, cartoony character with big-sized, non-spherical and asymmetric Eye. I’m having to revise the strategies regarding how the Eyelashes move.
I guess it’s not a new concept in CG
 but the idea in Blender that Spline IK Bone Constraint can actually be used for Facial Rig came to me after I’ve watched those tutorials about Bendy Bones Facial Rig, where you have those Segmented B-Bones sometimes looping around relevant Facial features. And since I could find no tutorial on it directly, I’ve decided to experiment
 and, as you can see, ¡it works!

The Eyelid Rig is a bit more complex than the Eye Contour (because it relies on what is behind: the Shrinkrwapped Eyelid Mesh onto the Eye Surface), so I wasn’t able make a tutorial on it yet; but I plan too. Differently from the Eye Contour with Spline IK Rig, the Eyelash is not a Cyclic Curve (it could have been, but on different 3D model circumstances), yet it’s still a single Curve on a layed down “U” shape; there are just too many things to consider in building that up to write down now; but in the WIP section I have shown some for that same character images/clips (on one of the last posts) on the structure behind it; at some point I’ll get a tutorial on those other Facial features as well, and if the automation on Rig Type from Rigify Addon’s experimental Feature Set (for Spline IK Bone Constraint Rig) works, then this will be extremely valuable to develop content on that too; I’d be also able to make much way more experiments in Facial Rig with Spline IK Bone Constraint because it would automate the process.
¿Did any of these answered the question? I didn’t understand what did you mean by ‘flat’.

1 Like

I meant that your eyelid is similar to a flat plane, compared to cylinder-like obgects in tutorials which are given as an example in videos about spline IK.

Yes, thank you very much! I got that spline IK may be a good substitute for bendy bones in my case.

Special thanks on the link to your tutorial!

1 Like

Welcome. Glad to help.

But there’s more good stuff on the road


I’ve just made the new test with Bendy Bones Sets for Facial Rig
 and the results in terms of Skinning are just about equivalent to the Spline IK Bone Constraint; maybe the latter is slightly smoother, but I can’t be sure
 the fact is that the expressive results are quite good on each type of Rig; but the Bendy Bones Rig is waaay easier to implement. I’ve basically reused the concept from Snail tutorial with some tweaks for Facial Rig; Absolute or Tangent, Handle types, both seem to behave the same in this approach (the Snail tutorial uses Tangent). The analogy of the Spline × Bendy Bone Set prooved to be very precise, the more Bendy Bone Sets, the more expressiveness is available (more radical curves); like on this exemple, the top of the Eye Contour should get, at least, +1 Bendy Bone Subdivision (with the insertion of a whole new Bendy Bone Set there); the bottom of the Eye Contour suffers a similar issue; the sides don’t need much more curvy effects than they already have.

With the ‘middle control points’ (or Controller Bones that exist on the interface of 2 Bendy Bone Sets), which can be Grabbed and also Rotated (or even Scaled), there are lots of Expressive possibilities and it is indeed quite intuitive to Pose, as opposed to my original experience with this stuff.

Now I have no doubt Bendy Bone Sets Rig for Facial Rig has great potential.
But, I struggle to understand if there would be any alternative to Expressive Facial Rigging in Blender, in the case we were not allowed to have access to, either Spline IK Rig or Bendy Bone Sets Rig.

Captura de tela_2022-09-05_20-57-18

2 Likes

Hello!
I have found some tips that may help people struggeling with problems wich i have described above

1
№1 (Auto bone controller producing an error). It was because the addon was not suitable for Blender 3.2.1 - Blunder (https://blender.stackexchange.com/users/107598/blunder) helped. A few lines of code had to be chaned. See add on - Auto bone controller addon issue - Blender Stack Exchange

6
Regarding №6 (with twisting after paranting)i figured out what was wrong. I posed my bendy bonesin pose mode, but i did not do “Pose ->apply → apply pose as rest pose”. After this operationparanting works fine. (see mesh - Can I set my pose position like the new rest position? - Blender Stack Exchange)
Plus, Control bones for bendy bones and attachment to mesh - Blender Stack Exchange

1 Like

Pxy-Gnomes,
In case you are still interested in bendy bones you may find dong this ( add on - Auto bone controller addon issue - Blender Stack Exchange) interesting to implement to make bendy bones like the ones that were in video Blender #EasyRigging for Animators - Facial Rig (proof of concept) on Vimeo

1 Like

Hello, again; (sorry for the delay)

Sure, I’m still interested, including in the automation Addons.

So, this looks pretty nice; ¿were you actually successful in manually updating the Auto Bone Controller Addon? I didn’t know this kind of code/Scripting fix would be so accessible to the Addon end user
 This suggests that a bit of Scripting knowledge might help end users to make temporary fixes to broken Addons sometimes (I’ve experienced many breakings over time on fundamental Addons that I was occasionally relying onto).

ÂĄThanks for sharing! This is very relevant to the Bendy Bones workflows.

Oh, yes; this is very hard to find clear information on Youtube to this day; even though that’s a fundamental Rigging technique (I know just 2 tutorials there and they are quite old, yet reliable); I didn’t know about that written topic, It’s always good to check on multiple explanations on the same subject, I’ll be looking into that too.

I believe this is related; Bone Rolls (at least for Bones Related through Connected Parenting), of course already on Edit Mode, actually have direct influence over the “inner” Twisting of a Bendy Bone —even if it’s not a Bendy Bone yet and has just 1 Segment, it is programmed to be Twisted; as soon as you Display Type: B-Bone and increase Segments, you start to visualize the Twisting. So in my following example here I was just curious and making all Bones of the character Bendy Bones with Segments; and because of Connected Parenting and ±180Âș opposed Bone Rolls (Thigh-Knee Bones, then Shin-Foot Bones); of course this natural, ‘apparent’ Twisting, poses absolutely no problem on the Rigging/Animation, unless of course we start employing Bendy Bones (Segments > 1)
DeformingBonesOnIKChainGetsTwistedByRootOnBendyBonesSettings-ButThisTwistingCausesNothingIfBendyBonesFeatureDisabled

Ok, so another topic (about Automation for this Rigs), then at some point in this thread I have stated this (I was about to starting this investigation)


so that now I’ve got this:

Hi!


here are the steps to do. I opened python script with “Notes” and replaced code on lines 152 and 156 to what Blunder suggested (i used “search” to find what to replace since i couldn’t make “notes” show line number like coding programs do). It worked for me in Blender 3.2.1.

1 Like