This is a short tutorial to show a way to distort an image in a very controlled way and similar to Photoshop’s puppet warp feature. Using any kind of modelling program with UV-features you can easily apply your not-yet-tiling texture, distort it to tile properly and bake the result to another image file.
I hope this tutorial is helpful for everyone who does not have photoshop (as gimp has no such feature, I believe) and even also for those who have PS but are maybe not satisfied with how the puppet warp works.
You will need to have basic understanding of applying materials and textures to objects in blender as well as UV-unwrapping and simple baking of textures from mesh to mesh. I don’t explain them here as there are covered multiple times in tutorials and posts on the net.
I will use the following texture as an example (its from the tiles section at cgtextures.com).

(only 3 attachments allowed, hence the link…)
Start with creating a mesh that represents the structure of your texture. In this case I simply recreated a simple representation of the tiles in my image. I modelled a very simple representation of every tile in my image that I want to have in my final texture. Make sure that your mesh is square in its outline to get a texture that tiles in two directions.
Apply a new material and add an image texture with UV mapping. In any image editing program cut out a more or less square part out of your texture that contains all elements that you want to have in your final texture.
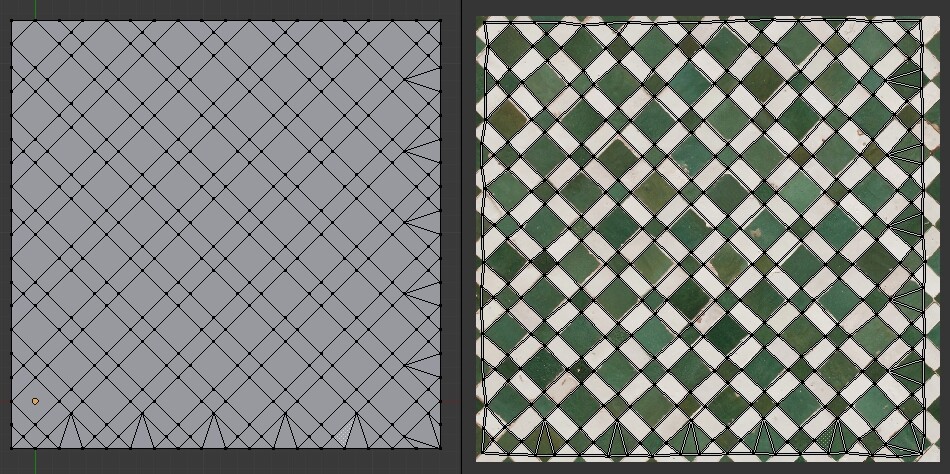
Then unwrap your mesh. Make sure that you get as less distortion in your UVs as possible (use conformal unwrapping or project from view). My mesh looks like this:

Note, that I have added vertices at every position where a tile is going to reach the end of the texture plane.
Load your cropped image to your UV-window and edit your UVs: Start with dragging the UV vertices of the outer border of your mesh to match the respective position of your image. In my case I move the vertices to the seams between the tiles. You probably want to adjust the adjacent UV verts as well to reduce obvious distortion in your texture. Inside your mesh, the UV-verts do not have to match the texture completely. In fact, little irregularities make your texture more believable.
This is how my UVs look after adjusting:
Finally bake the resulting UVed image as a new image file. Use a simple plane mesh to bake from your inital plane with your material. Unwrap the new plane and create a new image for it. Then, in the bake menu, choose the ‘Textures’ option and bake. The resulting image is perfectly aligned in itself to tile. You will have to paint color seams out of course.
This is my result. As you will see when you try ![]() , it tiles perfectly, apart from color differences.
, it tiles perfectly, apart from color differences.

I hope this helps some of you as much as it did help me.
Cheers,
walkonsky