i want to make something like something i’ve seen in a concert hall’s celling, i don’t know if it was copper or not, but it was reflective but with high bluryness, it was like dark copper colour in the hall(bad lighting) but that’s all i know, i’m trying to recreate the concert hall but i’m lacking sides and top and blinds material
but in this, lets just talk about copper
i would like it to be in cycles, but the copper is not smooth but something like this:

there are bumps but the copper is dark and there are some dark rust on it
That material would likely be a mix of anisotropic and diffuse materials (the anisotropic for the shiny copper areas and diffuse for the darker dull areas). These would have to be blended using a texture input into the fac node of the mix shader. The bump could be handled using a simple texture map bump - or a true displacement if you dont mind a lot of geometry.
Take a look at this tutorial by BlenderGuru. Its aimed at setting up a stainless steel material - but you could adapt the principles to make something like what appears in your image.
http://www.blenderguru.com/videos/introduction-to-anisotropic-shading/
can you get full pic for each disk
or you can try to manualy make a new bump image in gimp!
now i doubt that brass or something like that is aniso!
but you do need the radial texture!
happy cycles
remember this sphere
but it had some ridges which can give an aniso effect !
butm on this model here there is sort of a texture but don’t really see any ridges
mind you i tmight have an aniso effect too- i’v seen strange patterns giving this aniso effect !
but still major problem i see here is to get the right image for the texture
then it mgiht be nice to see different way to render this with aniso or not
happy bl
Ok - I had a few minutes - so had a play to see what I could come up with. I think this is pretty close…although it doesn’t have the bump map applied since I dont have a suitable image to use. Should give the OP some ideas as to where to start.

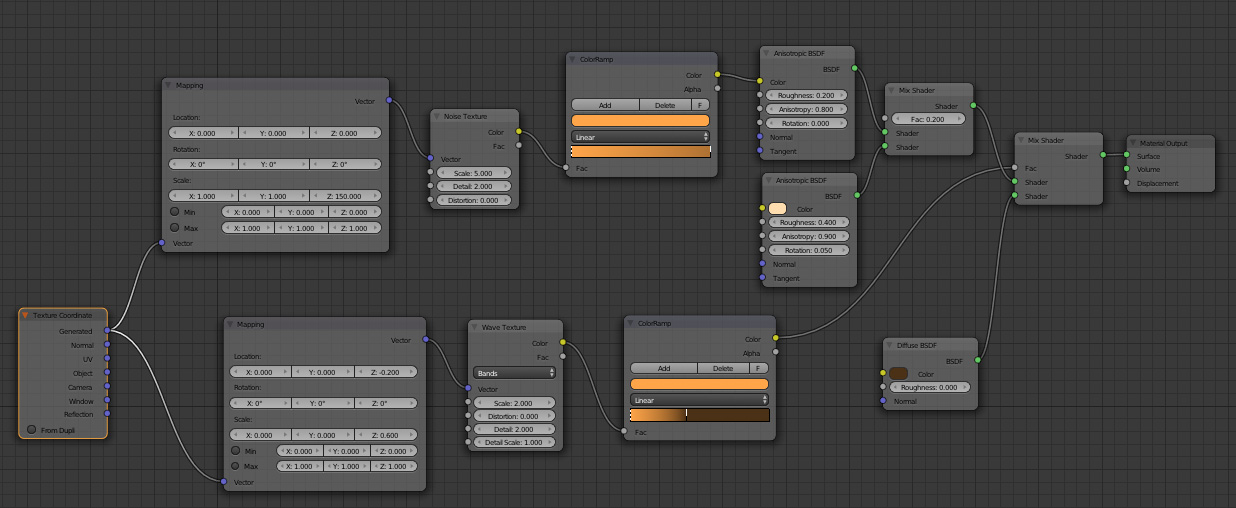
Node group
here are some nice pics
http://www.pearldrummersforum.com/showthread.php?153451-Show-your-Ride-Cymbals
nice beginning but still need to big bumps !
happy bl
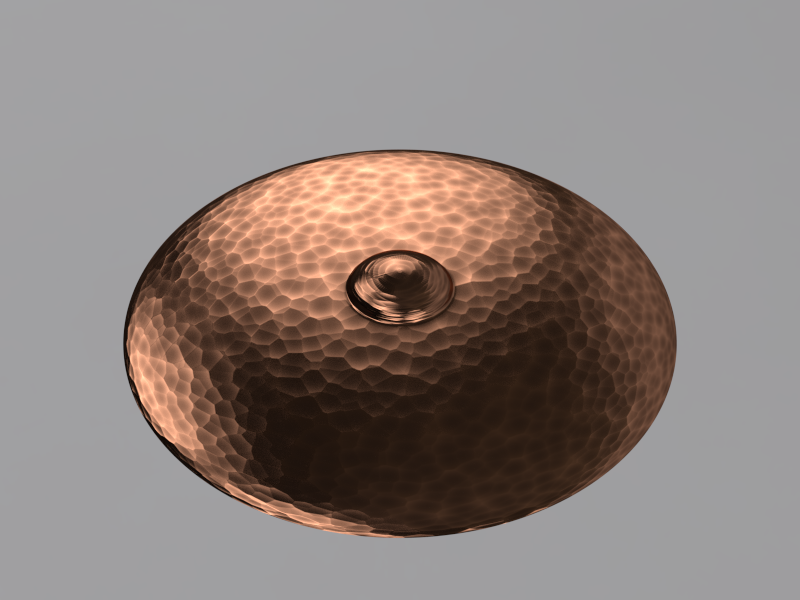
Just re-read your post OP - and I may have got the wrong end of the stick. Are you actually after a hammered copper look like this:

if so - this may give you a starting point (although it probably needs dirtying down a little)

but how to get the mat part which is still glossy? i’m kinda confused
Thats what the diffuse node is for. The matt part won’t be completely matt - so what I did above was mix the glossy node with the diffuse nde to give it a flatter matt look. The Voronoi texture going into the ColourRamp node handles the mixing of the pure glossy and glossy/diffuse parts of the shader (you can tweak the amount by playing with the ColorRamp). If you wanted the recessed part to be completely matt - simply remove the left mix shader and plug the diffuse shader straight into the top green input slot of the right hand mix shader.
In the node setup above - the raised part of the bump map are almost pure glossy (as you would expect since they would be polished by objects coming into contact with the surface). The interior of the bump map - i.e. the dip is where the diffuse shader has greater effect (simulating the dirt and corrosion which gathers there).
Of course the above node setup is quite simple and is just a starting point to give you the general idea of how to add different shaders to raised or indented parts of your model based on a bump map. You can use this basic principle to create much more complex node setups to get closer to the actual look you want.