corpus you can do it this way:
select a ‘particle’ then Shift+G > Siblings to select the rest, set active object Display to ‘Bounds’ and right click > Copy to Selected
Hi liero!
First of all i want to thank you for this awesome script. I really enjoy playing around with it and it’s a major time saver for populating large RB sims.
I was just wondering why the “box” collision shape doesn’t seem to work with the script (at least for me)?
“Sphere” works fine, as well as “mesh” and “convex hull”. What could be the reason for that? As far as I understood it (e.g. from Phymecs explanations), the box collision shape can be calculated faster (is more efficient) than “convex hull” in bullet, so it would be nice if it worked.
hi glad you found this useful, the collision shapes thing is not related to the script I guess
I usually got the best results with ‘convex hull’, things slow really down with ‘box’…
Haven’t used this script in a little while Liero… did you ever figure out a way that curve guides could be used?
curve guides are cool but never worked as force fields here -not even in Aligorith’s GSOC-
you could chain some force fields to get a similar look, or track particles with python then use RB constraints, but that does not seem very practical… I guess just wait for real RB particles
OK… thanks for getting back Liero, either way it is a great addon.
really cool script, but i tried to make the test scene a little more complex by duplicating the spinner, it just went wrong from there! the duplicated object refuses to be placed where i wanted it it keeps snapping to different locations if i try to grab it. can move it with G but constain ing it to an axis sends it away. dont know enough about blender to know if this is a rigid body fail or if it is caused by the script.
i am sure it would work fine if i set up the scene prior to adding the rigid body mechanics, but well whatever just thought i’d let you know in case its a script issue.
This sounds like just what I need for one of my projects! Will check this out later!
Okay… I’ve been playing with this, and I like it so far, but I have a couple of questions.
I noticed that in the test file, there are no lines between the empty and the emitted objects, but when I do it from my own created file, it seems to be parenting to the empty. I think. Is this normal?
Second, and this is really the more vital of the two, When my object comes to rest, it always tends to come “top” up, regardless of any other object that it encounters. I noticed that in the test file, objects came to rest in various positions (I checked this by adding a third material to only the top face of the object to be emitted, and that face came to rest in different directions.) But in my own file, it always (or almost always) comes to rest top up. I would expect the object to come to rest in a variety of directions, depending on what it hit on the way to coming to rest and how they pile up.
I’ve gone through all the settings I can think of on the particle emitter, the object to be emitted, and the container, and as far as I can tell, other than the fact I’m using a different object with a different size, for the most part, everything else seems to be the same.
Here’s the blend file if you want to look to see if you see something I’m missing. I’d really like to use this plug-in, because it seems to be exactly what I need if I can figure this little thing out.
Thanks for any help!
Edit: Seems I forgot to add the link to the blend file 
https://docs.google.com/file/d/0B9OO7EHUX19lMjltTWlmNk9tRnM/edit?usp=sharing
Can’t help with the second one. But concerning the lines: Those are relationship lines, indicating parent child relationships. They are just turned off in Lieros file:
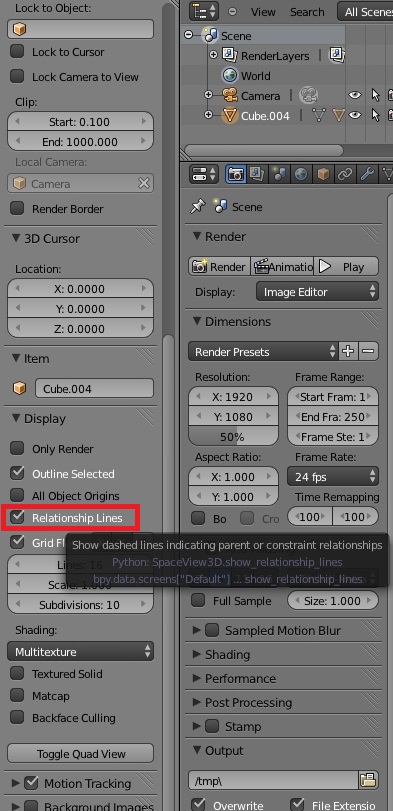
hi, as Lommbard said ‘Relationship Lines’ you see it is just a checkbox, objects will be parented to an empty anyway so you can move them around later… and for the orientation problem you should set objects origin -nut and bolt- to center of mass, this affects simulations
see you can emit a group of meshes -you almost had this working already-
here’s a ‘fixed’ file just in case: http://www.pasteall.org/blend/21475
I increased the steps per seconds for the simulation a bit
@Small Troll I am able to move duplicated spinner & constraints here…
I know script is slow but that can be improved
fixed the slowness issue, should run way better now… download script again from first post
Thanks, Liero! I figured it was something simple. That was exactly what I needed. Once I set the origin, it worked just like I expected. Just took me a minute to figure out what you were talking about, but once I realized it, that was a very easy fix.
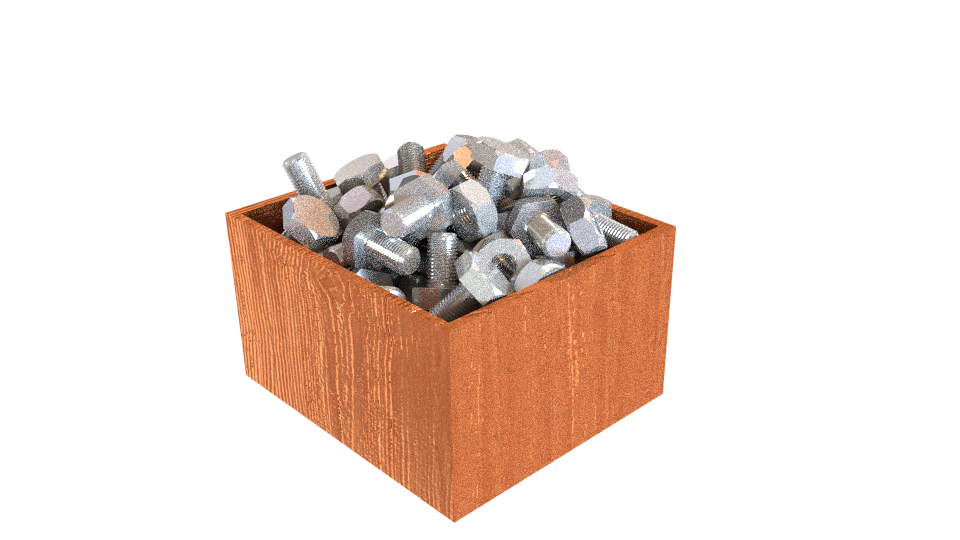
Thanks again, Liero! This is exactly the effect I was hoping to get. The image here is just a test for a different project where I wanted the be able to use the emit features of the particle system but wanted it to be able to interact with the other object correctly. Thanks a lot!
Okay… I just have one question: is there a way to “apply” the results of this? for example, once I have the objects in the box, is there a way to “turn off” or “apply to all frames” the location of the objects? I know there is with the normal emitter, but can’t seem to figure out how to do this with the results of the script. I ask for two reasons: first, once I have the objects in place, I would like to set it up so that I no longer need the animation so I can free up the resources for other uses. (Okay… not sure if it really uses resources, but I’d like to minimize that, especially when I have to do this for several items and the end result will just be a still anyway.) The other reason I ask is that I noticed that if I go to tweak the end result, the object “jumps” to it’s original starting point and I just want to slightly adjust where it ends up.
Otherwise, love what’s here so far!
looks nice gradyp, baking is a bit tricky even with operator, but try this steps:
- Alt+P > Clear Parent
- Ctrl+Alt+R ( remove from simulation )
- I > keyframe Visual LocRot
- Ctrl+Alt+G ( remove from group )
Thanx for this, liero!
Liero it works quite well (blender 2.68)!
It let overcomes the limitations of making particles of particles if you link the modifier stack to the siblings.
I’ve noticed that the particle size need to be set 0.5 of the orig size because it doubles once converted.
The speed factor also needs to be tweaked since at 1 go faster then the original particle simulation.
I don’t understand the grow time. Does it act like cache steps? The bigger the finer and more stable is the sim?
thanks so much for this great plugin!
Eli
hi Eli, for the size issue I think you should apply scale to your rigid body / particle object first, will look into that… the grow time setting is just ‘decorative’: particles scale up for some frames before simulating
Hi Liero!
I’ve put a lot of new features in the addon, mainly to support subparticles emitted by the rigid body instances, and field instances.
The new option should be self explanatory, the code is not truly tested but already very useful!
A refreshing wip i made to test the addon:
[video]http://goo.gl/nVhJqz[/video]
have fun! (I’ll today is my birthday)