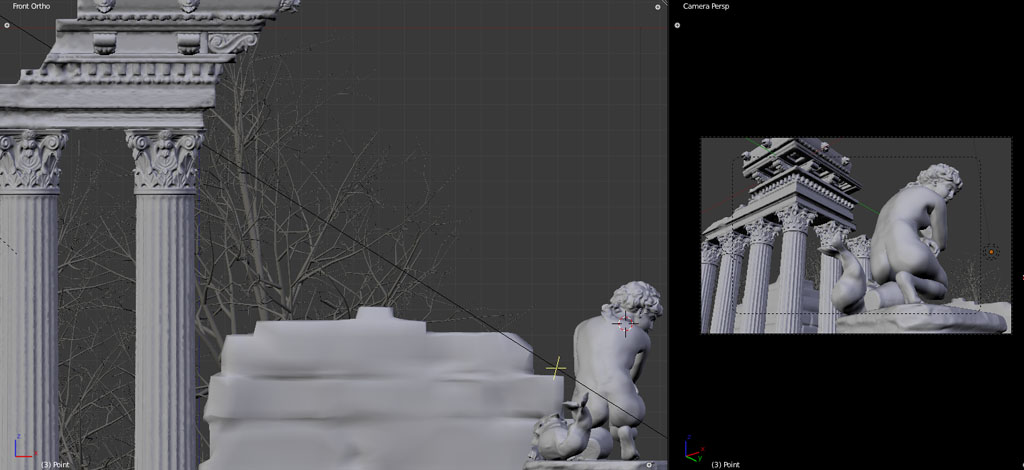
Here is the capture from blender. With displacements on.
This looks great! I love the texturing. You should update the render in your first post to show your latest work.
O freak! It is magnificent, real beauty!
A magnificent work!
The displace is used as a true master! ![]()
You can post an image without the displace to compare?
Thank you JayDez, kurchuri, DavideDozza, I really appreciate your replies.
I’m experiencing serious problems with normal maps support of blender. It doesn’t support them right. All builds. Blender doesn’t seem compatible with lot of standard app like zbrush at all. All 2.5x builds are worse than 2.49b. I spent a week searching and testing. Lot of advices here, but completely wrong in the end. The best I had is these render tests, though changing camera angle or position of the object affects tangent nor-maps badly. Does this explains why yafaray still doesn’t support nor-maps? Bl 2.5x, especially latest builds, isn’t compatible with blender 2.49b as well. Whats happening here?
Then I read this: http://wiki.blender.org/index.php/Dev:Shading/Tangent_Space_Normal_Maps
It didn’t hel me, there’s something wrong. Blender has to be able to exist on a chain, a workflow, with other apps like zbrush, 3dcoat etc.
Anyway here two test renders, one with displacements maps only, the second using tangent nor-maps only. This first took some 4 Gb of memory and two more minutes. But its superior, even AO looks better, as expected.


You improved your sculpting skills a lot, michalis. Renders are great too. About normal, yea they seem to be blurry, and inverted in some places. Like eg. compare knee and wrist - scratches seems inverted on wrist. I believe normals baked in blender display correct in blender, but have this inversion problem in other engines (and I don’t speak about inverted red channel). One the other hand correct normals form x-normal, zbrush are displayed wrong in bi, so yea it suck 
Is this really BI?? wow…
STILL no gallery?

You really should try your displacement map with sparky’s new bump mapping in recent builds
Oh, and normal maps have recently had a lot of fixes in blender… (last couple of weeks).
and for sparkybump see here post #11 is a greyscale bump map NOT normal mapped… From now on I’ll only use normal maps for realtime renders!
Very nice attention to detail. Also, the material you used for the stone is very fitting. Well done.
thank you, JoseConseco, Kenjikun, Michael W
These nor_maps are killing me. Though I’m using a r 35402 recent build for OSX, the worst isn’t that these are inverted in some places. The worst is that they’re messing lighting when the whole scene has imported from previews blender builds.
I mean its hard to compare blender builds, I have to reassign all mapping. (b 2.49b and all previews 2.5 builds, especially 32 418-indirect light).
@ Mike, thanks for the tip and its a shame how I missed your wonderful post. I haven’t find a build for OSX though.
But I tried displacement as bump on r-35402. Here I’m using two subdivisions real displacement and same disp for the rest as bump. A rather blurred effect but more stable than normal maps. I’m also using indirect lighting (it worked here) and SSS. Composition of maps in Ps. (dof map as well)
Update: I was blind, new bumps support was there lol, here a second render, one subdivision for real displacement the rest as bumps. (quality bumps, object space)

Nice!
Glad you found the right settings!
I must be stuck in the twilight zone or some weird shenanigans are under foot why the bloody hell is this not in the gallery. This is really excellent work that last piece with the kneeling figure show me, someone who has done a better example of figurative art in the last two years on this forum and I will shut up. When stuff stuck in t-poses gets into the gallery and this doesn’t words fail me.
Michalis you rock. 5 stars from me
Five from me as well… really nice work!
Very Nice, I like the statue.
@ Michael W
unfortunately blender crashes when trying to paint bumps, real time preview. Waiting for another build. probably. Thanks for the info mike. I used too much of it (I’m afraid), but now I have to bake two displacement maps, one for real subdivision the other from this level and up. As with normaps
@tyrant monkey
thanks but lets keep it low, better this way. I’ve seen some great sculpting works here (not always in gallery…)
@MarkJoel60
@meatlover
thank you.
Here a 40k faces, one subdivision with displacement, the rest as new blender bumps. A little SSS and indirect lighting (approximate), four lights. I’m using two disp maps, one for the real one sub disp, the second is baked in zbrush from the second subdivision. I think it helps.


Very impressive. I think the main statue is absolutely stunning. The rock at the bottom needs some work though - you can clearly see unproportional flow between right and left sides. Unless you didnt concentrate on it yet (sorry didnt get a chance to read the entire thread)
Polish the piece…finish the scene, and I am sure it will get to the gallery. Our Blender folks do apreciate a good work.
Take care
WOOOOOOOOW!!! this always happens. I think Im getting pretty good at blender then I come accross work like this and go DANG IT! I SUCK! anyway well done.
a good artists knows when to use an external renderer, a Great artists knows how to make the internal work for him/her!
@CG-predator, thanks, the base was really fast modeling in 3dcoat (painting bumps). Now, this is possible in newer blender builds, we all know this? I didn’t, a week ago. I mean real time bumps preview. Follow michael’s link #29 above.
@pefertig, thank you, I’m not really a fun of external renders. I’m not a fun of slow renders too. The whole scene here as baked textures can be real time animated-rendered. A camera traveling, I have in mind.
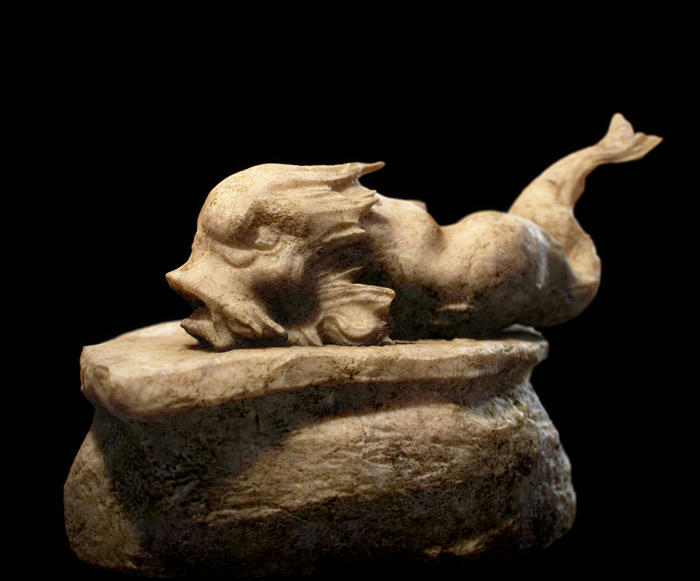
Lets not forget that I used SketchUp-blender-3dcoat (the temple), blender (base mesh-UVs) and zbrush for venus. 3dcoat for the fish and base of statue. And blender trees.
The venus sculpt started in 3dcoat as voxels. (this is somehow related with unlimited clay as well). It was clear for me that I couldn’t seriously sculpt this on a t-like pose. Serious sculpting study can’t be performed this way, not for me. So, a “sculpt first, do re-topo later” wasn’t working in this case. I cut the head, did some retopo and imported to blender. I modeled a nice base mesh for the body, did some more subdivided sculpting and exported to zbrush for details.