Corners of the mouth (Updated)

I have had a problem with the corners of the mouth, that puzzling spot where the top and bottom lips come together. Finally I took the time to analyze the problem and figure out a solution.

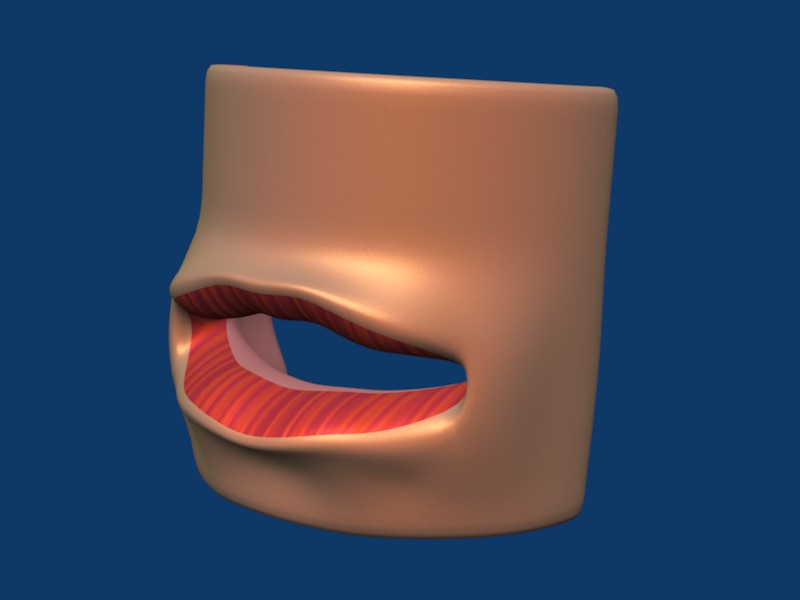
Here’s the problem: the inner lip, the part that’s colored differently and needs to be kept moist, is everted in humans, instead of the upper lip being sealed against the lower lip when the mouth is closed, the inner lips are turned out to a greater or lesser extent. But at the corners, the upper lip does lay on top of the lower lip, and both are inside the mouth, at least, behind the ordinary skin that comes up to the corner of the mouth.

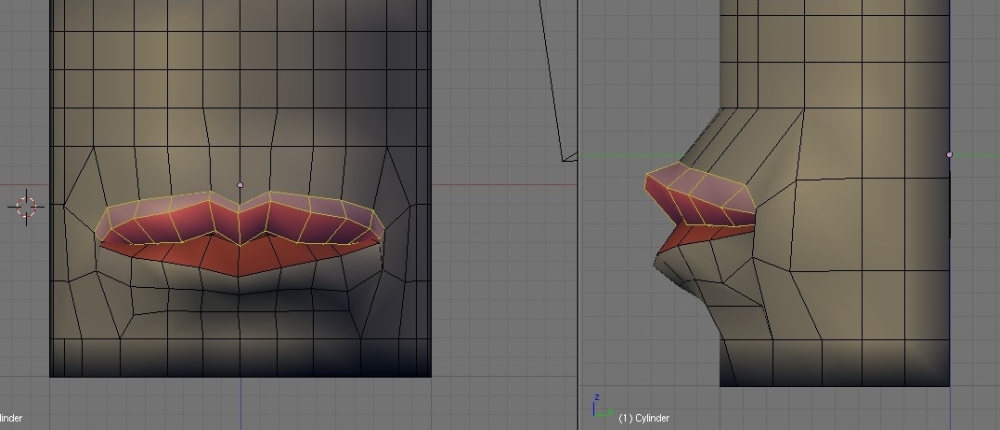
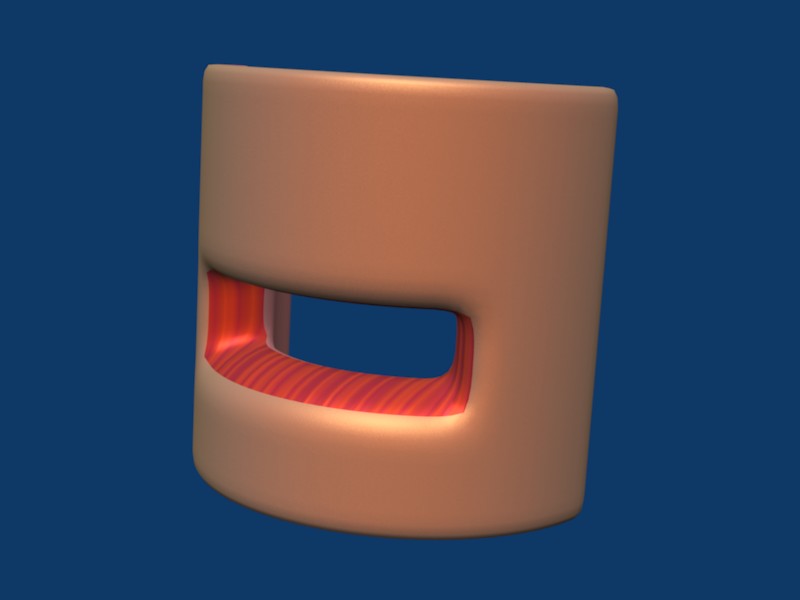
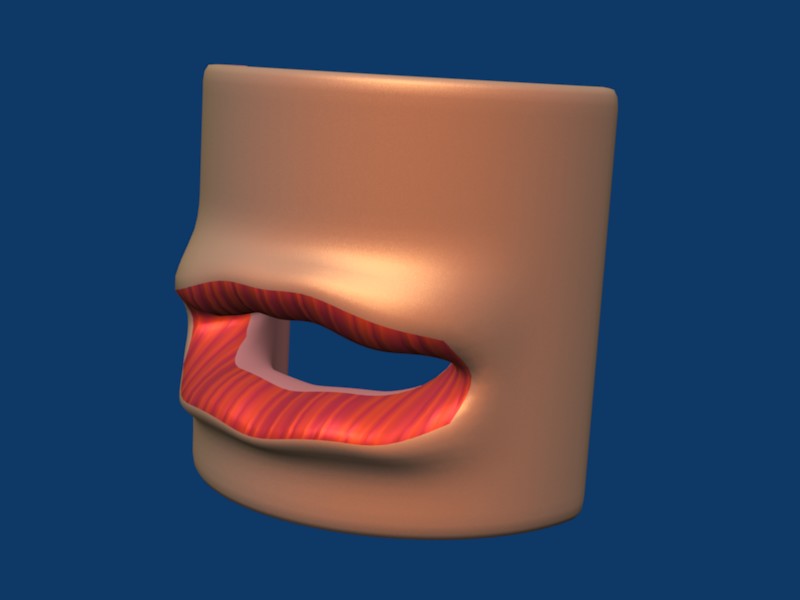
This is a very complex transition, and it looks somewhat like this:

In the right hand image, the loop of inner lip goes behind and inside the loop of skin surrounding the mouth. The key to making this work is to insert a transitional face between the skin loop and the inner lip loop. You can see this face highlighted in the image on the left.

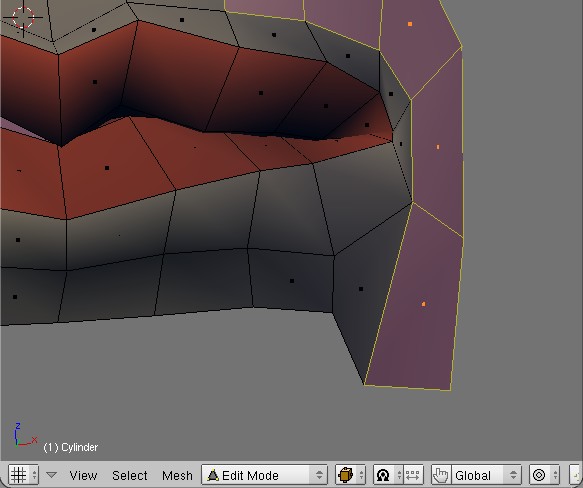
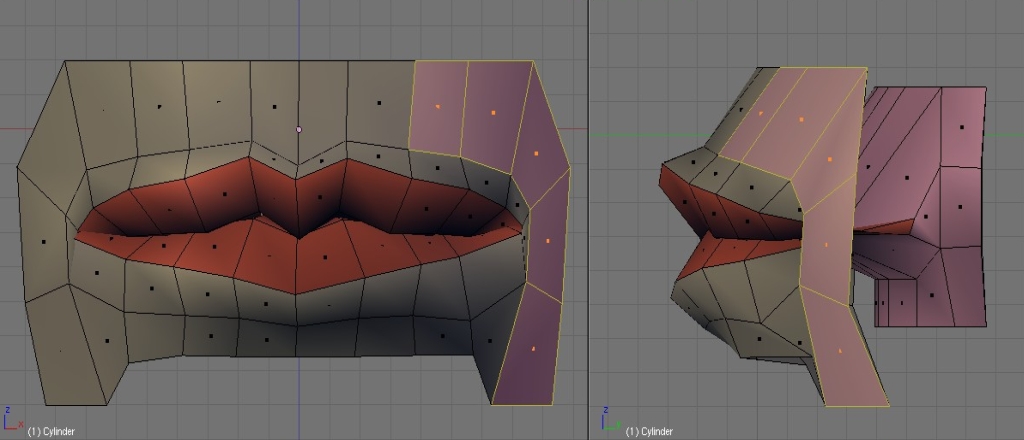
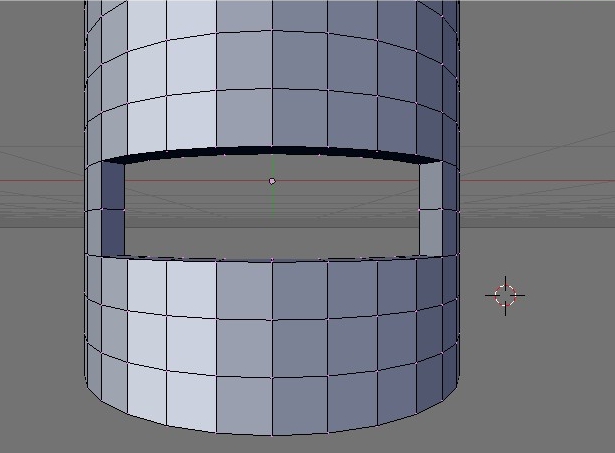
If we take a look at this from the inside, here’s what we see:

I’ve just moved the camera around the corner of the model to get a better view of that transitional face, colored blue.

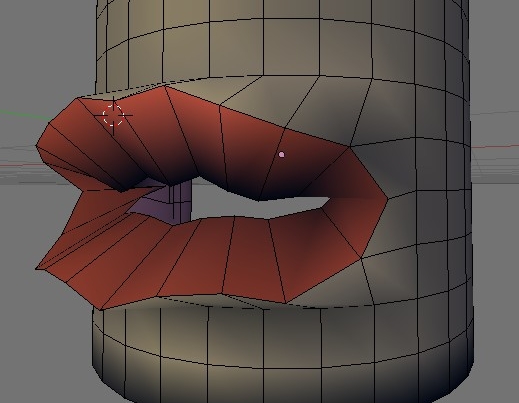
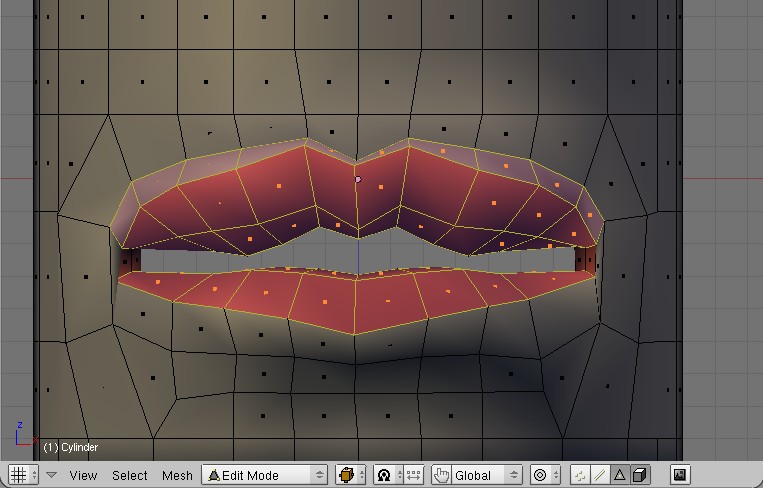
Now, getting that face in place. I assume most head models will have loops around the mouth and the lips will be loops as well. I’ve taken the model in the images above, and flattened it out. It’s sort of like a UV map - a curved 3D surface flattened into 2D. Not that I mean for you to do it this way, its just easier to explain this way.

Find the edges that separates the skin-around-the-lips faces from the inner-lip faces.

Step 1: Select the edge in the corner of the mouth (left mesh highlighted edge), and delete it. This removes a face from both the outer and middle loops.

Step 2: Remake the outer loop face (second mesh, highlighted face). Cut the face in the inner loop into three quads with the loop cut tool (two highlighted edges).

Step 3: Select the edge and extrude a new face into the gap (third mesh, highlighted face) for the middle loop.

Step 4: Complete the middle loop and make the transition face by connecting edges to form three new faces (highlighted faces in the rightmost mesh).

Step 5: (not shown) Select the face you extruded in step 3, and move it behind the skin loop face that you remade in step 2, dragging the three new faces you made in step 4 along with it.

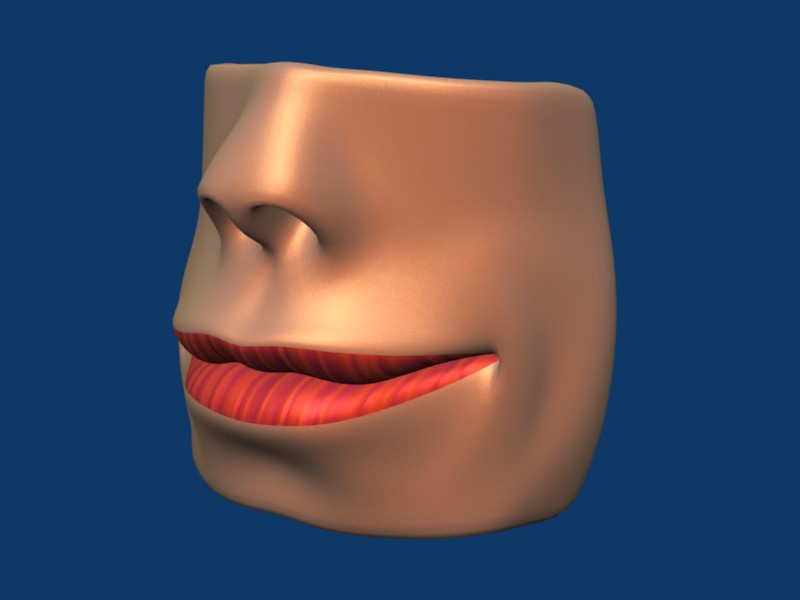
Then just push the verts around until you like the form, et voila! the perfect mouth corner!

I’ve tried this now on a couple of my head models, and, believe me, it takes less time to do than to explain. Try it out, let me know how it works out for you. Thanks.

interesting, thanks for posting this!

OK, it you’ve gotten this far, you realize that this is an intermediate level tutorial. I’m not showing screen shots of Blender button panels, and not usually talking about key press sequences, except when it seems like that’s the simplest way to explain what I’m doing. I’m assuming a general knowledge of Blender modeling and material tools, and the Blender interface.

After studying photos of mouths, I felt I still had some more work to do to figure out this tricky transition.


I wanted to find a topology that would (1) have a smooth transition of the skin around the corner of the mouth, (2) accomodate the eversion (turning from the inside to the outside) of the lip surfaces at the corner and (3) handle that little bulge under the outside of the lower lip.

I decided to build a mouth from scratch.


Here’s the mesh (in perspective) and Here’s what it looks like, subsurfed and smoothed.

I started with a 32 segment cylinder, deleted the back half and cut in nine new edges with the loop cut tool, then removed seven vertices from the front for a mouth opening. Then I extruded the faces in and back to give the half cylinder some thickness. I gave the mesh three materials: The skin, a light skin tone; the lips, a streaky red; the inside of the mouth, pink.

The next step is everting the lip surfaces, pushing them out and rotating them. [Before you do that, this would probably be a good time to set up vertex groups for the upper and lower lip surfaces, while they are still easily accessible. I did it later when it’s more difficult to select the correct faces.] The two faces that separate the upper lip and lower lip were adjusted by hand to keep the center edge between the two lips. Individual edges in the upper and lower lip surface were moved and rotated slightly to give the mesh a more lip-like look.


You’ll notice that the “loop” in the skin around the lips is not a true loop, since we just cut the mouth out of a square grid. I turn it into an actual loop like this:


I removed the edges going from the lip to the grid, made three new faces (pink) and will get rid of the triangles by collapsing the highlighted faces with the ‘collapse face’ tool (Is there such a thing? I did it by hand, selecting pairs of vertices and merging on center). Once that loop was in place, I could use the loop cut tool to cut in another loop through the skin faces for the edge of the lip.

Attachments


Here is the new loop with the loop cut tool showing that it does, indeed, make a loop around the mouth opening. We want that loop cut into the skin faces, near the lip. This becomes the margin of the lip, that thin transition between skin membrane and lip membrane, in photos this is the place where lip color changes to skin color and it has more of the skin texture (smoother, fewer of the characteristic lip wrinkles.)

The next step is a departure from a strict make-more-loops approach shown in other animatable face tutorials.

It seems to me that the skin loop over the lip does not follow the lip margin as it goes under the lip, but heads down more toward the chin. This redirected loop is highlighted in the image below.


So, grab the vertical outside edge of the skin face next to the corner of the mouth and move it out (x direction) to give yourself some room to work, and to shape the corner a bit, then select the outer edge (outer = furthest from mouth) in the face just below that one, and rotate it (Ctrl-Ekey gives you the edge menu, Rotate CCW and Rotate CW are the relevant choices, depends which side of the mouth you’re working on.)

Then do a little shaping: move the skin face on the side of the mouth forward and inward to begin to cover the lip faces in the corner. Scale the inner edge of the lip corner face down quite a bit, and move it so it is behind the outer edge of the same face (What I’m trying to say is this face should be parallel to the yz plane, and in front view should be a line, or close to it.)


Here’s what the render looks like. Notice that adding the lip margin loop has pulled some of the skin color onto the lip surface. This is a good thing. When you paint your UV map, this is the loop where you transition from lip color to skin color. If you’re going for procedural textures, these are the faces where you play with the blending texture tools. Since my focus now is on topology, that’s all I’m going to say about that.

You might also notice that the line of vertical edges just under the lower lip allow us to start making that bulge under the lower lip, which is goal (3) of this investigation. Still, the render looks an awful lot like a fish with lipstick, so to fix that I’ll add a new loop to cut through the lip faces.


Scale this new loop while constrained in the Z direction (SKey ZKey while the new loop is still selected, and scale down). The Z constraint on the scaling means the upper edges will move down, the lower edges will move up, and the side edges will just shrink a little bit. This produces a nicely rounded lip surface.

If you created upper and lower lip vertex groups earlier, as suggested, you’ll need to add the upper lip margin faces to the upper lip vertex group. If you haven’t created the vertex groups, now’s the time to do it, because we’re about to use them to close the mouth.


In this image, the upper and lower vertex groups are highlighted. Note: the side lip faces are not part of either group. Also, the lip margin is part of the upper lip vertex group, but the lower lip margin is not. When you move these groups to close the mouth, if the upper lip margin doesn’t move, the results are horrible and deformed. However, stretching the faces under the lower lip still produces a good looking lip.

To close the mouth (don’t want to leave it open - no teeth :wink: ) I use both views. Select the lower lip vertex group. In the front view move it up slightly, and in the side view, rotate it clockwise a bit. Deselect everything, then select the upper lip vertex group. In front view, move it down to meet the lower lip, and in side view rotate it, also clockwise a bit.


I jump in and out of Edit mode to Object mode to check the models appearance with the subsurface effect, but it’s possible to set subsurf to show up in edit mode so you can see the effects on the fly. This is where the vertex groups are really handy. Sometimes when editing you can’t see where all the vertices are, especially when the faces are interpenetrating, as they are here. Going to wire frame draw mode shows too much and is confusing. Vertex groups let you select the whole thing, make an adjustment, and move on. Also, if you just want one elusive vertex in a group, light the whole group up in wire frame, then RMB on just the vertex you want, it is selected and the rest of the group is deselected.

At this point the mouth topology is done and getting the shape you want involves tweaking, of which there is no end.

Here are some close ups of the faces involved in this tutorial


If you’re planning on using a mouth like this in an actual face, I’d suggest keeping only the faces shown in these two images. If you move the bottom edges down (or the two projecting edges up) you’ll have a nice loop around the whole mouth area that you can extrude, scale up and shape to make the lower part of the nose and the cheeks and the chin, and still have a nicely animatable topology. As an added benefit, you’ve got interior faces you can turn into the inside of the mouth.


Well, here’s the “finished” product. I roughed in a nose, pulled the lip corner back into a smile, and tweaked an edge just outside the highlighted faces into a dimple. Cute, huh?

[PS: comments and critiques welcome. This is an intermediate tutorial. I assume people know how to use modeling and material tools.]

Although this thread is concerning the mouth I’m interested in knowing the steps you used to create the nose, as well as more details on exactly how you did the corners of the mouth.

Video tutorial / … or just a capture of you working ? :slight_smile:

I tried to copy what you did, but with my underdeveloped (non existent?) modelling skills, what I’ve come up with looks like you’re character’s ugly cousin / uncle /aunt … thing from the black lagoon :smiley:

Mike

mstram, you took a look at it before I’d finished. There’s a lot more to it now. Take another look.

About the nose: the nose I roughed in for the final pic is not a good animation nose. TorQ has a great animated gif in his A Better Face Tutorial V 1.1(UPDATE) showing how to make noses. I’d recommend you use that.

In fact, you could consider this whole mouth tutorial to be an extension of TorQ’s Face. He doesn’t go into details on making the mouth and lips, which of course is the entire focus here. And there is one minor change to his loop topology, under the lower lip.

So: what you might want to do is start with TorQ’s Better Face, then come here for the mouth, then along to Mr. Bomb for the ear. Somebody also mentioned putting together a tutorial on finishing up the head shape, given a face only, but that’s not done yet.

As for a video tut from me, it’s not in the cards just now. I don’t know how. I’m working on marenzelleria’s BSoD: Introduction to Character Animation tutorial and discovered I have to take on learning Audacity and Nandub or Virtualdub to finish. Not that I’m complaining, but that’s where my “learning new software” focus is going to be for a while.