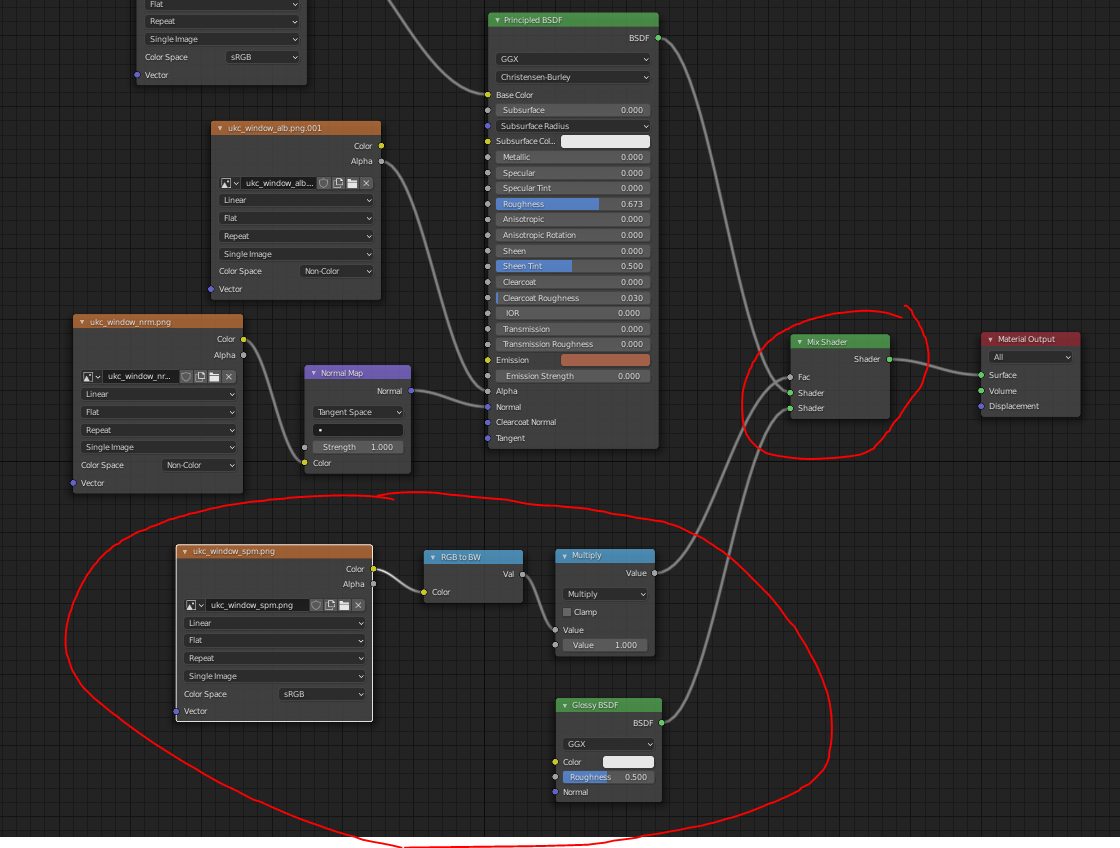
Hi. I’m wondering if I’m doing this correctly (I’m pretty new to nodes). Anyway, I read that specular maps should be used with an Add Shader or else it’ll be dim in some parts if a Mix Shader is used. However, when looking at the Add Shader node, I don’t see a Fac input for it.
I do see some specularity with my approach below but I’m unsure if what I did is the best way to go about using the specular map.
Edit: Also, what should the color space for the specular map be in? I’m assuming Non-Color since specular maps uses black and white data, right? But then how come some of the specular maps actually have color in them?
Why should it? The shaders are combined together. When you have mix shader at 0.5 factor, only half of each shaders output are added together, half of specular shader and half the other shader even if it is not covered by specular bsdf. Specular lighting is highly reflective in nature so for polygons facing away from camera those light rays are not captured. You will ended up with less light and thus dimmer material…
I think we need to know what you’re trying to achieve here, if you just want to make part of the image shiny, you could plug it into the specular or roughness input without all the other nodes (depending on what you’re trying to to). What material are you creating?
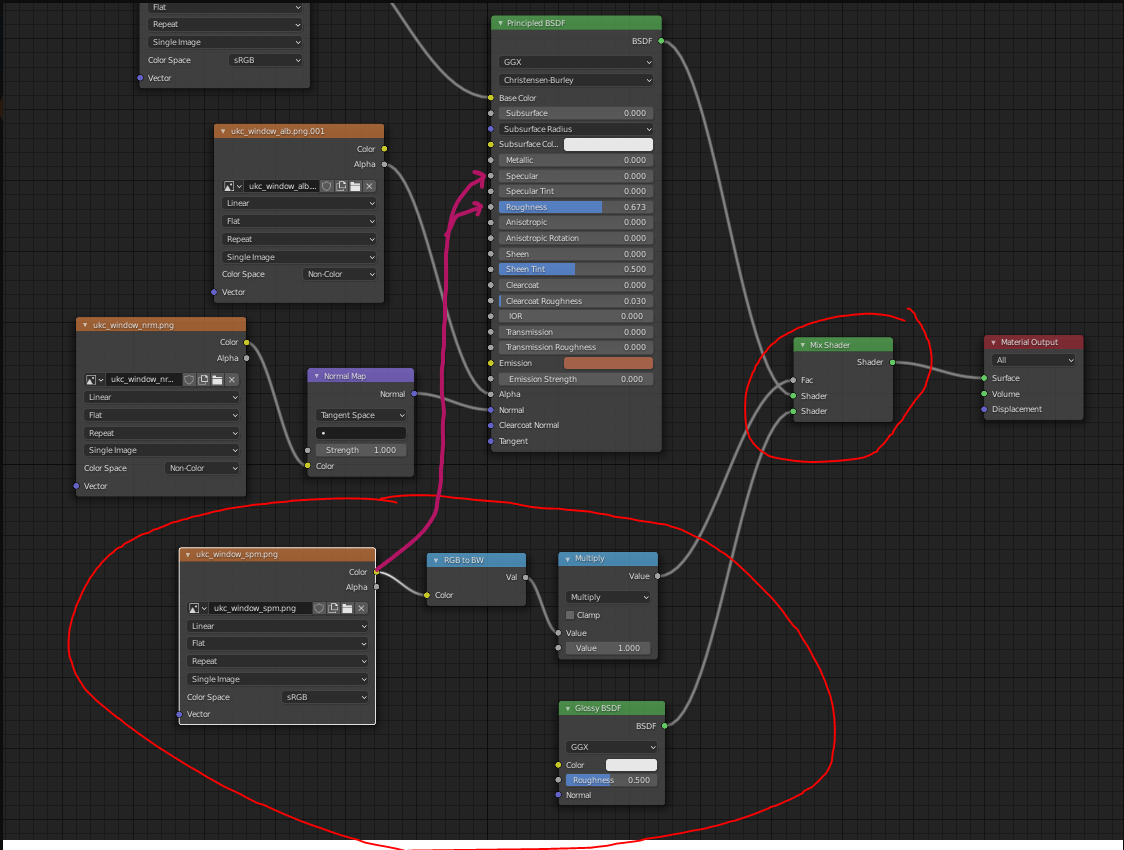
edit: it looks like you’re using the albedos alpha channel to provide alpha AND the diffuse color with 2 different nodes, why not just use the same one at the top (if thats what it is) and use both of its outputs?
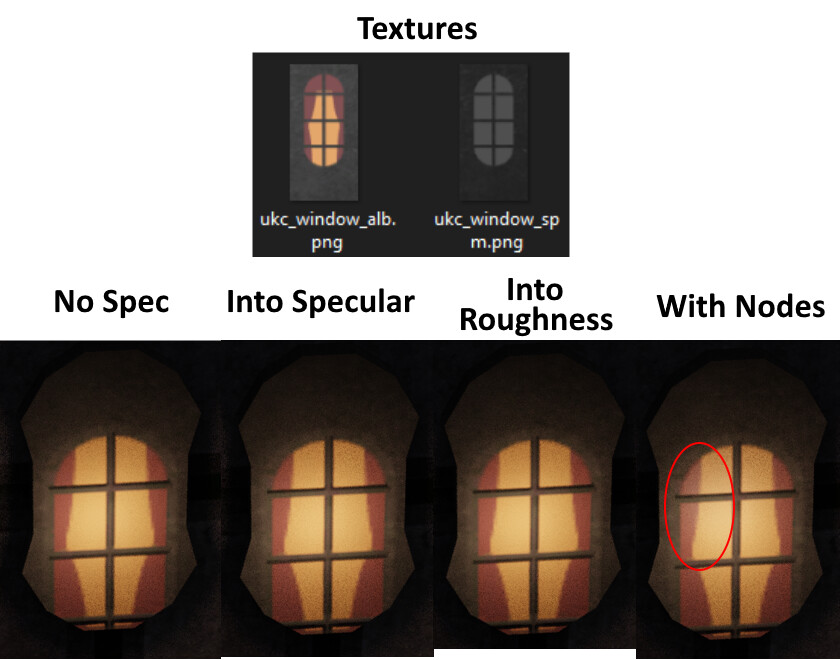
I’m trying to create a window where only the glass is shinier than the rest of the window (see below for the image textures).
“if you just want to make part of the image shiny, you could plug it into the specular or roughness”
I tried plugging the spec image straight into specular (and plugged BSDF into Material Output), but I saw no discernable difference. It looked as if there wasn’t any specular map applied at all. Here are the results:
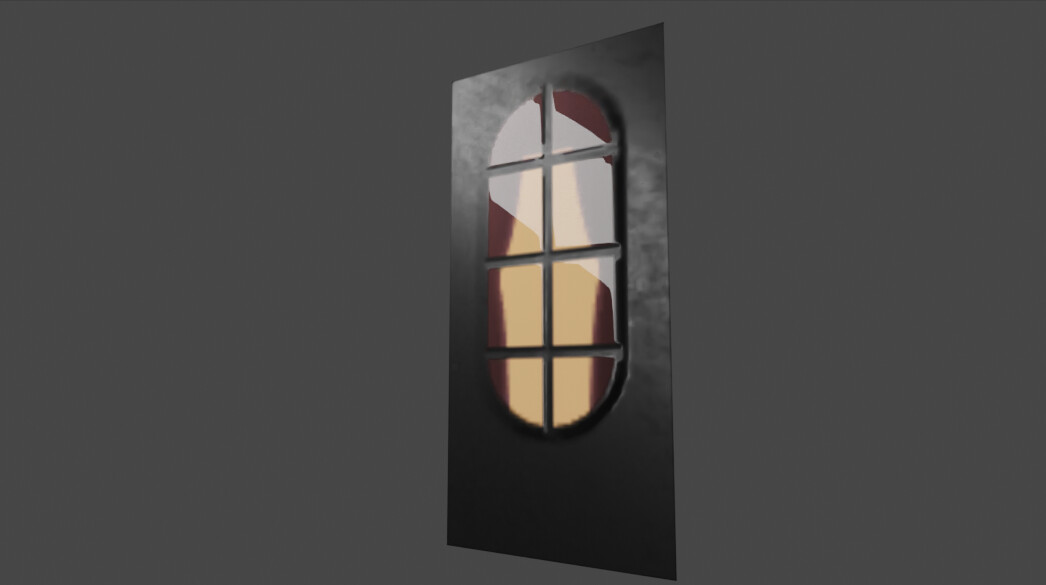
The “Into Specular” and “Into Roughness” looks like there was no specularity at all. I quickly flipped back and forth between the 3 images and saw no difference. However, with the approach that I went with, you can see some specularity on the left curtains; it’s fainter than the others (circled).
I also tried maxing out the SpecularTint when trying the “Into Specular” approach but it made no difference.
it looks like you’re using the albedos alpha channel to provide alpha AND the diffuse color with 2 different nodes, why not just use the same one at the top (if thats what it is) and use both of its outputs?
It was already populated like that when I loaded .obj file so I just left it the way it was. Also, looking at those two nodes, it seems the difference is the Color Space field, so maybe that’s why two different nodes were used.
Plug the “alb” image into Base Color of Principled BSDF
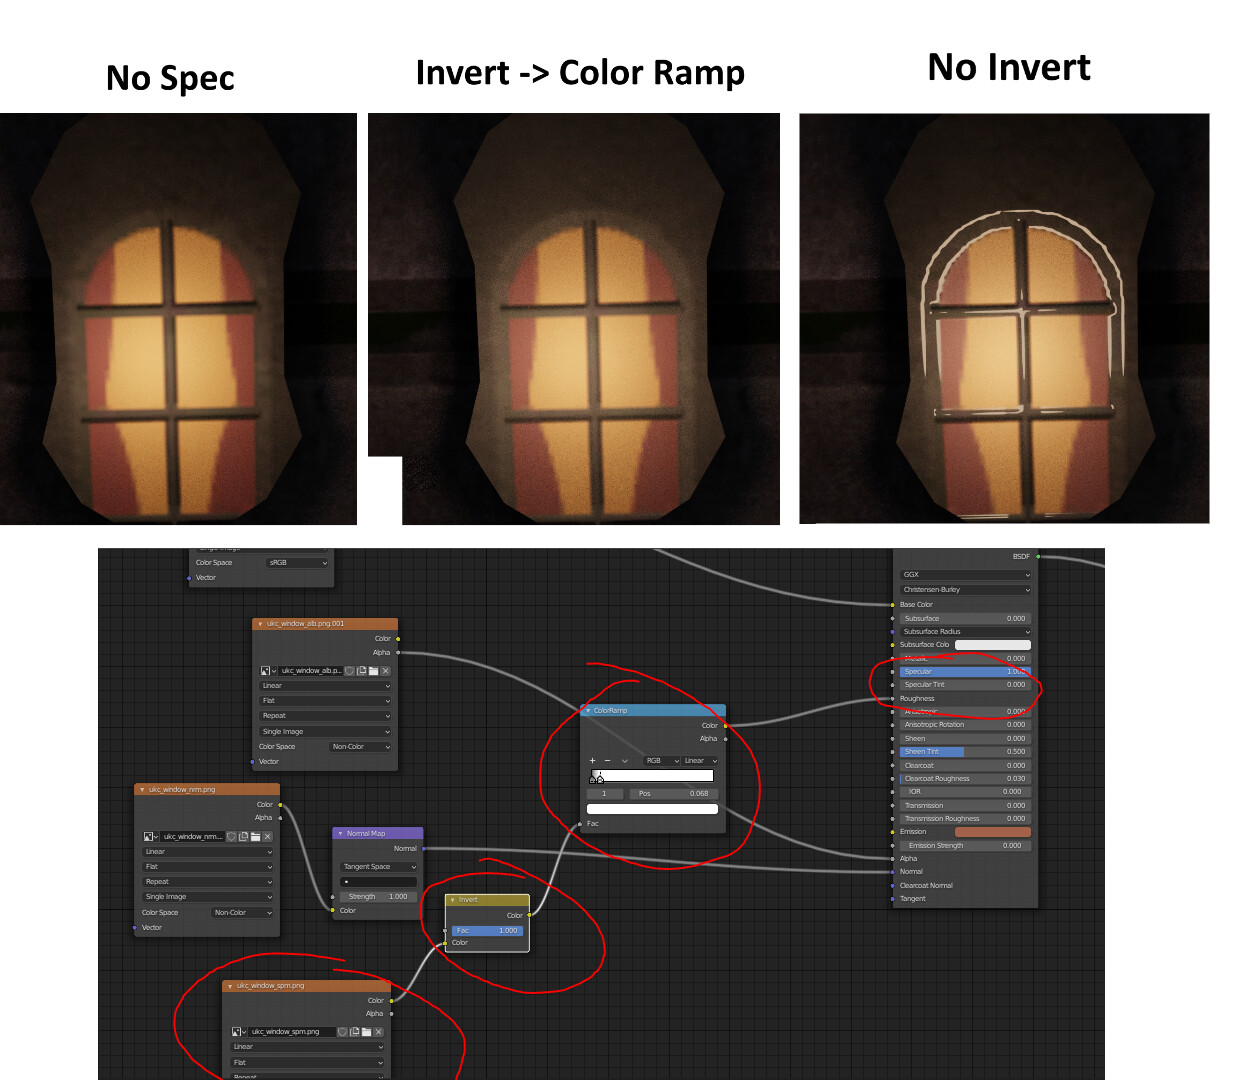
Plug specular map image into invert node, into color ramp node (like @Kolloom said), into Roughness of Principled BSDF, adjust ramp to desired outcome of shiny-ness (or leave out invert node and invert the color ramp, either/or)
turn specular to 1.000 in Principled BSDF, adjust for fun
Normal map configuration is fine.
If you’re not using this as a transparent texture, alpha channel/node is not needed.
if you drop your .blend here w/ the images, I can set it up for you as an example
Sorry. I just got around to trying your suggestion. It looks like it’s producing the same effect as my original approach (results below) but I do have a few questions:
Yours will change the color of the specular areas to white, while the other way will just make it a glossy version of the base albedo color. Can you link the images you’re using? removing the alpha channel shouldnt do anything, but you need to make sure the slider is set to 1.000, otherwise it’ll be invisible.
As far as inverting the map, thats because black = 0, white = 1. you want 0% roughness for the window pane, but your map has the fully smooth areas as white, not black, so you invert it so the smoother portion is black, not the lighter color in the map.
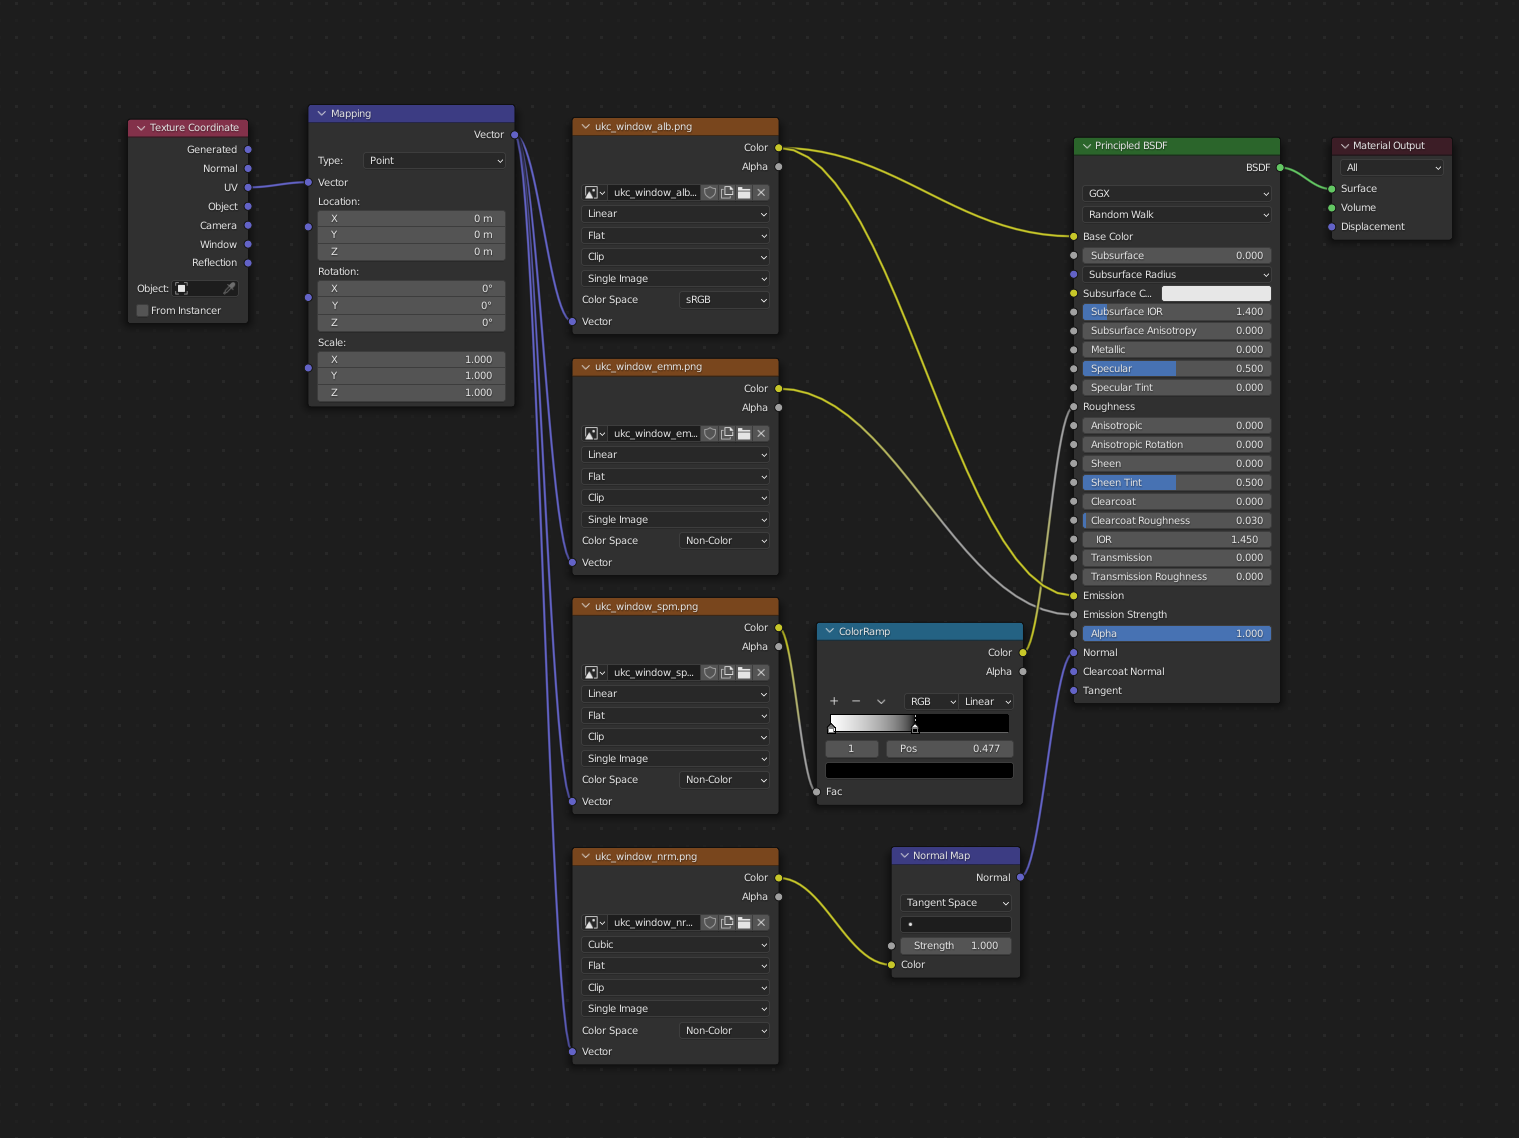
Here is how you want to set those up. The issue here is that you’re using maps from another engine in blender, so you have to make it work for the engine you’re in:
Why are you using the “texture coordinate” and “mapping” nodes if they are only using their default values? It looks fine without them.
In your Principal BSDF, you have a couple of extra Subsurface fields that I don’t have: “Subsurface IOR” and “Subsurface Anisotropy”. Where do you get those? Are you using a different version than 2.93.6?
Is this how I should be using my specular maps for everything from now on? With ColorRamp into Roughness?
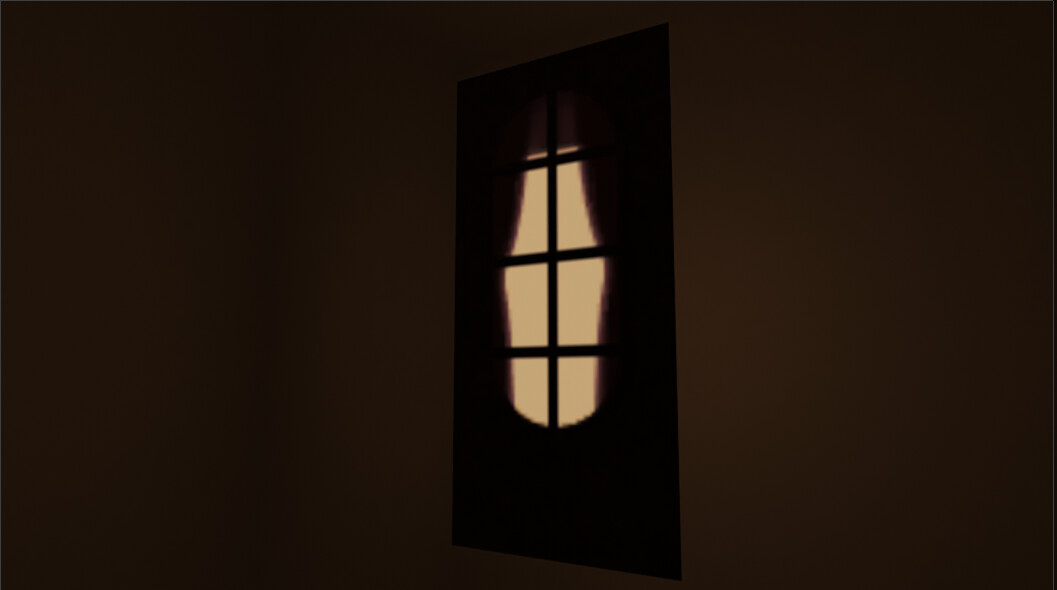
How do I get the emission to light the surfaces around it (see picture below)? I thought emission can do that but with the way you did it, it doesn’t seem to light the wall and the ceiling nearby (left). Note: the wall is slightly behind the window - which I think is the reason why. I had to get the effect I want by putting a point light in front of the window (right). I know I can see the point light in the reflection, I’d probably have to tweak the spec/colorramp values to prevent that. Anyway, I also tried, instead of using a point light, putting a Math (Multiply) node between the emission map and BSDF’s Emission Strength field (with a large multiply value) but that doesn’t seem to work. Is putting a point light in front of it the only way to achieve the effect I want?
built into node wrangler/import Images As Planes default node setup
on 3.0, you dont need to worry about those for this application
if you want to achieve the same outcome, yes, but note that the colorramp has its “sliders” flipped, which effectively is the same as inverting the image.
thats just due to how the scene is set up, there would be no physical way for light from that window to hit that surface (at least without something to bounce off of). You’re taking a stylized look into a “physically correct” renderer, so some artistic license needs to be taken