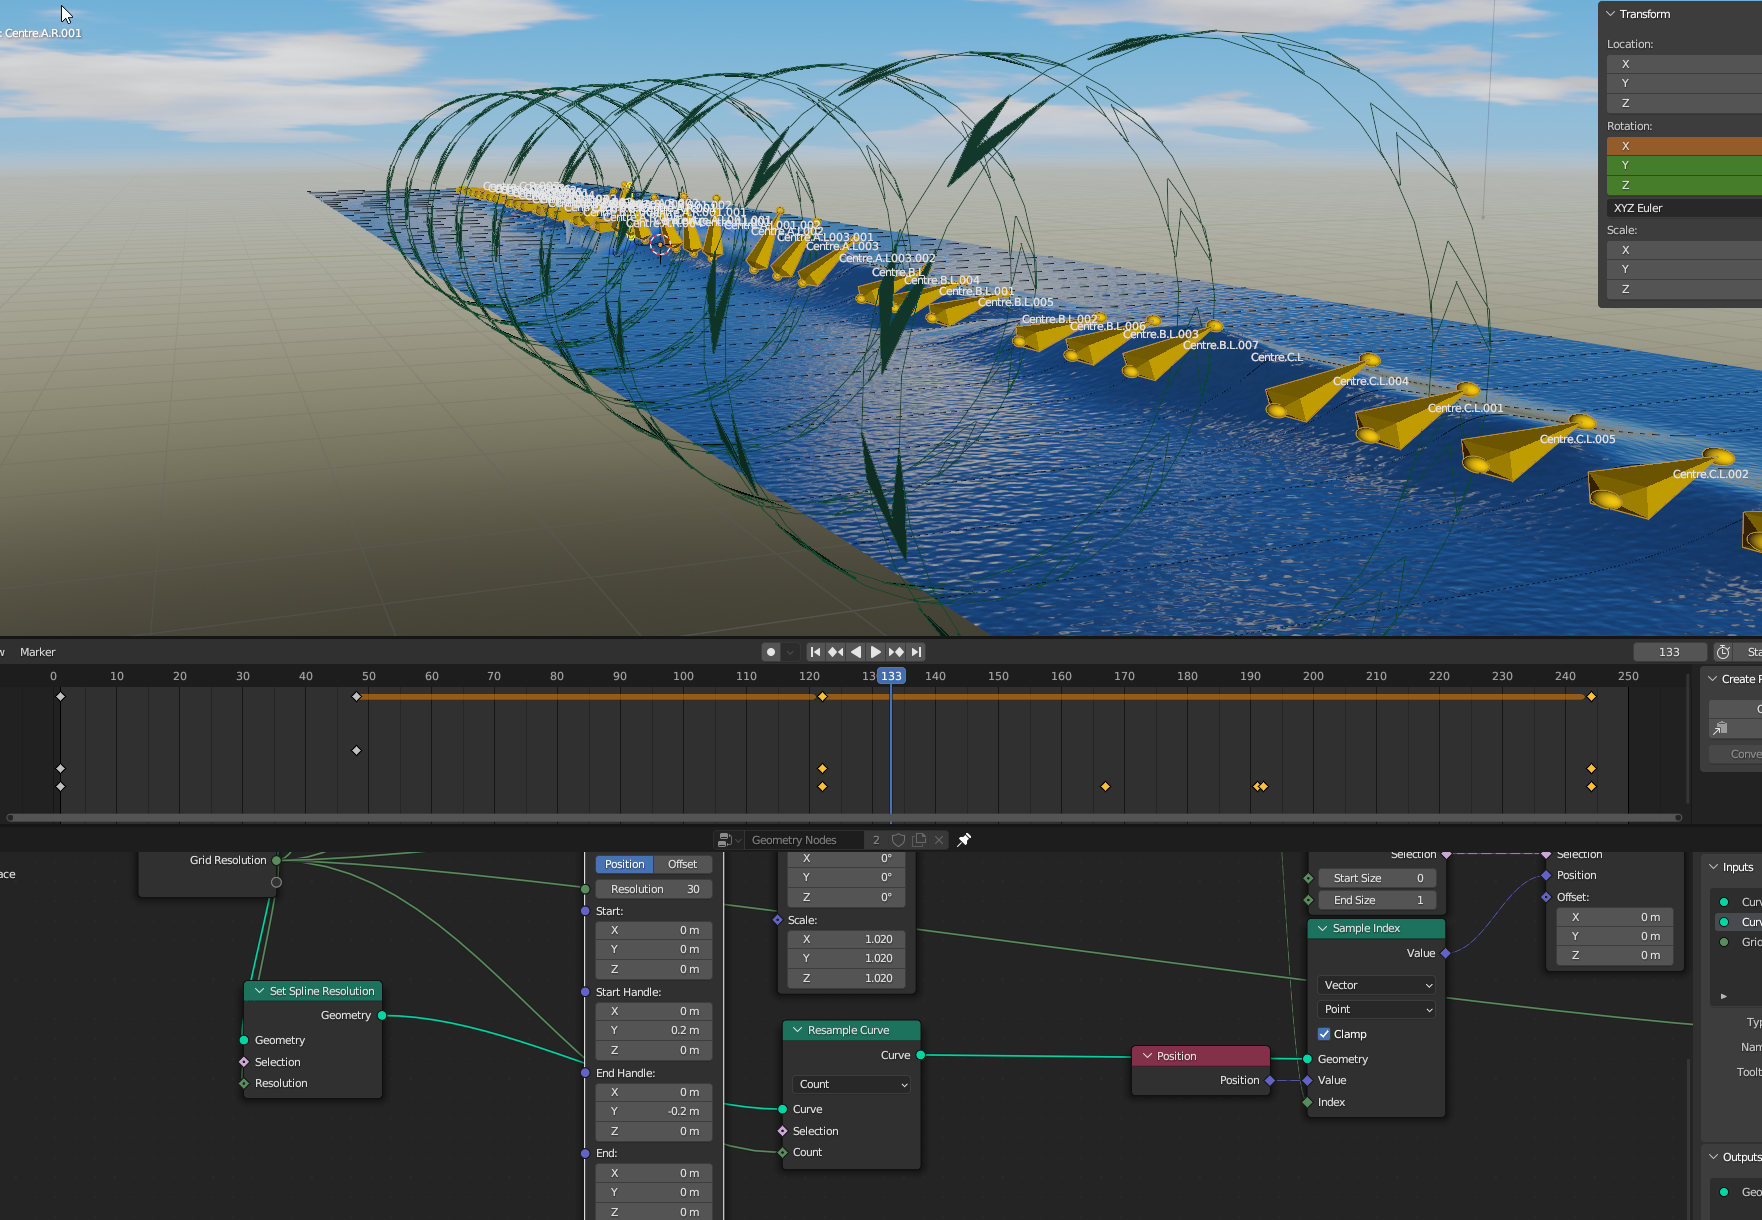
Do you think I am on the right track with creating this rig?
It is a wave rig that uses bones to drive a shape keyed spline. The smaller controllers are using bone constraints that have there influences at different strengths depending on how close they are to the main bone controller. It is very fiddley to build and I dont know if i can continue in this direction. Is there anyone out there that can offer any guidance?
What you did is interesting and it looks like you are tinkering on the subject since a bit of time !
Funnily enough I’m about to do something similar for a paid work in a few mounts, but didn’t starting really digging into the subject yet, it’s definitely tricky.
While this isn’t for blender, and it’s not a tutorial either, it’s interesting to dissect and think about how it can be done :
I think you’ve got an interesting test, but I’d probably try to test different approach on a basic level…
Here is a test with geometry node, definitively not the one I’d go for, but I’d keep doodleling and exploring the possibilities first before settling on something. wave.blend (152.7 KB)
Hi ! Thankyou for your input! Ah yes the deformer this has been implemted in blender before but never released. I believe a software engineer from a big studio has messed around with the idea. If i find the link i will post it. I have been researching breaking wave solutions for about 3 years and so far lofting splines feels obtainable for me . I have been having some success with the spline lofting method , similar to what dreamworks did with there surfs up movie.
I have run into some issues of bone driver glitching but hopefully woth some research i can fix that. The new simulation nodes in blender look promising for ocean spray with the lofted mesh. Anyway best of luck with your wave deformer . Thanks for your interest!
Hey ! That looks really cool ! especially the fact that you can make a very long, non-uniform wave like you do ! Well done !
And also thanks for the youtube link , that’s also interesting to see !
What is the end goal of your setup is it for a short film or just to explore how it can be done ? The result looks amazing, but it seems that the shape of the wave is baked in because of the shape keys.
If for some reason you want a bigger or smaller wave, make it thicker or thinner, or else it’s getting difficult with your approach or I’m mistaken ?
Having something a bit more procedural could allow more variations one the shape.
I am making a short film yes. I am working through what it looks like to transform the wave. Currently I can scale in all axis. see video below.
there are plans further down the line to have the wave operate along a bezier curve which can be stretched and bent and the wave will respond accordingly but that is later. The thickness of the wave might be adjusted through geonodes if I can wpork out a solidify type solution, again thats an adventure later on. right now I am happy I can adjust its size in all axis and get it animating. Bones drivers are being used and I am currently working out the best way to implement drivers. Curruentyl using transform drivers but that is not working well. looking at single property drivers next. i estimate I am only half way through but as blender gets better the more hopeful i become when it comes to solving this problem.
As to procedural matters, geeonodes is definaely the go. I am using geonodes to loft the mesh and am waiting for blender developers to add an armature node to geo nodeos so the rigging can more procedural . I have been waiting three years for geonodes to become well implmented and I am impressed with its progress. Viva la blender! hahah peace!
Cool ! thanks a lot for these extra details !
It’s sounds quite interesting indeed and having that extra layer of deformation with bezier is probably going to be helpful. Maybe a lattice with few points might help to shape the wave better according to camera angles !
Sadly that’s probably a long way to go, unless you want to wait extra years to finish this rig !
Fell free to post if you have questions regarding drivers, I’m not an expert but having an extra pair of eyes sometimes help !
Hi again! I was thinking the same thing with the lattice. I have applied one across all the splines and it looks really cool. we are definately on the same “wave” length haha. I am not sure when the rigging nodes will be out but I have just found rigging nodes by a third party developer so i will look into that for now. https://www.youtube.com/watch?v=1PRAAw-1jGk
here is a quick animation of the wave . timing is abit off but the bugs in the drivers are almost gone.
I am looking at using a compare node to establish a selection of vertices along the x axis of the grid which is lofting the mesh.setting the grids x value to a higher number gives the ability to produce a higher epsolon value resulting in a smoother selection. see video below.
an idea i have is to use the selection for a simulation node setup that would maybe turn on the simulation that would disperse “foam” when the bone is rotated at the angle of which the shape keys are displaying the wave shape when foam would occur.
Super cool ! And funnily enough, after being briefed by my CG supervisor we are probably going for a
technique similar than yours rather than the full procedural method !
In the video it works very well until the end : having flat water but yet the borders feels unnatural.
Since you use the first state of the animation to make the borders , and the middle finished the whole cycle.
Maybe it’s better to have 2 cycles, one is a small one, and the other forms the big one.
From there , having the wave to always make a full cycles, but having only controllers to offset a little bit the cycles to create variations ?
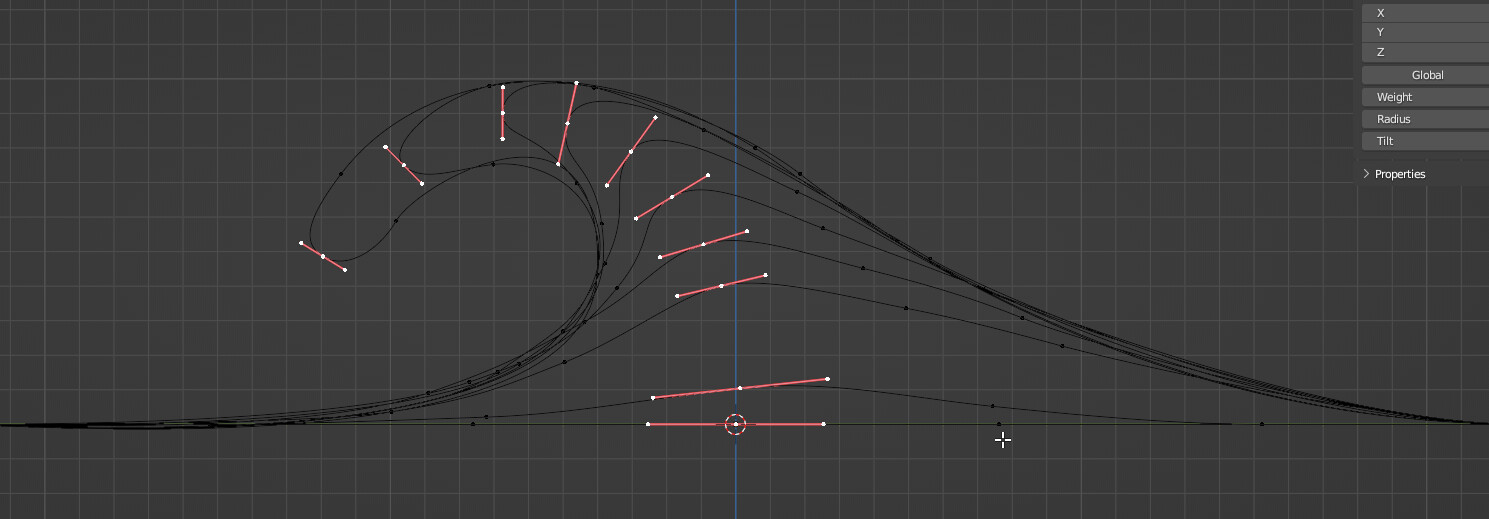
I’m not sure to 100% understand, but you want to select that part of the wave to emit foam right ? :
It’s the only part where one point got two edges going nearly in opposite direction.
Therefore it should be possible to select only the peak using a dot product on these two edges, and then it’s just a matter of growing selection maybe with blur node and greater than node.
Again you are on the same waveas me ! hahaa! Previously I have created three different splines with shapekeys that match how the wave transitions when approaching the outer limits of itself. I have spent a good 30 hours toying with them in the rig and I have produced good results. It does limit the wave form and it makes me wish I could swap them in and out of the rig so I could place them where I want easily.
I have been experimenting with this for some time now. I do think a transitional spline is needed. I will revisit this idea.
Thanks for the suggestion with the dot product. I spent yesterday studying dot product and will attempt to implement it win the node tree.
@sozap I was not able to apply a dot product to obtain the edge selection of the wave sorry. I am not that skilled. might skip that and jump into creating a curve that follows the lip and emits spray
Thanks for your answers, it’s quite interesting and taking advantage of your experiences before jumping into the water is very valuable !
I’ve setup a little test scene for you that allows to morph two curves, that’s what I’m planning to use to mix between different shapes ( rather than using shape keys) and also mixing between different cycles, so I can switch between “big waves” and “small waves” in different places.
I also included a test for the dot product thing I was talking about …
But of course, instead of removing it I’d probably make an attribute and massage the value, by blurring, and averaging it over time with simulation nodes…
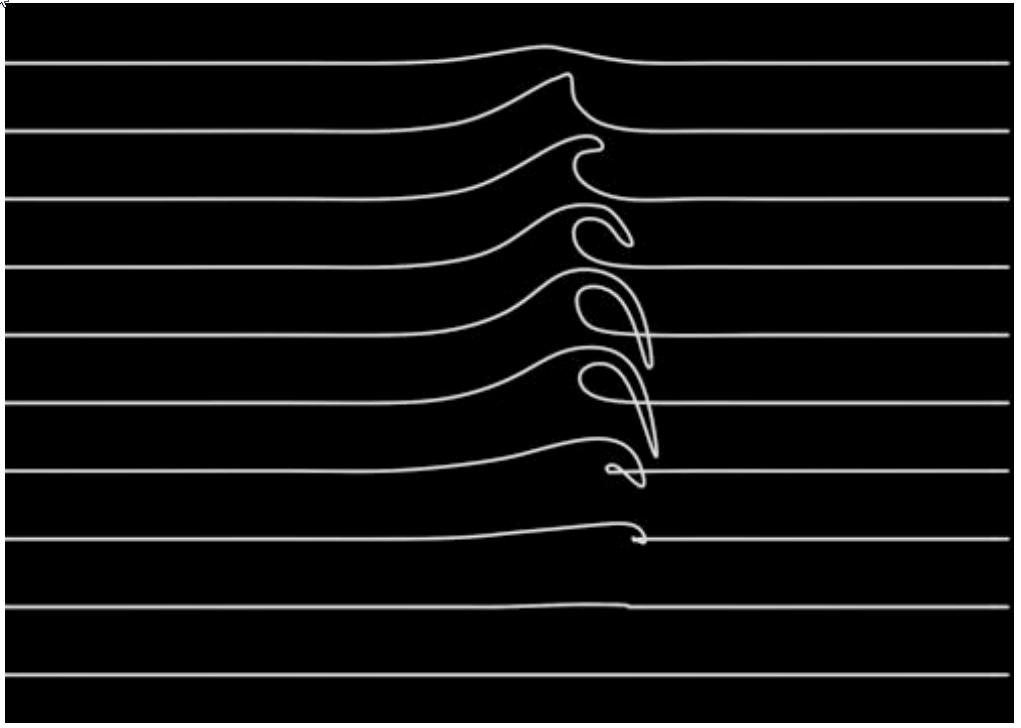
Hi there. ok cool! Just a quick reminder if you dont know already that the interpolation of both of the methods , that is blending curves in geonodes and shapekeys, use linear interpolation. I do recommend using a minimum of 10 iterations of a breaking wave as shown below.
further more , keep all control points including handles flowing from blend to blend. this helps in better interpolation. as seen below with minimum shape key steps.
the following is how many steps i use. this is the first ten. I use a total of 31because i want the wave to form in a specific way and i have to baby the interpolation all the way through.
Thanks a lot for all these pointers ! Super appreciated !
I’m not sure to follow everything you said, but it might make more sense when I actually try building the system for real. Anyway it’s quite interesting already and simple screen captures like that are quite inspiring.
Feel free to ask if you need any help and in the meantime these little breakdowns / pointers are super interesting !
Hi there. Just an update. I implemented your suggestion with the curve morph. I used a three stage curve morph with gemoetry nodes and drivers. see vid below. The way i went about it is quite laborious as I now have for ever wave spline one base spline for each bone which the GN morph operates on a 3 splines that are shapekeyed to different stages of the wave ( a full wave , a mid sized wave and a small hump wave) the I use drivers that are attached to the genodes to drive a bone that drives the blending of the geonode geomoetry. I will upload a small demo file once I get some time.
hi @sozap here is my wave morph. I ended up having problems with this method. I will show you when i get some time to make a small vid. there are three drivers attached to the geonode curves. The problem is the drivers take a while to update and the rig glitches. so this brings me to asking yo a question if your up for it. It’s simply asking to add upon the demo wave you posted called wave 2. Is it possible to have a morph over 3 curves still only having a single value to operate the morph?