I am passionate with the eastern cultures, especially the Japanese history. Anything Japanese catches my eye and thus I have attempted to recreate several Japanese objects in Blender. The japanese gate gave me some trouble, though, in my early Blender days. That’s why I decided to help all of you by making a small tutorial on using curve modifiers on meshes, for instance to make a gate.
STEP 1
Open Blender and add a cube (SPACE -> Add -> Mesh -> Cube) (if there wasn’t one beforehand).
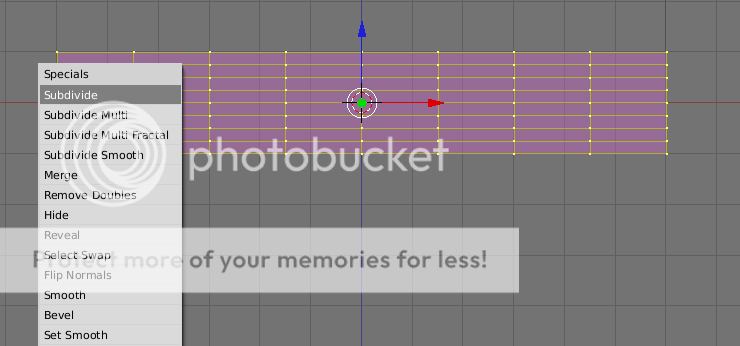
Go into edit mode (TAB-key) and subdivide the Cube a couple of times (W - > subdivide). The more you subdivide it, the smoother the result will be but we’ll add a subsurf modifier afterwards anyway so don’t go insane. IMPORTANT Do not delete any of the vertices we got by subdividing. If you do, you will experience troubles with your normals later on, which cannot be solved by recalculating the normals.
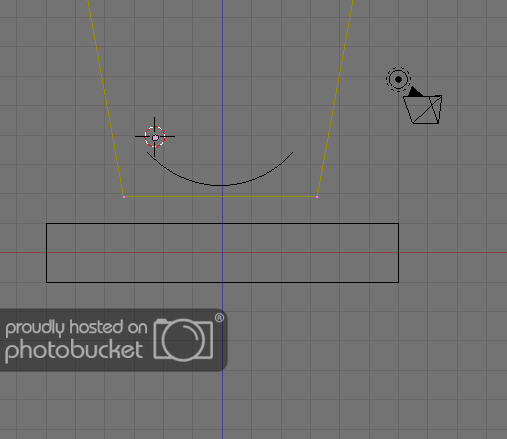
Add a curve (Add -> Curve -> NURBS). I recommend a NURBS, though you can use béziers or paths for some unusual Japanese gates.
Make sure the curve is smaller than your cube and is to be found above it.
Call it whatever you like and remember that exact name.
What the curve looks like is more or less what the curved wooden beam atop the gate will look like, so feel free to edit your curve.
STEP 3
Here’s where the fun begins.
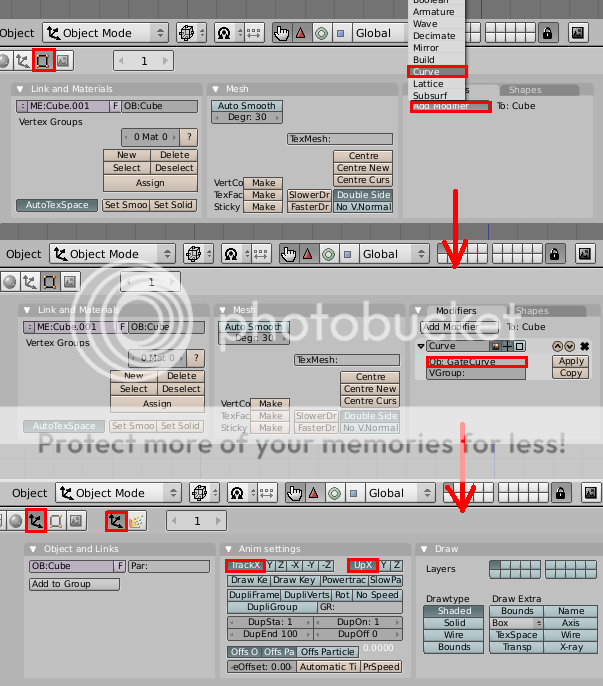
Add a curve modifier to your cube (F9 -> modifiers -> add modifier -> curve) and Type in the name you gave to your curve as “Ob”.
In the objects buttons (F9) you’ll have to do some editing as well. In the “Anim settings” tab you’ll find “Track X Y Z -X -Y -Z” and “Up X Y Z” at the top. Turn on both.
Here you’ll have to adjust depending on which axis your curve and cube are to be found. If they’re in the top (meaning X and Y are your coordinates) then enable Track X and Up X.
Next, parent the Cube to the curve (select Cube, SHIFT + select Curve, CTRL + N).
What you’ll see is that the cube bending depending on the curve.
However, on both the left and the right there’s a part which does not follow the curve. That’s because the curve is smaller than the cube (like I told you). Simply scale (S-key) the curve to a greater size.
You may add a Subsurf modifier (modifier tab) and/or a smooth (F9 -> Link and material, Mesh) if you like. DO remember that wood is normally not rounded.
Next you can add the left and right supportive beams and a flat plane under the curved beam if you like. Texture the gate and voila… a japanese gate!
Even if you don’t want a japanese gate, here’s how to make a mesh bend according to a curve.
Finally I’m back on my own pc, so I added the pictures
I have not included a render of a japanese gate, but if there is any demand I will add such a picture.
Thanks Charles for the quick tutorial. I had some free time at work Friday night working the late shift and decided to play around with it. I got a little dramatic because I am also enjoying cogfilms tutorials right now also. but here goes:
Remember I’m a total newb at this. I was looking at the grass tutorial in this forum and I tried to make the grass more sparse and reedy like I would imagine near the ocean. I know the ocean looks terrible, but ran out of time before had to go home, but thanks to Cog at Cogfilms also for inspiring me to add a little more to the scene.
@saladin: now for a bigger challenge… model a 15th century japanese village!
@JPorter: you’re welcome :). as a somewhat experienced blender user (though relative to some others, I’m still an apprentice) i can advise you to don’t worry about your results and just play around with the thing. that’s how i discovered how to correctly use the curve modifier which i explained in my tutorial!
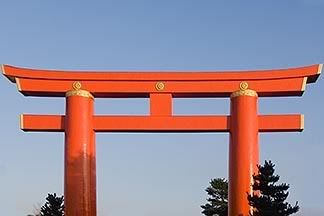
In case you’re interested, the name of a famous gate in that style is the Torii gate and this wikipedia image shows you of what components such a shrine gate consists (it’s in japanese, though, but you can look at the picture).
Good luck in your blender career
Well since tonight is another boring night at work here’s another one.
The original photograph courtesy of David Sanger (found on Google Images).
and my very, very quick interpretation (didn’t do anything with lights or textures, or background for that matter).
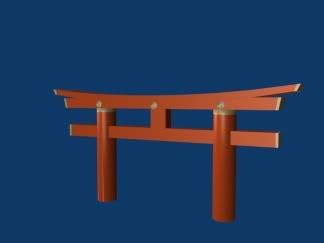
I’m not happy with the angle the curve is taking at the ends, but kinda got tired of messing with it. The original picture also looks like the pillars are not just cylinders, but I didn’t mess with that either. BTW, the photo said this was the Heian Shrine Torii Gate in Kyoto, Japan.
I’m not sure if it’s against the rules of the board for me to post these here so this’ll be my last one. Once again, I’m new to this, please be kind.
I really liked this tutorial.
It’s really simple, but that’s where I am at the moment and I’d never really used the curve modifier before.
I coaxed the technique to make an arch tonight. I won’t bore you with the simplicity of the model, but I was happy that I’d learned another tool to the arsenal.
Heh, thanks Free_ality! I don’t think I’ll have plenty of time to spend on writing tutorials (or on Blender, for that matter), but I’ll do another one if I find time for it
And I don’t think a few examples of things created with curve mods are misplaced here, JPorter.
No problem, Caleb72. Blender is complex enough to allow for even advanced users to discover a neat little trick once in a while . In fact, I don’t think there is someone who knows every little detail of Blender, not even those who create(d) it!
I know wut you mean. I always make some killer model, or node effect, and im like, “Man , this would make an awesome tute! I think Ill make one!”
and now ive made lets see…0 tutorials.
Im too lazy too share my secrets…
BTW Much better with pix
Might be a bit late to post this, but like I said in the tut, you can use any kind of curve. You could use Béziers to come up with some weird variations and likewise you can make a curve of which just the ends bend and the rest is flat. Your imagination is your only limitation!
Check the attachment to see how sick a subdivided cube and a Bézier curve can get
thanks for that. this whole time i’ve been using deformed sections of circles whenever i wanted to make a curved shape. this looks much more convenient
Haha
There are many ways to do most things in Blender, though some are faster and a better. Most are a matter of personal preferance and/or requirement of the specific scene or model you’re creating, though.


 . In fact, I don’t think there is someone who knows every little detail of Blender, not even those who create(d) it!