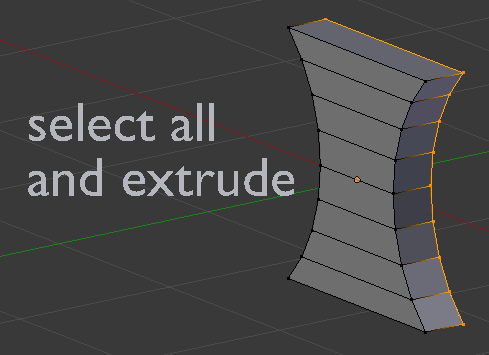
I would like to create a plane, that I can extrude a little for depth, but I want opposite edges of the plane to be curved (as depicted in the image).
I’ve tried playing with bezier curves and even trying that means 8 anchor points, somehow exactly aligning the corners (and turning them into sharp corners), somehow exactly centering the anchor points on each side, trial and error trying to make sure the handles are the precise length on each side, etc.
So, I’m thinking there’s probably an easier way. Right?
I would appreciate any tips, directions, or links to tutorials (I’ve tried but don’t even know what to search for
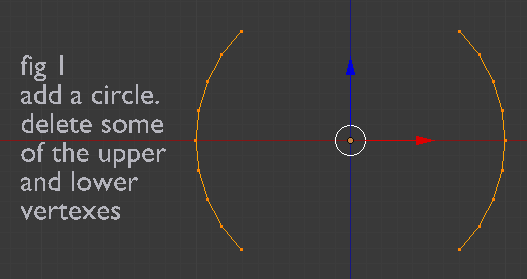
You’re looking for default Circle then…Hint. Or deal with 2 Bezier points set to Vector, Shift D duplicate them, scale x -1 if in top view and finish by select 2 points and F connect. To get points and handles flat, select and s y 0.
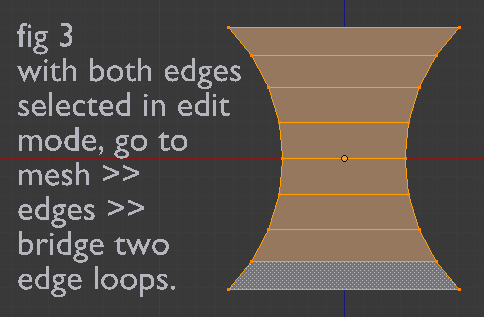
Added bonus - drop in Default grid and using proportional edit mode scale side middle vertexes in.
Well, I understood “default Circle” then the rest of the shorthand might as well be Greek It’ ll take some more experience on my part to understand what that all means. Thanks for chiming in though!
i know that was somehow short, however, as you pointed out, you have already played with blender and curves before…
Assuming you have seen Bezier curve at it’s best while in edit mode and taking into account that blending equals using keyboard a lot…
here comes transcript:
add Bezier curve, go edit mode with it, on Properties panel for curve click 2D button.
switch Top view (numpad 7), select all (A), delete.
3)Ctrl left mouse click anywhere you want (in 3dview window)
on T-panel click Vector button
on keyboard: e,y,3,Enter,e,x,3,Enter,e,y,-3,Enter
Shift select first point you added (should be on the left), press F.
Here you should see square. If not, something’s gone wrong.
7)Shift select 4 handles on the left and right side.
8) s, x; move mouse until you like the shape.
9)add slight bevel on curve properties panel, extrude a bit


 It’ ll take some more experience on my part to understand what that all means. Thanks for chiming in though!