Like there was in the internal’s Blend texture?
Just rotate the coordinates using the mapping node (in which it’s because of this that Cycles doesn’t need that extra option, compare that to BI where you couldn’t rotate the coordinates at all using the texture stack).
I have tried that, but I am (potentially) to stupid to handle the node. I UV unwrapped the plane (which shows a material gradient “set to ease” from left to right (x-axis)) and plugging the Texture mapping node in between the texture output and the mix shader factor input gives me control over the scale of the gradient, but the angle switches do not rotate the texture.
I have now flipped the object (but there are cases where that might not be possible). Would you be so kind as to paste a quick node setup? Or refer to a wiki page detailing this? Thank you.
Rotate 90 degrees around Z axis or flip coordinates via Separate RGB/Combine RGB nodes.
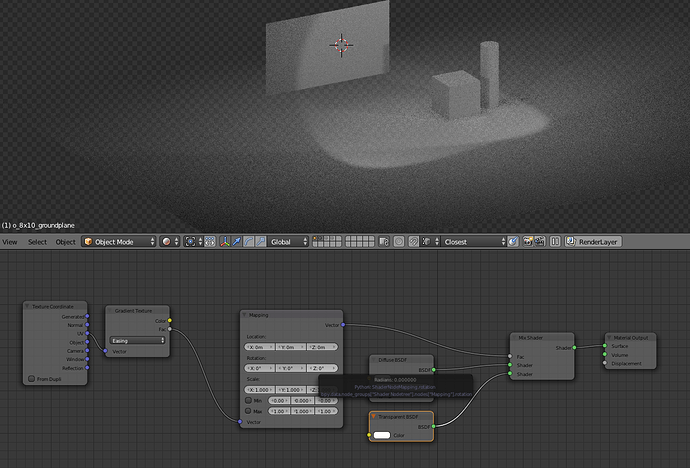
Please see here my node set-up. You will see that the ground plane has now horizontal, but that is because I rotated the object itself - not always possible if doing multiple materials per mesh. If I would now want to rotate the gradient from down/up to left/right, changing the texture mapping node 90 degrees in Z (or the respective 1.57xxx in radiant) does not change anything for me.
Setting the mapping of the UV coordinates between the co-ordinate node and the gradient texture node does only weird things and from another tut I believe is also not what we want.
Maybe the texture rotation only works in compositing (there I think I saw it once). Thank you again.
Nanana, first you need to change the coordinates from “UV” to “Generated”.
Then you need to connect it to the mapping first, followed by the Gradient Texture ![]()
I don’t get it… Why’d you put Mapping node after Gradient Texture?  It’s for coordinates. Plug it before. If anything, input/output color codes should’ve shown you something is wrong
It is somehow not quite ordinary, as it turns out.
- Use of Texture Coordinate node Genereated is mandatory in this case.
- 90 deg rotation comes with Location x=1 while for 270 deg rotation Location x=0 (using default plane).
eppo - you are my hero. Addressing the Q from Stan, yes, plugging the colours correctly was my initial approach, but as that gave no result at all, I tried it after that (knowing that I get weird results, e.g. the mix fading factor was messed up, but at least showed a somehow controllable gradient). Sometimes the metrics you plug from one node to the other has more or less dimensions or a different implementation, but sometimes you get the right result just by wildly trying :D.
@eppo: UV for me shows same result as generated (meaning ok, but maybe because I properly UV unmapped the plane). But interesting to know that you have to set the axis first and then the 90 degrees brings the thing round again.
thx again.
Then what would be the answer when someone wants to rotate a gradient that is mapped and following his own made UVmap? U could offcourse go back to the UVmap editor and rotate them there, but there must be a way to fix this using nodes.
