It’s definitely possible.
First, render your scene in Eevee with the compositor disabled and save it as an image.
Second, switch to Cycles. Here the flame will be separated in the compositor before applying the glare on it. It can be done in two ways: with an index pass or with Cryptomatte. I’m going to use the index pass because I find it more intuitive.
- Select your flame object and go to the Object Properties tab. In the Relations panel, there is a field named Pass Index. Set its value to a number other than zero.
- In the View Layer Properties tab, there is a check box named Object Index under the Passes panel. Check it.
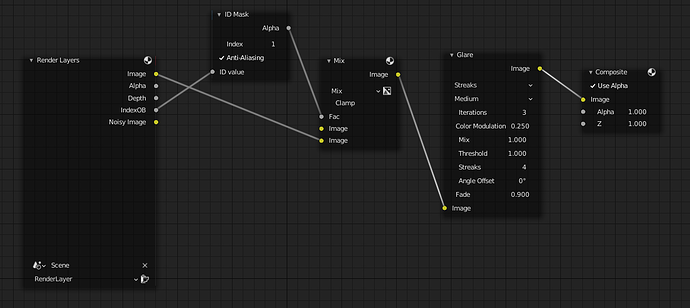
- Now go to the compositor and do the following node setup:
In the Color Mix node, the unconnected image socket is set to black (it can’t be seen here). In the Glare node, the Mix factor is set to 1 because only the processed image is needed (otherwise the flame will be too bright later). The rest of the parameters in this node are set to your liking. In the ID Mask node, the Index parameter must have the same value as the one you set in the Pass Index field (in the Object Properties tab). - Render the scene with the compositor enabled and save it as an image.
Now, create a new blend file. Go to the compositor, add the two images you have rendered and combine them with a Color Add node.
Edit: if you think about it, rendering the scene in Cycles makes rendering the same scene in Eevee pointless. For the Cycles version, I would replace the material of every object (except the flame of course) with a solid black diffuse shader to save on the render time.
