Darkening overlay

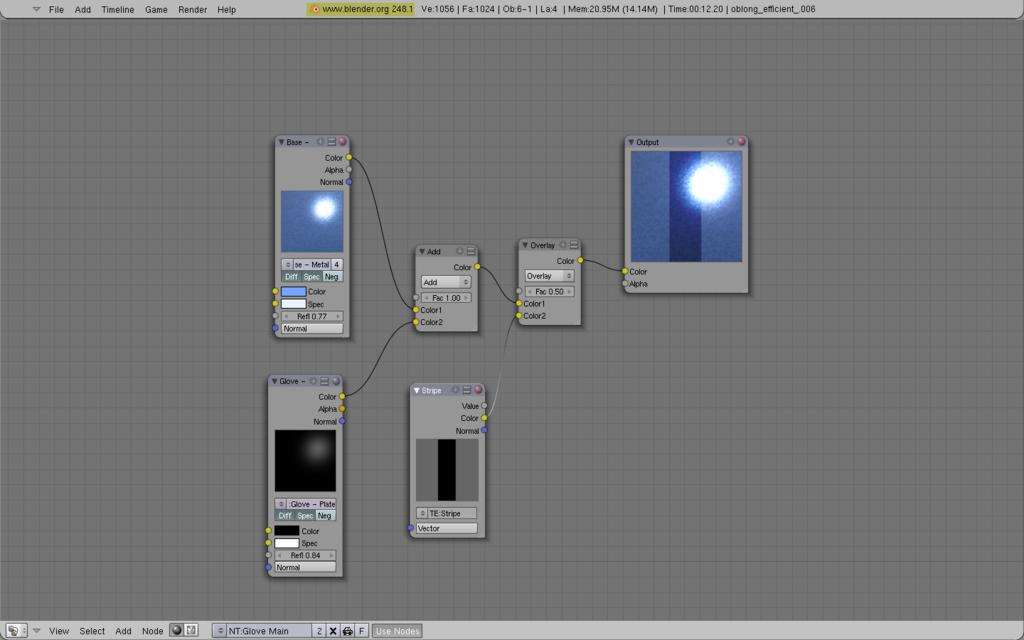
Quick summary, my current project uses a base metal material, and a decal material for fine details over that, blended with material nodes.

At the moment, I’m trying to add a part to one of the decal layers, to create a darker patch on the overall image.

My first simple thought, was to use a plain white block, select no rgb in the texture panel, and color it black. But somehow, it seems making it black causes it to disappear, rather than appear as a black block.

I tried again with a plain black image, same result, except, it never showed at all.

Just adjusting the color of the patch, even if I make it a darker color than the underlying metal, it still creates a spot which is lighter. I want to make a darker patch

I’ve tried fiddling with the Texture blending modes, can’t seem tog et it working.

Mix, lighten, value, difference and Add just display the white patch more or less as is, and it still vanishes when I make it dark.

Subtract, color, hue, saturation, divide and overlay, just make the patch vanish regardless, and doesn’t seem to affect the rest of the image

Multiply or darken makes the entire decal material invisible, so that only the base metal is shown. certainly not what I want.

Screen makes everything pure white, and washes out the entire image

Ok, nevermind the above, I’ve sorted that. But running into another related problem.

I had to split the darkening layer off onto another material, the problem is trying to mix it back into the main.

In the preview window for my darkening material, it shows a few seperate black blocks, with alpha in between. as intended

but when I use a mix node, to merge it with the main image, it comes out as a solid black block instead, darkening the whole thing instead of specific parts

http://i103.photobucket.com/albums/m143/WarKirby/layer_darkened.png

Example picture. The above you would logically expect to create a dark stripe down the centre of the output, but instead, it makes it all darker. Any idea why ?

After hours of poking at it and trying everything I can think of, I’m no closer to a solution. I really do need help this time. :frowning:

you might need to use the alpha information

it depends on how you choose to mix the colors (you have chosen mix)

but white will make it lighter, 50% grey will do nothing, and black will make it darker (this can be opposite depending on how you choose to mix them)

you might try using overlay for the second mix node

http://i103.photobucket.com/albums/m143/WarKirby/layer_darkened2.png

This is what happens if I use overlay. It’s somehow different, in that it seems to darken the base layer more than the white decal layer, but the problem is still the same. It darkens the whole thing, rather than a strip down the middle.

it is not actually transparent because you can see the specular highlight on it
therefore it is effecting the whole image rather than the strip

try changing your texture to have 50% grey instead of the transparency

You can see the specular highlight on the light decal layer too, and that one works just fine. Surely, if it wasn’t alpha, it wouldn’t have that checkered background? and if it’s not alpha, how can I make it so.

Yu misunderstand about my texture though. The texture I’m using, if you can even call it that, is literally just a plain black square. One color. that’s it.

It uses the Clip option in the texture params, and sizex of something like 3 or 4. there is no alpha information encoded in the image. This is also pretty much how I did the light decal layer, so the concept is sound.

I did try one with alpha though, to see if that was the problem, and it’s not.

post a .blend

the easiest way to get your Glove - Dark to show as a strip down the middle
is to use a texture to map it there

in your picture you are using a material node
this means that even what seems to be transparent, isn’t actually transparent

so create a new texture (you can do this in the UV/Image editor or 2d graphics program)
create a 50% grey image
then paint a strip down the middle as black

save this
then use this image to darken the section you want
if you use overlay - black will darken, white will lighten and grey will remain the same

OR

you could check if the Glove - Dark material has the alpha turned down to 0 in the materials tab

but not knowing exactly how you set things up - I can’t be sure

http://www.magotek-industries.com/Files/glove_dark_problem.blend

here’s my blend file. The problem material is Glove - Dark, which is a node in glove - Main

OK here is a screen shot of what I mean
the file you sent through doesn’t have the clipped edges for the glove plate though
so I can’t see how you have done that
but any way -
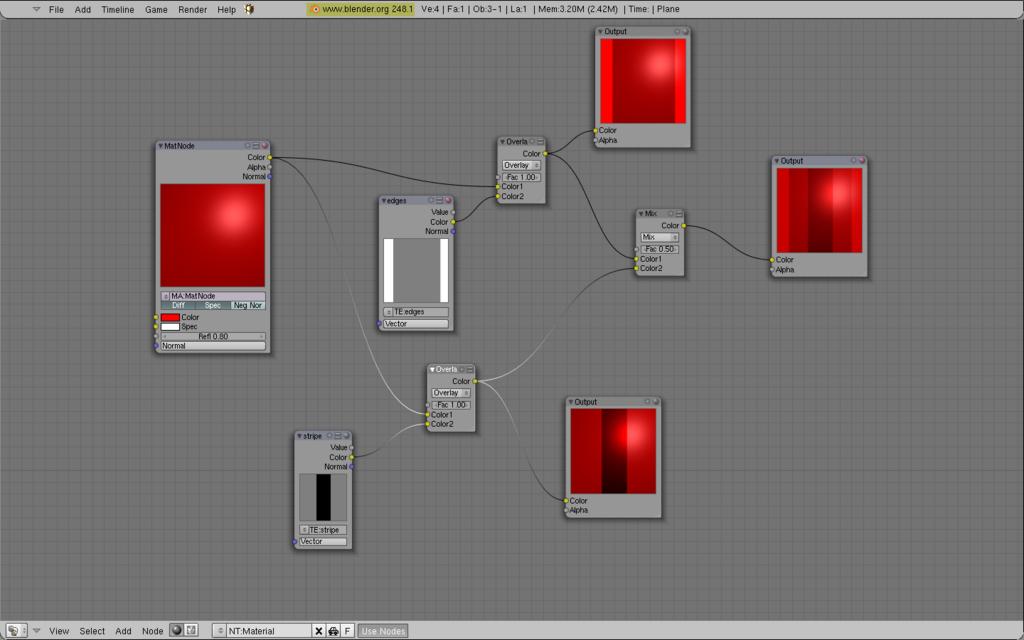
her is a screen shot and the strip texture

notice I am using a texture node, not a material node

one more thing - the effect you are trying to achieve doesn’t have to be done by using nodes
you may have noticed that using nodes has increased the render times
(as well as the amount of ray traced lights you have in your scene)

Attachments


Thank you, it’s working now, but this solution seems insufficient.

With Fac at 0.5, the darkening on the black strip isn’t dark enough for my needs here. So I thought I’d just increase Fac. But that makes the grey parts darker too, putting me right back where I started

And since you don’t get darker than black, I can’t just make that part of the texture darker.

Can you possibly explain why alpha worked for my light colored “Glove - Plate” layer, but not for the dark one ? I think getting the alpha to work is the only real solution here.

My bad,

I chose 60% grey by mistake

try this

And I don’t know why the alpha worked on the light glove because as I said the blend file you sent didn’t have that material working in it

did you use a texture to achieve the clipping for the light material?

Attachments


Hmm, I think I might have workd out why. The alpha wasn’t actually working at all with the light decal layer either. It’s just that I was using Add blending mode, which apparently seems to only work with lighter colors, and black is fully transparent. Hence, the dark background was getting hidden there, when I tried to do it with a dark patch, my patch was hidden too.

So, simple question. HOW do I make alpha work properly, when layering material nodes. I just want to stick textures on top of each other, and have 100% alpha parts show through to the underneath. Why is this so complex?

tears hair out

Is it something to do with the alpha output on a material node? I can’t really figure out what to do with that.

Even with the new image you put up there, they grey parts are still darkening the whole (with overlay mix mode in the node editor.)

If I try changing the mix mode in the texture’s Map To panel to overlay too, it just causes it to darken the whole image by the amount of the black stripe, which is worse.

I also tried changing the shade of grey in photoshop just a little. just in case 808080 would do it (you had it at 7f7f7f) No luck though.

Woohoo, I seem to have figured it out, kind of by accident, but it’s working, to some degree at least

On a whim, I tried putting the alpha output into the Fac of a mix node. I also abandoned the grey background idea, and went back to my clipped black square method.

http://i103.photobucket.com/albums/m143/WarKirby/sucess.png

Now, when I adjust the Fac on that last Overlay mix node, only the stripe changes tone. The background is left entirely untouched, yay.

It’s not entirely perfect, even with Fac at 1, there’s a limit on how dark it can go that isn’t black, but it should be sufficient, and hopefully a step in the right direction.

i left one of the inputs empty, and it seems to default to 50% grey, so maybe that’s why this works ?

Mix node, lower material “Colour” to “Colour 1”, upper material “Colour” to “Colour 2” and “Alpha” to “Fac”. See attachment.

If you don’t have a basic understanding of blending and compositing I suggest you read up on them (I presume the Blender wiki should cover this stuff) and experiment with them in an image editor to familiarise yourself with them.

Attachments


Thank you surt. That’s the answer I’ve been looking for all along, and it’s perfect.

I seem to be learning as I go along about the various blending modes. So far, I can honestly say I understand Add, Subtract, Mix, and overlay. Also just today I’ve learned that the order of blending them is important too.

Learn something new every day :smiley:

But for now, I’m finally capable of making some progress, so back to work, and I probably won’t respond to this thread anymore. Thanks greatly to you both.

here is yet another set up to achieve what you are after

but I see you figured out how to use the alpha information

Attachments