Hi guys,
Building a 3D parametric shoe sole model and can’t find a way to set the location for the start of the toe spring. Despite scripting a start of the spring at 10% of the surface length, the spring starts somewhere in the middle of the surface somehow. Some script snippets of interest:
# Define params for different areas
sole_length = 24 / 100  # Length in meters (converted from cm)
toe_spring_angle_rad = -8 * (math.pi / 180)  # Convert degrees to radians
toes_perc = 0.16 # percentage top area
forefoot_perc = 0.39 # percentage second area
midfoot_perc = 0.3 # percentage 3rd area
heel_perc = 0.15 # percentage bottom area
def calculate_z(x):
    # Define the start of the spring at 10% of the sole length from the front
    spring_start_x = sole_length * 0.1

    # Calculate the relative position for `x` beyond the spring start
    if x <= (sole_length - spring_start_x):
        # Calculate the reverse progression from back to front starting from the spring start
        progression = ((sole_length - spring_start_x) - x) / (sole_length - spring_start_x)

        # Ensure the elevation increases towards the front
        z = math.tan(toe_spring_angle_rad) * (1 - progression) * (sole_length - spring_start_x)
        return z
    else:
        # Return 0 for the initial 10% of the sole length to keep it flat
        return 0
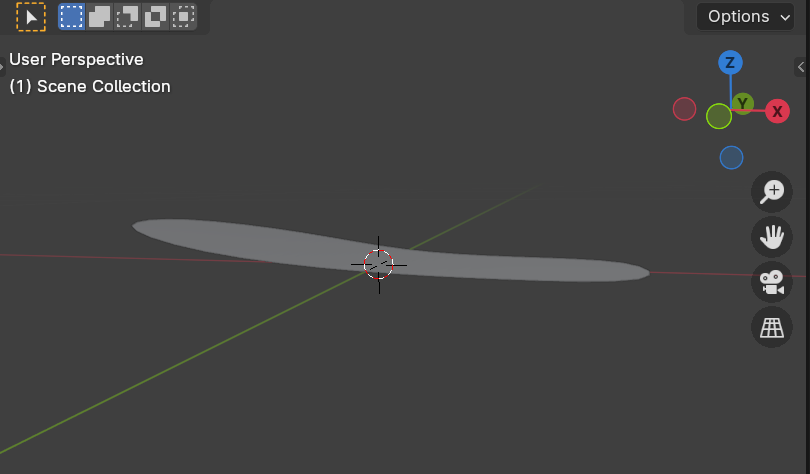
See how the spring starts nowhere near the 10% mark - which should be in the toe area:
It looks to be in the middle of the object, and if your goal is to start a rise 10% of the way into your object then I believe you would need to ensure that the object’s origin is at one end or the other.
I’m just eyeballing it, but it looks like it could start at around the 40 or 60% mark, which would be 10% off a central origin point.
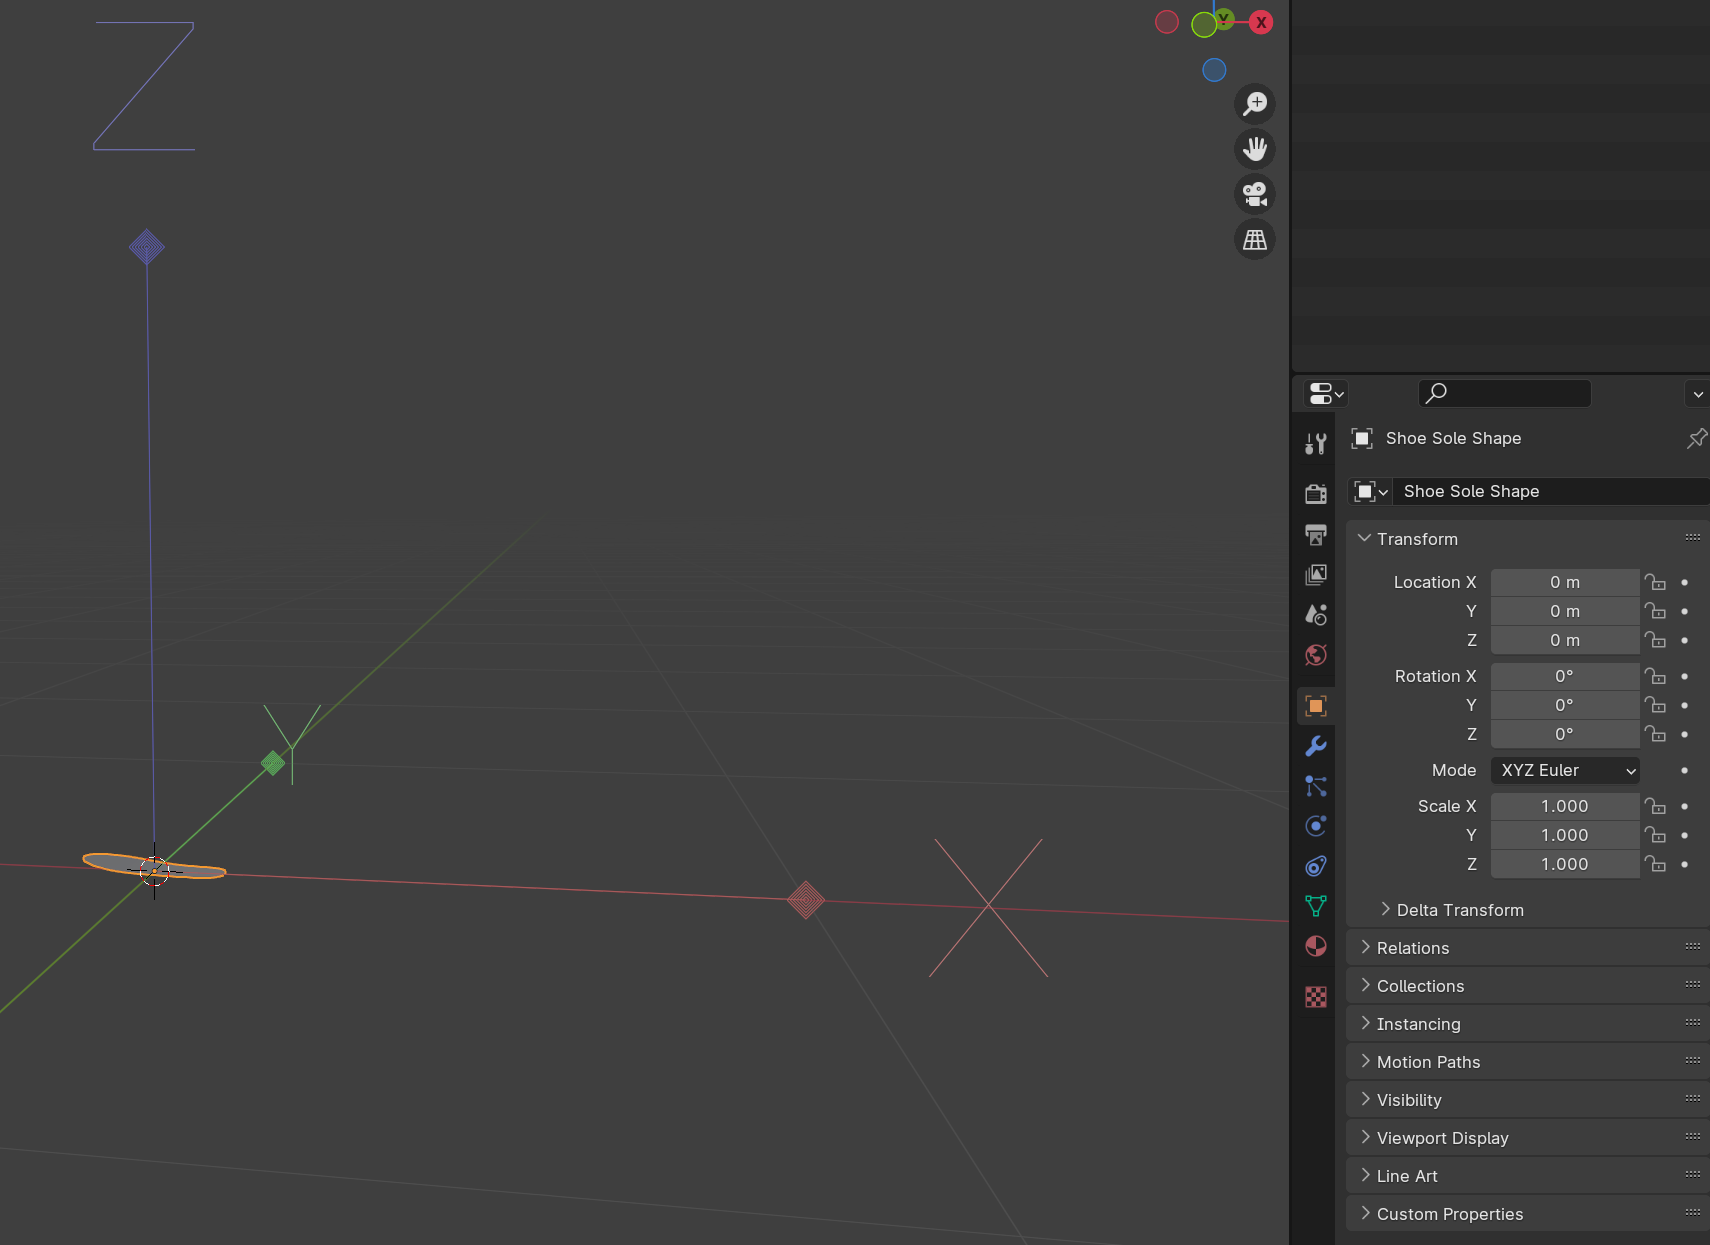
Click on the ‘Options’ box shown in the top right of your screenshot, select ‘Transform Affect Only Origins’, and you can then use the standard transform controls to move the object origin point to wherever you need it to be.
Apologies if I’m way off, but a misaligned origin was the first thing I thought of when I saw your screenshot.
It would replace the first suggestion, though either of them work, it’s just that Snapping will be slightly more accurate. (though a little more confusing, potentially)
It’s tough for me to tell exactly what is happening in the last pic you posted:
It looks like the 3D cursor is sitting in empty space just past the toe of the shoe, and the object origin is not shown. This could mean that you haven’t snapped the origin to the cursor yet, or that you’ve already snapped it and then turned off ‘Transform Affect Only Origins’
So, if the 3D Cursor is where you want your object origin to be, you could (first make sure that ‘Transform Affect Only Origins’ is switched on) just snap ‘Selection to Cursor’ and it will move the object origin point to the 3D cursor location.
For clarity’s sake:
the 3D cursor is the small red and white circle sitting just past the toe of the shoe in the last shot, and it will always show in the viewport by default
the object origin is the XYZ gizmo with squares on the end, and it will only be visible when you have ‘Options > Transform Affect Only Origins’ turned on
I think you’re already most of the way there, this is one of those issues that can be harder to explain than it is to fix.
Sorry to jump in and hopefully you already have a resolution but I think I would start by verifying:
Length is generally a reference to a magnitude where as x is generally a reference to a specific point in space.
If the sole is 20 cm then it doesn’t mattter if the sole’s starting position was at x=0 or at x=-1 or at x=pi.
However when saying x <= (sole_length - spring_start_x) you seem to be referencing a position in space not a position from the start of the sole.
It is possible the x you are passing into your function already converts from a screen space to a local based specifically on a reference to the toe or heel end point being 0 but that is not shown in your example.
Got it, I’ve learned a new thing.
However, no matter where I place the origin point, it is not read as the object’s reference point in the script. As suggested by @nezumi.blend this origin point seems to be referencing a coordinate in the XYZ “space” rather than in the object which may be why my function does not produce the intended effect.
I’m sure it is not a hard fix but I’m new to Blender so I’m not sure which instruction I should script to Blender.
Ah, I was afraid that might happen, I admit I hadn’t considered that until nezumi responded to your post.
Maybe this won’t help, but if the issue is that you need a location in world space, and the 3D cursor is already in the location that you want, you could try:
x = bpy.context.scene.cursor.location[0]

if x <= (sole_length - spring_start_x):
This will set your x value to the X value of the 3D cursor location, and might give you what you’re after.
I’m also wondering if there is maybe an issue with your object being in the center of the scene.
If you’re looking to deal with locations in world space, it’s probably easier if your object starts at 0, and ends at 0.24. (Assuming that the sole is 24cm)
If your object is in the middle of the scene then it will start at -0.12 and end at 0.12, which might make your math a bit trickier. (Unless I’m totally mixed up)
sole_length and spring_start_x are both just numbers with no tying point to the objects location or min max bounds. My assumption is that the x value passed to the function is from a vertex coordinate but that is an assumption.
For some context (@SpectralVectors) and as a reply to Nezumi, the x value is generated within a loop that iterates to create vertices for the sole mesh:
for i in range(5):  # 5 sections along the length of the sole
    x = i / 4 * sole_length - sole_length / 2
And the z value returned by calculate_z(x) sets the height of each vertex, creating the spring effect which is supposed to be at the toe area of the sole:
z = calculate_z(x)
bm.verts.new((x, y * y_width / 2, z))
Thing is, I will also need a little spring effect in the heel area too. That’s why I have created specific areas so I can focus on each and define the exact spring_start location easily as a percent of that area.
It’s been a long time since I looked at bmesh and I’m old so my memory isn’t what it used to be but it looks like you are trying to create the whole mesh in one go instead of updating an existing mesh.
“IF” that is the case using bounding box won’t help because the vertices and object don’t exist yet.
That being said it’s ok and you still have several options to solve your initial query.
if you notice when you calculate x in your for loop you subtract 1/2 the sole_length which means your 1st value of x is the absolute minimum (without crazy functions driving a negative value).
In your original post however: spring_start_x = sole_length * 0.1
does not subtract 1/2 the sole_length so it is shifted.
you will need to do similar with the y-axis.
My assumption is that you will be starting with essentially a curled plane of 0 thickness so you shouldn’t need to find your midpoint for Z only calculate where you want it to end from a reference of (0,0,0).
Again it’s been a long time since I tried bmesh but if I recall it creates centered on world origin unless explicitly told not to. As such you should be able to calculate the offsets for local space easily.
So let me try to understand. I need to adjust both the x and y calculations to consistently apply offsets, so that they are correctly positioned relative to the (0,0,0) origin point? This is to create a mesh that starts with a “curled” plane of zero thickness?
If Y can be purely defined as a function of x ie: y=sin(x)
you don’t need a reference to the y-min or max.
If you later need to say make a slope for the arch of a foot you will need to know not only that the peak Z is (inner most) but where that curve should stop along the y-axis so that the outer most section (along the entire little toe line flattens out) not just the very edge. (Hopefully that makes sense )
I’m not going to be able to pull this off. I usually use python for simple backend functions, python for Blender is too different.
Quite sad to be stuck because of a dumb positioning issue.
Anyone willing to review / fix my script? I’ll pay for the hour spent.