I tried asking this in the “basics” forum but didn’t even get a single thread view other than my own in two days, so maybe I’ll have better luck here :).
I’m trying to make a low LOD version of my object. I haven’t found the decimate or poly reducer scripts to do a satisfactory job, but I can easily delete some edge loops by hand to get what I want.
But my problem is that if i use ‘x’ ‘Erase Edge Loop’, it leaves holes in my carefully made UV mapping! I googled around and found a reference to a very old (2002) remvrtloop03.py script to deal with this problem, but the link is no longer valid, and the script doesn’t seem to exist in the default 2.49 mesh scripts menu.
What is the best way to accomplish this? Ideally I’d like something that can delete multiple edge loops all at once, while preserving the UVs.
10,000 people may have looked at your thread and you would never know. The forum view count hasn’t worked forever with no hope of it ever getting fixed.
The only sure way to reduce polygons the way you want is to do it the hard way, delete edge loops and fix any UV changes manually. Or preferably don’t have the high poly mesh to begin with. So rather than waiting two days looking for an answer you could have probably sorted it out by now.
Thanks for the reply Richard. I didn’t know the view count was broken.
Anyway that is possible, but will multiply my work to get the low poly version by a factor of 20 if I have to manually redo all my UV mappings :(. Seems like there should be some automated way to accomplish it!
If anyone knows where to get that remvrtloop03 script, I’d be happy to know of it. I’ve done a ton of googling to find anything similar, but have come up dry so far.
Hi Jörzi! And thank you for trying to help me; I appreciate this very much.
Yes, I’m using 2.49, but when I use “x Delete edge loop” it leaves holes in my UV mapping. If it would just leave the UV’s alone for verts that weren’t involved in the edge loop I deleted, I think everything would be OK, but that’s not what happens.
I have to step out now but later on I’ll try to post a screen grab of what I mean.
Unfortunately this problem is stopping me from making good low-LOD versions of my models :(.
EDIT by “delete vertloop tool”, did you mean the “x Delete edge loop” menu? If not, then maybe you’re onto something that I haven’t found yet that would solve my problem (hopeful…)
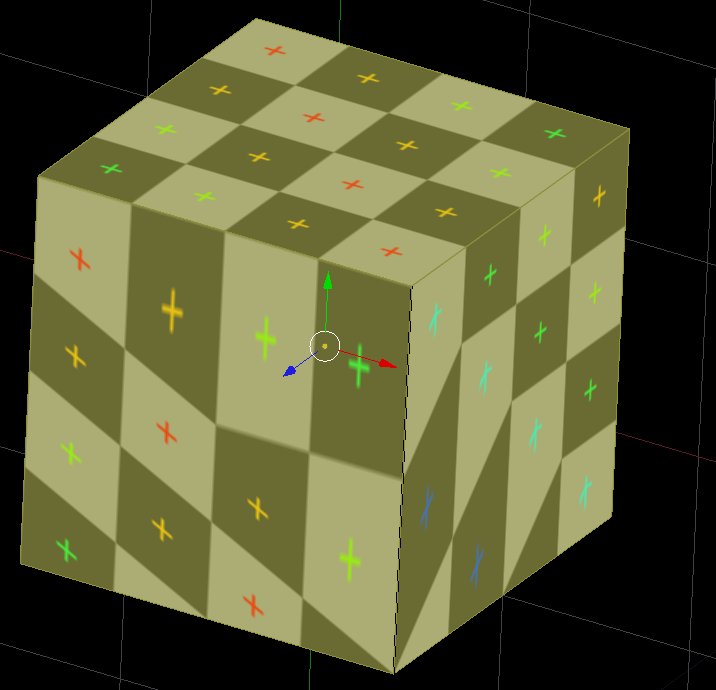
OK here is the simplest example I could make. I used the default cube, and used Ctrl-R loop subdivide to add one edge loop. I mapped the cube to a UV test image, and everything looks fine at this point (ss01.jpeg).
Then, I selected the edge loop and deleted it with “x Erase edge loop”. Now it looks like ss02.jpeg.
My actual case is a more complicated model and the symptoms are a little different, but I think it’s the same problem. In both cases I just want the UV’s for verts I haven’t touched to remain the same as they were before, but something weird happens and the UV mappings become mangled.
So my question is how to delete an edge loop without that happening. Otherwise I’m in for many, many hours of manually re-doing my UV mappings!
I think that, if the UV’s for the vertices you delete are completely enclosed inside the boundaries of a UV island, the UV’s will be maintained. But, if you delete a vertex on the border of a UV island, Blender (or any other 3D app), not being able to read your mind to determine how to associate the “old” U,V to X,Y coordinates (UV seams have 2 UV coordinates for 1 mesh vertex), the UV’s get hosed.
I say I “think” because I don’t run into this problem. I get the mesh approved and signed off by the client prior to UV mapping (even if the “client” is myself). After that, the mesh is “carved in stone” and I never go back without the conceding to a total re-do of the UV mapping.
My mesh is OK except that I’m trying to make a low-LOD version of the model. The results I get with the decimate and similar tools are not very encouraging, so I was just going to make it by hand by removing some edge loops. Geometrically, that does exactly what I want! I thought I could see a path to where I wanted to go, but then I ran into this UV issue…
It seems to me like there should be a way to do this in an automated manner. All I really want is for the U/Vs in places I don’t touch to remain the same. For example, let’s say I make a 1x1x1 cube. Think about one face of that cube, where the U coordinate is spanning the range 0 to 1.
Now I add an edge loop. Everything is OK, because the new verts just pick up interpolated UVs according to their physical position, so along one dimension of my object, I now have three U coordinates: 0.0, 0.5, and 1.0. The 0.5 in the middle came from the edge loop I just added. The 0 and 1 were there before.
All I want to happen when I remove that edge loop is to be left with U coordinates of 0.0 and 1.0 again. I’m removing the vertex that goes with the 0.5 coordinate, but I want the other two to just remain untouched. They were 0.0 and 1.0 before, so I just want them to be left alone.