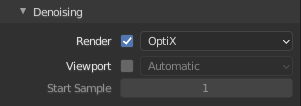
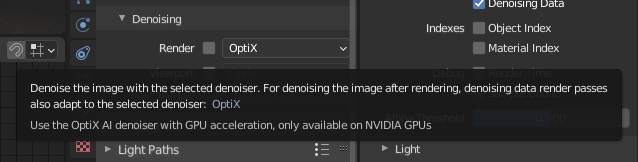
Under the Render tab->Sampling->Denoising I can select what type of denoising to use for the render and viewport. In the tooltip it says whatever setting I select here, e.g. Optix, will also be used in the render passes which I assume is used with the denoise node under the compositor?
Denoiser setting
In the denoise setting do I have to tick the Render box for the type of denoise to be active or is selecting a denoiser from the dropdown enough?
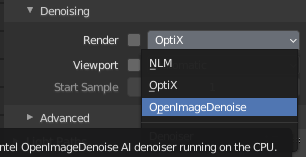
Selecting a denoiser to use without having ticked the Render check box
What’s the difference between using either the denoiser render setting or the denoiser node? I understand using the node denoises the image at the end as a seperate pass but how does this compare to just using the render setting and when would you use one over the other?
What happens if I have the denoise setting turned on AND I also use the denoiser node?
the node one is more faster accordingly, because it denoises the entire image rather than tile per tile when directly rendering…also the node one tends to give better results (less splotches for example)…
I check the box in the render settings and then use the Denoise node to break down each render pass and denoise them individually. Results in a much cleaner image since it has more information to work with rather than trying to denoise each pass together, which is what would happen if you didn’t use the node.
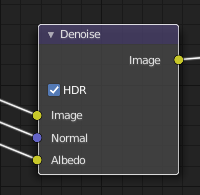
You have to check the box under Cycles > Sampling > Denoising > Render. The Denoise node can only be used if you have compositing turned on and you could also use it for Eevee. I wanted to know the same thing so thanks for posting the question. You can select which denoiser to use under Render Properties but the node can process HDR images and also use Normal and Albedo information to help with the denoising.
Using OIDN from properties panel has only two advantages. Quick and easy setup, and since you are supposed to use small tiles in rendering, it uses less RAM. If you don’t have enough RAM and you render very big resolution images, you can easily run into RAM problems using Denoise node.
Thanks all. So it sounds like it most cases the node is the better method to use, assuming no RAM issues.
So just to confirm a couple of points?
If I want to use the denoising node I still have to tick the render denoise checkbox under settings for it to work? I thought just enabling the denoising data pass would be enough?
So if I enable the render denoise checkbox AND use the denoise node the node takes preference and it will only deniose at the end and not per-tile and end up denoising twice?
One further question. Setting aside the technical differences and when you can use one over the other what are people’s opinions on the quality differences between Optix and the OpenImageDenoise options? Does one give better results over the other?
Thanks for posting that moonboots, it was a very interesting video.
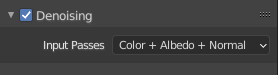
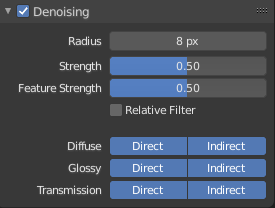
I’ve just watched the whole video and as you say he states you need to TURN OFF the render check box when using the node otherwise it will denoise twice. However towards the end of the video he show’s that the denoiser settings (color + albedo + normal) at the bottom of the view layers tab only appear if you TURN ON the render check box so how are you supposed to select these settings if the render check box is turned off? Unless these settings are only used for per-tile denoising and not compositing denoising but why put the settings in the view layers tab and not in render properties if that’s the case?
A couple of interesting points.
Optix and OpenImage are both miles ahead of NLM when using lower samples and will give better results. However he said given enough samples NLM will give better results over the other two by keeping more details. I was ready to write off NLM and just use Optix but i’ll need to run some tests now after reading that.
He said NLM isn’t available when using the compositor yet it appears to be an option I can select so i’m not sure what he means there.
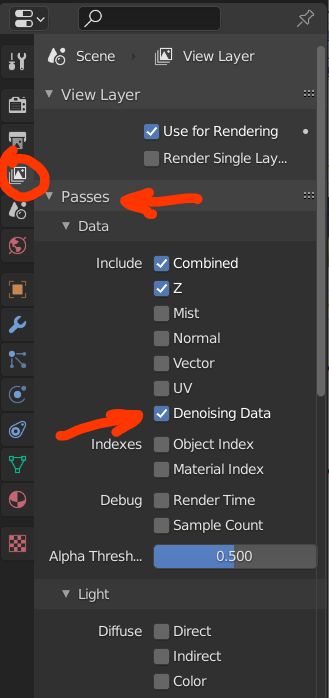
if you go in the Layer View panel and turn on Denoising Data, it will display the the Render Layers node denoising ouputs, you don’t have to turn on the Render > Denoising option
I don’t see these options under the layer view panel unless I turn on the render denoising option. The denoising data option makes no difference to the visibility of these options.
I think that the denoise node is using Intel’s denoiser while the denoise render settting lets you choose Optix along with couple others which gives better results in some instances.
ok I hope someone will answer to our various questions but if you don’t need to enable the Render Denoising options to make the Compositor work, it doesn’t make sense to select a mode in the dropdown menu, while the option is deactivated
actually you could simply test the different solutions, the denoisers are quite different so you’ll easily see how it works
I’ve noticed that clicking denoising data render pass “turns on” the denoising render dropdown box. By this I mean the text is faded out/grey when turned off and then turns white once denoising data is enabled. This is with the render button turned off.
You need to turn off the Render Denoising option if you want to denoise through the Compositor (if you don’t, the 2 denoising may accumulate)
The option you choose in the Render Denoising dropdown menu (whether it is off or not) won’t be taken into account in the Compositor, Compositor will use Open Image Denoise
I’m also not seeing any difference when selecting different denoiser options in the dropdown when using the node.
The release notes for Blender 2.81 also says this -
A new Denoise node was added in the compositor, to denoise renders using OpenImageDenoise. It needs Albedo and Normal passes, which Cycles can render by enabling Denoising Data passes.
So unless anything has changed since 2.81 it does appear to just use OpenImage. It doesn’t however explain the denoising data tooltip which seems to suggest it should adapt to whichever denoiser is selected.
For denoising the image after rendering, denoising data render passes also adapt to the selected denoiser