Hey everyone!
While I often got help in this forum by just reading through other threads, today might be the time for me to ask my first question => sorry if it is in the wrong category or anything like that ![]() .
.
The question
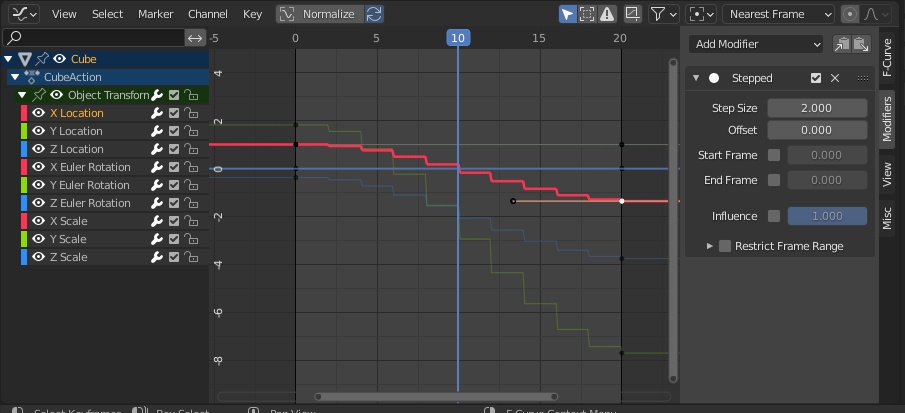
Is it possible to have different frame rates in the keyframe interpolation per object? I.e., can I have the overall scene be 24 FPS (“on ones”) while the position keyframes for, e.g., the default cube (![]() ) get interpolated with 12 FPS (“on twos”)?
) get interpolated with 12 FPS (“on twos”)?
Possible, but non-optimal solutions I’ve considered
-
Animate everything with a keyframe interpolation “on ones” (24 FPS), and then, once I’ve finished the animation, manually add keyframes with constant interpolation on twos for the cube’s position. Converting it afterward has some obvious limitations, like the inability to preview the result and not a lot of flexibility (the “rasterization” of the frames, for lack of a better term, can only be undone immediately afterward re-adding frames is tedious. Even if I built a script converting those frames, I would still lose a lot of creative options by having this destructive process)
-
Animate everything “on ones”, then render different frame rates in separate passes and use something like After Effects’ “Posterize Time” effect to get the “cube pass” to the correct frame rate. Doing it in compositing comes with the same disadvantages as (1.) with an advantage of being non-destructive. Still, it requires a re-render of two passes + importing into After Effects, etc., for a preview.
Is there any better way to achieve the desired result?
I really appreciate any help you can provide (even if I, as expected, get the answer that there’s currently no better way of doing it).
Pablo