Hello, i have been new to Blender for 2 weeks and now, i guess, to this forum… Hi
Although i’m not new to 3D/CG, i’m having quite some trouble with creating a lightbulb i’m currently having as my first Blender-project.
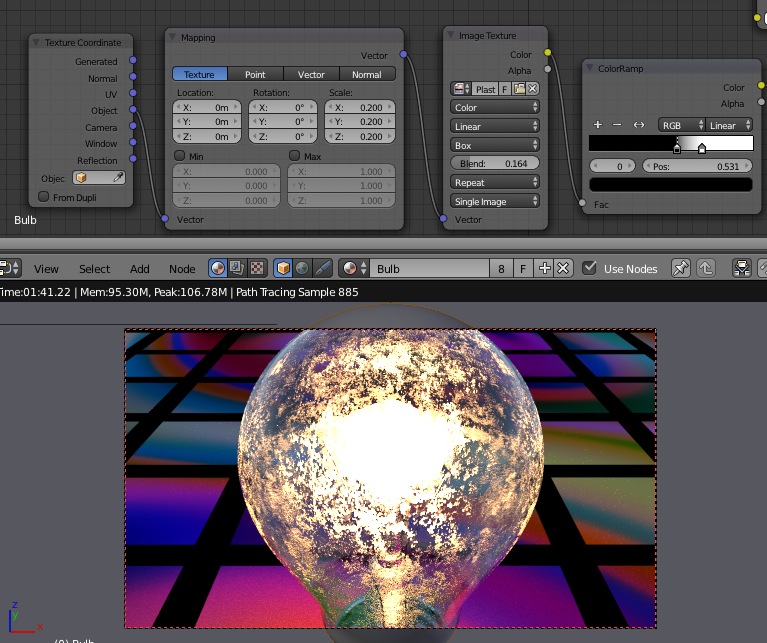
Now the modeling is finished, and the materials have been assigned to their respective parts of the model, i’m trying to create the glass-material. And it has to be a bit smudgy/dirty.
I’m doing this through the node-editor as seen through Andrew Price’s video tutorials from 2012(great tut’s).
The problem is just that Blender has had a LOT of progress since then… so much that that method doesn’t work anymore somehow.
And now i’m just stuck for 2 whole days and Google nor any page doesn’t have a clear answer to this.
So, how to apply a smudge/dirt texture to a glass?
This is only if you’re using cycles (as for blender internal, you can just use the same method you’d in other 3d packages):
First, you need to know how does your dirt interact with the light… if it’s diffuse, translucent, reflective, etc.! You need to have shaders for this types of light interaction.
Then you use Grayscale images as masks to mix between your glass and your ‘dirty’ shaders (you can have more than one!)
Why yes, i forgot to mention i’m using the Cycles rendering engine.
It just seems to click to go with the most ‘fancies’ as diving into a new application.
Until now i have tried to replace my dirt-texture with a build-in procedural one, and that seems to work immediately.
Doubt that. The core work flow of applying textures is more or less unchanged since Cycles’ very beginnings.
The problem in your setup is that Cycles defaults to UV mapping for textures: If you don’t explicitly tell Blender differently via the Texture Coordinate node, it will always and only use the meshes’ UV coordinates.
But since your light bulb mesh is not UV unwrapped, Blender doesn’t know how to apply the image and therefore just does nothing. So, either UV unwrap the bulb or tell Blender to use another projection method (e. g. “generated” or “object” coordinates).
I guess the procedural textures work even without valid coordinates because of their “volumetric” (3 dimensional) nature.
BTW, you did not pack the textures into the .blend file (File > External > Pack All Into .Blend) - which is a bit unfortunate if you want us to help you with a texturing issue…
By the way, I’m using the “seamless” texture from cgtextures (at the link you provided). If it isn’t seamless, you’ll have trouble shrinking down the image size…
So much thanks for the info guys
And i should say sorry, because last night i left a post right here about telling that i had solved the UV unwrap problem.
But i think it didn’t come through for some reason.
Yeah i was just assuming that it simply had “more progressed”, but probably not so much in this sense indeed.
I’m still thinking in “3DsMax-terms” which i’m constantly telling myself to stop with because in that program you’ll see at least A result on the moment of applying a texture (also, until now Blender seems so fantastically more straight forward to use. But 3DsMax has it’s reasons not to be). But i guess that’s either not fitting in with Blender’s workflow, or it’s just not a thing we’re going to see any time soon.
But yeah i figured the standard shaders are generated in 3 dimensions, such that Blender recognizes the coordinate system, wraps it around the object, and shows it right of the bat. Unlike textures based off of photo’s.
Oh thanks for the tip. That “pack All Into .blend” sure is handy.
I didn’t include the texture itself, which was kind of a meh-moment from me.
I shall look for a different texture though, seamless would be nice of course.
I just wanted to get the hang of the method first before picking a final texture. Just like the floor, which is kind of groovy and all that.
So much thanks for the info guys
And i should say sorry, because last night as well as today i tried to leave a post right here about telling that i had solved the UV unwrap problem.
But i think it didn’t come through for some reason.
Yeah i was just assuming that it simply had “more progressed”, but probably not so much in this sense indeed.
I’m still thinking in “3DsMax-terms” which i’m constantly telling myself to stop with because in that program you’ll see at least A result on the moment of applying a texture (also, until now Blender seems so fantastically more straight forward to use. But 3DsMax has it’s reasons not to be). But i guess that’s either not fitting in with Blender’s workflow, or it’s just not a thing we’re going to see any time soon.
But yeah i figured the standard shaders are generated in 3 dimensions, such that Blender recognizes the coordinate system, wraps it around the object, and shows it right of the bat. Unlike textures based off of photo’s.
Oh thanks for the tip. That “pack All Into .blend” sure is handy.
I didn’t include the texture itself, which was kind of a meh-moment from me.
I shall look for a different texture though, seamless would be nice of course.
I just wanted to get the hang of the method first before picking a final texture. Just like the floor, which is kind of groovy and all that.
So much thanks for the info guys
And i should say sorry, because i had left a post right last night about telling that i had solved the UV unwrap problem.
But i think it didn’t come through for some reason. Maybe a URL restriction because of my <10 posts.
So here it is again without URL’s:
Yeah i was just assuming that it simply had “more progressed”, but probably not so much in this sense indeed.
I’m still thinking in “3DsMax-terms” which i’m constantly telling myself to stop with because in that program you’ll see at least A result on the moment of applying a texture (also, until now Blender seems so fantastically more straight forward to use. But 3DsMax has it’s reasons not to be). But i guess that’s either not fitting in with Blender’s workflow, or it’s just not a thing we’re going to see any time soon.
But yeah i figured the standard shaders are generated in 3 dimensions, such that Blender recognizes the coordinate system, wraps it around the object, and shows it right of the bat. Unlike textures based off of photo’s.
Oh thanks for the tip. That “pack All Into .blend” sure is handy.
I didn’t include the texture itself, which was kind of a meh-moment of me.
I shall look for a different texture though, seamless would be nice of course.
I just wanted to get the hang of the method first before picking a final texture. Just like the floor, which is kind of groovy and all that.