So have a cube, and I want the four vertical edges rounded heavily. If I apply subdivisions and then use the “smooth” subsurf, the smoothing is too jagged and ugly.
But if I apply lots more subdivisions and smooth, the smoothing is only applied the last few subdivisions. So the corners are barely rounded.
How can I get a smooth curve along these highlighted faces? Preferably one that can be mirrored exactly on the other 3 corners?
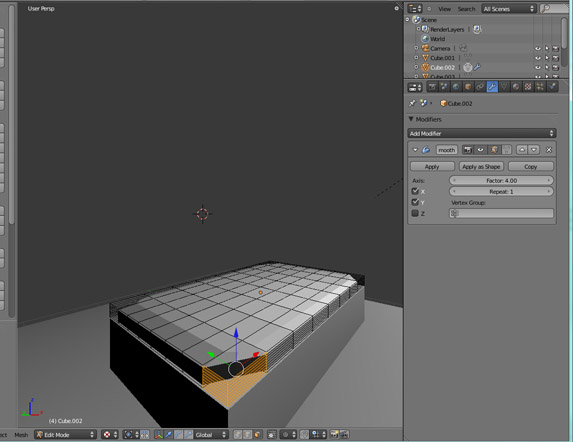
I’ve attached a file using a mirror and subsurf modifier. I’m using a single edge loop to control the curvature. The smoothing is done by the subsurf modifier, and the mirror modifier is copying one corner to all the others.
ah ok, I see what I needed to do… I was thinking of subsurf was a term used to describe those modifiers like smooth. But now I see it’s a type of modifier, and it does exactly what I want.
Is there a way to constrain it only to X and Y axis, no Z axis? Also, say the cube is exactly the size I want. When I add the modifier, the smoothing seems to shrink the cube a tiny bit. Is there a way to keep everything except the four corners exactly as it is now, no size change?
The subsurf is applied to the whole object but you can adjust the effect by adding a crease value to an edge. Select an edge and in the Properties panel (N) adjust the crease value in the Transform settings (in edit mode)
The manual entry for Subsurf modifier: http://wiki.blender.org/index.php/Doc:Manual/Modifiers/Mesh/Subsurf
Richard to the rescue again ^^ I should be paying you weekly.
Maybe you can answer one more noob question (or should I start a thread?)
Going absolutely batsh*t insane trying to figure how to just texture this rounded slab shape with an image (or anything, really).
I highlighted the cube, went to the texture section of the properties page, added a new texture, chose the type as image, selected it from my drive… it shows in the preview on the right pane… but it doesn’t show in the 3D view and it doesn’t render. I am set to view textured rather than wireframe/solid. I changed every setting I could under mapping and image mapping in the properties page. Nothing.
Opening a second window and going to the UV view, I tried uv unwrapping my object. I made seams (probably incorrectly) and selected unwrap. There’s nothing showing in the uv view still. I tried the other unwrap options like “cube projection” with no luck. I tried opening an image in the UV view with Image -> open -> highlighting my image -> choosing open. No image is showing in that view. So… no image, no 3D faces… nothing in that window.
The only thing I seem to have accomplished is my object now previews as all white in edit mode (the image is not white).
I have spent 2 hours trying to figure this out on my own and am finally giving up and asking. What am I missing here?
CreeDorofl - you are not alone. I’m also a noob to Blender and I find the task of getting an image mapped to some faces to be ridiculously confusing compared to modeling the object in the first place, and I usually only manage after hours of random messing with various buttons.
I loaded up your .blend and was able to get an image mapped in 2.49 by doing the following:
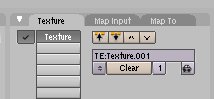
In the texture page, you have to enable that texture. I attached a little screenshot so you can see where it is, the checkbox just to the left there. It was disabled when I loaded your blend.
I had to select your mesh and use U key followed by “Unwrap (smart projections)”.
Open the UV editor, and select the image you want. Why that’s necessary in addition to selecting the image in at two other areas of the UI, I have no idea, but it seems to be.
After those things, I was able to see my image mapped to your mesh.
Hope that helps - and IMHO this is a really confusing part of Blender. I get along nicely with the geometry editing tools, but not so well with texture mapping
flips out AGHHHHHHH …the checkbox. I missed it. I’m on blender 2.5 btw but I found the equivalent checkbox. So basically to get it work here, I had to select that checkbox, unwrap, …select all for some reason in 3D view otherwise I cannot see my unwrap results? …then in the unwrap window reselect my image (even though I had one selected before, it went away) … then select the various “islands” and position/scale to suit.
Thanks for the assistance, now I can stop bashing my head against the wall.