I am trying to figure out bendy bones. I have set one up. I am trying to fit it to a mesh. Do I do this in object mode or edit mode? When I do it in edit mode and then exit, the bone returns to its original state. If I do it in pose mode the pose stays, but now I have introduced animation to the armature. In other words, no base pose. How do I do this? Thanks.
If I do it in pose mode the pose stays, but now I have introduced animation to the armature…
Make sure you have turned off Automatic Keyframe Insertion (Timeline menu / red button).
Generally you match up Armature and Geometry in Object mode, adjust the bones of the Armature to the Geometry in Edit mode, and animate in Pose mode.
So if the bendy bones look differently in Edit and Pose mode, this might be caused by different ‘Bendy Bones’ settings for Edit and Pose mode.
After, adjusting the bones to the Geometry in Edit mode and setting the desired curve/easing/scaling/roll… (Bendy Bones Tab), switch to Pose mode and make sure that their according Bendy Bones settings are set to 0 (or 1 for Scale In/Scale Out respectively). Now the bones should keep their initial pose (set up in Edit mode) and are ready for animation.
Unfortunately by default the Easing in Pose mode is set to 1. That causes a jump once one swaps from Edit to Pose mode. Just turn down the value to 0 in Pose mode for matching the two modes up.
With all Armatures… Bendy or not… you have 3 modes… Object, Edit, Pose…
Object mode is generally for selecting and manipulating Objects… at the Object level…
Edit mode is for working on only one object… Armatures are concidered an Object unto themselves…
so to add and ‘Edit’ bones in an Armature you have to tab into Edit mode… now since Armatures are made to be used in Animation… Pose mode is the special case for them… that is to say… don’t do anything in Pose mode until your done doing everything you need to do in Edit mode…
this rule doesn’t always apply however as when you start constructing ‘bone constraints’ those have to be done in pose mode… (I’m not exactly sure why that is) (but it is what it is)
Thus…
when you start Editing Bendy Bones in Edit mode… your Edit sticks…
That is it does not go away just because you have Tabbed out into Object mode…
Normally you must pay attention to what you do with your bones in what mode because it will effect the bones in other modes…
but in the case of Bendies and Object mode… in this case… there is no effect…
…
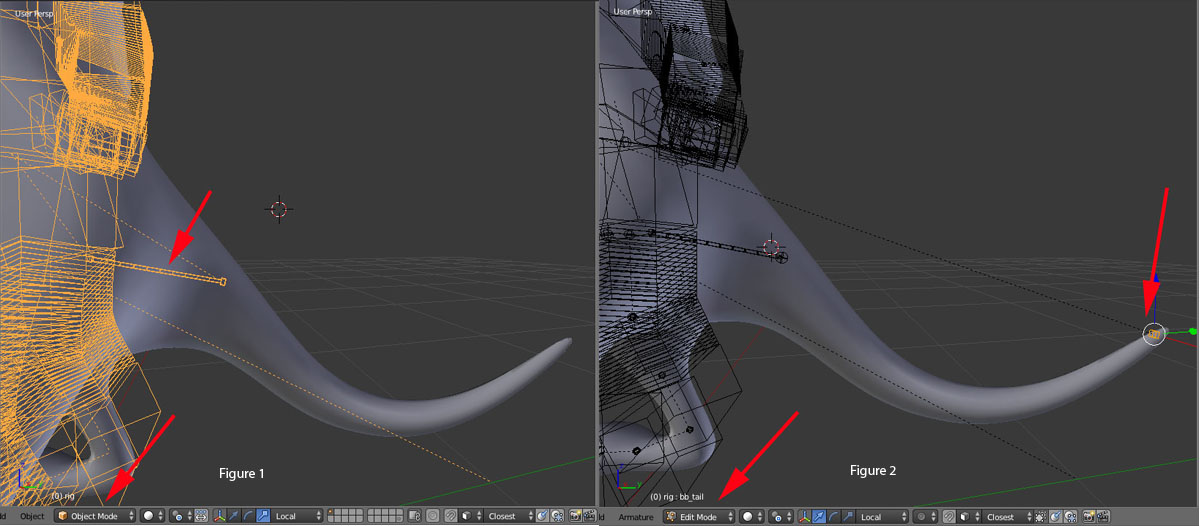
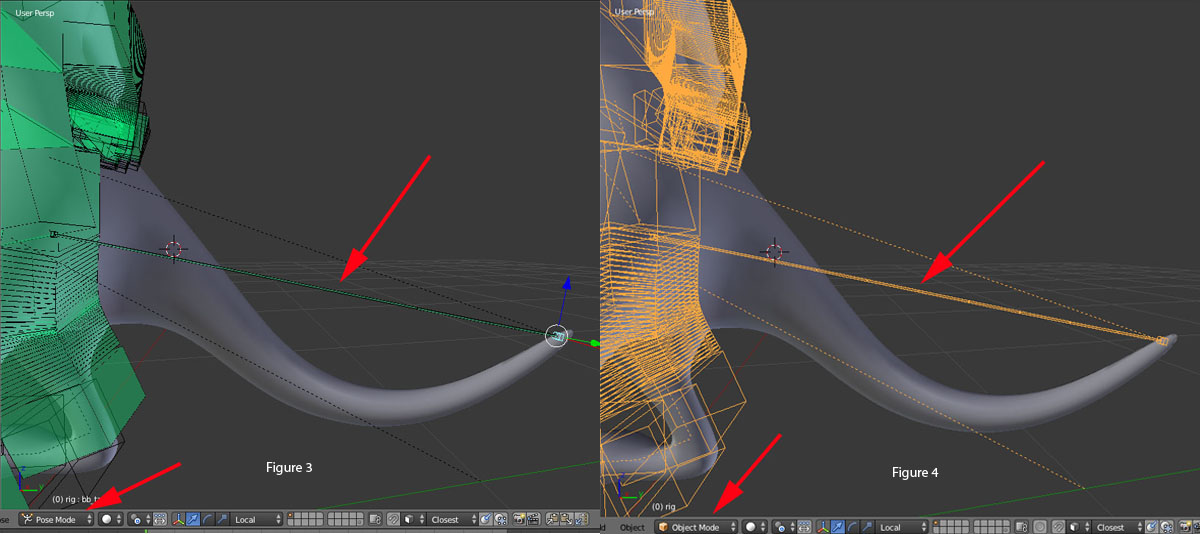
I have attached some screenshots for the purpose of illustrating my problem. In figure 1, I have moved a bendy bone chain to the position of the tail As you can see, it is too short. I moved it in object mode to this position. In figure 2, I am in Edit mode on bendy chain and have moved the tail to the position that I want it to be. Notice the bendy chain does not follow in edit mode. In figure 3, I have changed to Pose mode. Notice that the bendy bone chain is now moved to the tail position. I have done nothing other than change modes. In figure 4, I have changed modes to Object mode. Notice the chain still reflects the position of the tail bone in chain. What is going on here? Why doesn’t the chain update with tail bone in Edit mode? Thanks.
I moved it in object mode to this position.
Okay there is definitely something wrong with the way you set up your Rigg if your moving a bone around in Object mode separate from the rest of the Armature…
is that Tail bone Joined together into one Armature with the rest of the bones?
I m attaching a pic of the hierarchy. It is joined to " rig " armature and parented to the "DEF rig " at the spine.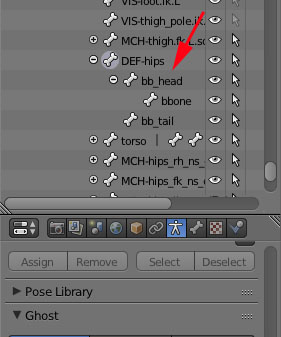
I m attaching a pic of the hierarchy. It is joined to " rig " armature and parented to the "DEF rig " at the spine.
I moved it in object mode to this position.
So when you say… “I moved ‘it’ in object mode…”
you mean you moved the whole Armature not just the one bone… correct?
or do you mean "I moved ‘it’ (meaning just the bone) … but you perhaps mis-spoke and meant ‘edit’ mode… correct?
Actually, I said I moved the “tail” bone in Edit mode. The tail bone moved, but as you can see the bendy bone did not update. When I left Edit mode to Object mode, the display updated to what I captured in figure 4. When I went to Pose mode, the display updated to what I capture d in figure 3. However, when I am in Edit mode it looks like figure 2. I can’t see how I can adjust the " curve " of the bendy bone to match the tail in Edit mode, when it does not display what I anticipated; which was for it to look the way it did in Pose mode.
Actually, I said I moved the “tail” bone in Edit mode.
well you see I qouted you…
I moved it in object mode to this position.
so that’s why I was asking…
I think your best bet at this point is to upload your file…
I can’t sit here and try to guess at what your doing…
Ok. I see your question. I duplicated the original bendy bone armature and placed it into position in Object mode. Then I went into Edit mode and moved the " tail ", producing the results I posted. I have decided to give up on this attempt to put bendy bones into the Rigify rig. There are too many variables when this rig is generated to try and run down the issue. I have other things I need to move on to. Thanks very much for your help.
That’s understandable… Riggifiy is not really a solution to a lot of Rigging problems… If your not familiar with Rigging and don’t understand what’s going on with the Meta Rigg and what it is trying to accomplish… it can be a daunting task to try and use it… it’s not that the meta Rigg is not a great rigg… but trying to find good information on how to use it and understand what it is doing is a bit of task… one could pretty much say you could rigg your own Rigg quicker than you could start from scratch with Riggify not knowing anything about rigging or even how to rigg properly in blender…
all I can say is learning to Rigg, especially in blender is a greatly rewarding task… the Rigging tools in blender are very very very good for character animation so… don’t give up on Rigging all together…
hope all goes well for you…