eyes and teeth not moving with head, deform not working, arms move weird

So I have a few problems here. I’m so close to finishing, but there are a few thing I need to do to finish it off.

When I move the head, the eyes aren’t completely in the head. They don’t stick in the eye sockets. The teeth are worse. They don’t move at all if I move the head left and right.

When I put on the deform mesh, it moves the head, arms, whatever way too much. I put on the multi modifier on the rig, and it still does the same thing.

My last problem is that the arm moves weird. The whole thing moves along with the hand, so if I move the hand to his chest, the arm stays straight. I want to be able to move the hand up and have the rest of the arm just bend, like the guy was doing arm curls or something, then be able to move the forearm and bicep up and down, and rotate it.

Here’s the file I’m working on.
http://www.pasteall.org/blend/9184

That’s because you forgot to parent the Eye the contols to the head. For the second problem, the teeth aren’t moving because they aren’t assigned to any bones to influence the movement. Go into Weight paint mode and click on the appropiate bones so they can move when a bone of a higher hiearchy moves. For your arms, you created a IK chain for the forearm. If you are planning on creating a IK Chain for the arm, you need to apply it to both bones of the arm, not just the forearm.

Thanks for the help.
Is there a better way to rig the arm than what I have?

And does anyone have an idea how to fix the deform modifier? I have it unbound in the file I posted, but whenever it turns on, it moves the limbs way too much. The deform mesh is on another layer.

There is a tutorial series on YouTube called Johnny Blender. Look for the rigging tutorial and you can actually follow along with the rigging setup. That’s what I’vew done for the models I have now. As far as the deform modifier, I never used it before. Hopefully, someone can see this part of the question and answer it for you.

ok, I got the arms working right now. The eyes stay in the sockets and teeth are good.

I’m still having problems with mesh deform. I understand what your saying, Randy, about how the armature moves the mesh and mesh deform moving the mesh, so it moves it 2x. I’ve watched the videos you posted, but I’m a total noob, so you’ll have to excuse me. What I want to do with the mesh deform is to be able to have the stomach move or face elongate when I pull on it, but move the body with the armature. I tried, like in the video, to setup the armature to move the mesh deform which would then move the mesh, but then I got a weird, rubber band like, arm where it would bend at the elbow.
I saw the 3rd video on your post, and it looks like the way you made it work for both is to separate the vertex group and name it as the same bone that you wanted to move. I don’t know how to do that for the whole body, though.

My other problem is with the eyes. When I turn the head, the eyes stay with it, but the pupils do their own thing. I attached a picture to illustrate what I’m talking about. Any ideas there?

Attachments


Are the eye controls parented to the head?

Please post up the latest .blend file and I’ll look at it again. I don’t mind helping out when I got the time and the easiest way to do so is by just getting in there and looking around.

Randy

ok, the latest file is here (thanks for taking a look):

http://www.pasteall.org/blend/9245

See how when the head is moved, the eyes do their own thing?

I am still having problems with the armature and mesh modifier, but I think I am just going to go without a mesh modifier. I had it so that armature moved the mesh modifier, which moved the mesh. It gave me stretch armstrong arms, so I’m just going to have to do without.

Ok, took me a min to figure this one out. And just let me say for the record and for everyone who may read this, this is exactly why you should always post up a .blend file, without one, I could have never figured out what was wrong.

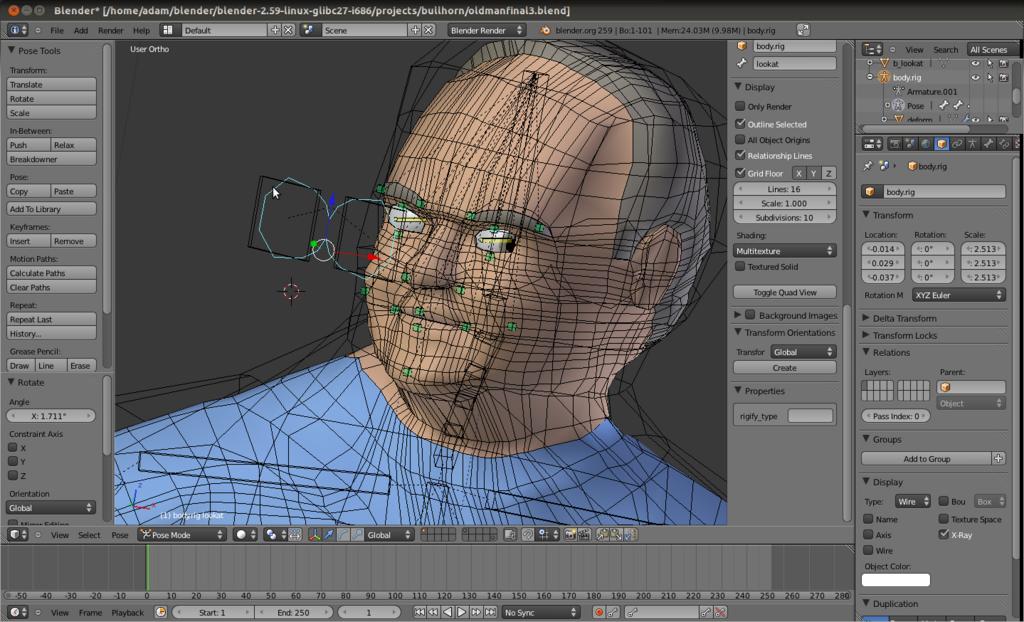
Here’s what’s wrong with the eyes: They are parented to the head bone and they have a copy rot constraint on them targeting the eye bone. When you parent a mesh object to a bone, you are telling that mesh object to move as the bone moves. Then when adding the copy rot constraint to the eyes, you are telling the eyes to copy the rotation of their bones. So basically you are telling the eyes to move as the head bone moves (and rotate as the head bone rotates) and also rotate as the eye bones rotate. So how should the eyes move, as the head bone moves or as the eye bones move? See my point?

So, here’s how to fix it. In the armature panel, put the armature into ‘Rest Position’, select the eye mesh objects and clear their parents (alt-p). Then select the eye mesh object, shift-select the armature, enter pose mode and select the eye bone, do a ctrl-p and select ‘bone’ from the menu. Oh, and remove the copy rot constraint from the eye mesh objects. Now the eye should only be influenced by the eye bone. Since the eye bones are children of the head bone they will move as the head bone moves. I didn’t actually do this with your model, but it’s how I always do eyes, parent them to their bones.

Now, here’s a few other things I noticed that you will need to fix up as well:

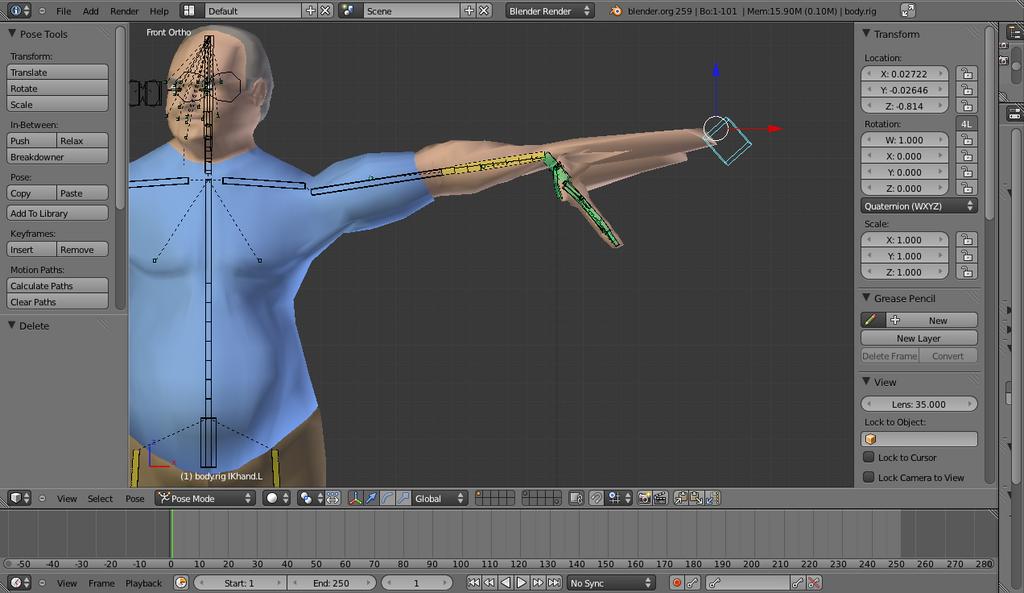
  • The arm ik controllers are influencing your mesh. Grab one and move it far away from the mesh and you will see what I mean. Any bone that is not to deform your mesh should have ‘Deform’ in the bones panel un-checked. This might mess with the weight painting as the mesh is weight painted to that bone and once ‘Deform’ is unchecked it will no longer be influenced by that bone, and the remaining bones that influence that area may not do so in the way you want.

  • Remove the mesh deform modifier from the eyes, it’s not needed there… and in general, remove it from the main mesh until you are ready to use it. I only mention this because sloppiness like this can lead to confusion.

  • The legs need work, no, they need a lot of work. I’m not sure how you are meaning them to work (and they can be the toughest to rig), but you can get rid of the ik constraints on the thigh bones. Instead use the ‘pole targets’ on the ik constraint for the lower leg to control the knees.

  • Replace the ik constraints on the eyes with track-to constraints instead. KISS - Keep It Simple Stupid, or only use what you need and track-to will work fine here.

There are a few more things I see, and actually you may want to end up using the mesh deform for this, so don’t get rid of it just yet. By that I mean, don’t delete the cage just yet, just move it to a different layer and hide it for now and get rid of the modifiers.

To see how to set up pole targets see this:

Also, check out the Joe rig in my signature for other ideas… The python scripts for the UI in blender are broken, but you might get a few ideas from it. I need to update it.

Anyhow, I feel like I just wrote a whole book…
Randy

3 Likes

No you just wrote a pamphlet.

Thanks again Randy. My mesh is working great now.
How would I make the arms work without deform checked? I unchecked it and the arms went flat.

As a side note, the legs are controlled by the bottom of the feet. Sounds strange, but it works.

It felt like a book :stuck_out_tongue:

chargeman:
I meant to just disable deform for your controller bones, in this case, just for IKhand.L and I assume IKhand.R. It would probably be a good idea to delete those vertex groups as well. See here:


I also hope I haven’t been sounding like an a$$hole pointing out all the things I noticed, I only wanted to show where improvements could be made. As for telling you not to delete the mesh deform cage, I think you are really going to need it. You mesh topology isn’t the best around the shoulders, it could help you there. Also, when I rotate the ‘spine’ bone around, the deformation is pretty bad, the mesh deform could help out there as well.

I’ve also noticed another bug concerning the hips. When using the bone ‘hips’ the mesh deforms and the leg bones are parented to it, but the spine bone is parented to ‘hips.000’. I think I see what you are trying to do, but you might have missed a step or two there. But I’m not sure what you are try to achieve there.

Let me know what you are after, and I’ll let you know how to fix it up, as far as the hips go. Clear up these few problems, post up a .blend and I’ll look further for other problems. We get these problems fixed up, then I’ll be happy to show you how the mesh deform works for your case.

Randy

PS Feels like I wrote a pamphlet… :rolleyes:

Randy, you aren’t coming off like an a$$hole, I want some good feedback to make my blend better.

What I wanted to do with the hips was to make it so that I can swing them back and forth a little if the person is walking and to have the other one parented to the spine, so that it doesn’t mess up the legs when the person moves his spine.

As for the shoulders and spine deforming, yes, how do I fix that. I saw that when I was playing around with it, but could not figure out how to fix it. I was trying to play with weight paint, but could not get it to work.

Here’s the blend:
http://www.pasteall.org/blend/9275

For the hips, check out this video:

Watch the whole video if you have time, it’s very good and almost everything applies to the 2.5/6x versions, just different UI. About 22:00 into the video is what you are looking to achieve with your hips I think.

As to the deformation of spine, this is where you will really want to use the mesh deform, that’s why I mentioned not removing it just yet. It can really help out on the spine/stomach area. I only mentioned it for the shoulders because your topology there is not good for deformation. blendercookie.com has a good video on shoulder topology. Search for it and view it when you get a chance. But since I assume your not going to re-model the shoulders of this mesh, you can use the mesh deform to fix them up.

As it is now, play with posing and identify any bad deformations. I’ve not fully played with this as far as posing goes and seeing what is bad and what is good deformation wise. From what I have seen, I think you will need the mesh deform on the stomach/chest/shoulders and the arms. You probably won’t need it on the legs (good topology) and won’t want it on the feet or hands (as you will want sharp bends there) and the head will probably be fine.

Anyway, play with what I’ve mentioned, identify the bad deformation areas, re-watch the videos I posted, and I’ll help you with the mesh deform.

Randy

This has been on my mind for some time now. But for some reason, the model looks like Rush Limbaugh to a certain point.

Xero, that’s good it kind of looks like Rush Limbaugh, it is supposed to be a character based on him. The project I’m doing is a political satire animation.

I almost gone nuts.

Case: Have a himanoid model with separated eyes and hair.

I rig the body just fine with Rigify Add ons. Yes! But, When I wanted to rig the eye to then be connected to the head bone. I have an issue when editing the bones on the eyeballs…the just wont copy good. They slanted as if the copies is laying in the surface of them eyes…S X - 1 didn;t cut it.

So I try to rig the yes on a seperate file, I thought I will copy to the body later on…that didn;t work either, my eye rig seemed to hit something invisible…

Can anyone help me…Hooorah!

MAAAAAATE!!! been messing with this problem for hours and you just fixed it for me. legend