Hello,
I use blender as a hobby just for the fun of it. After a year or two I decided to try out the new version. The new tools for sculpting are great
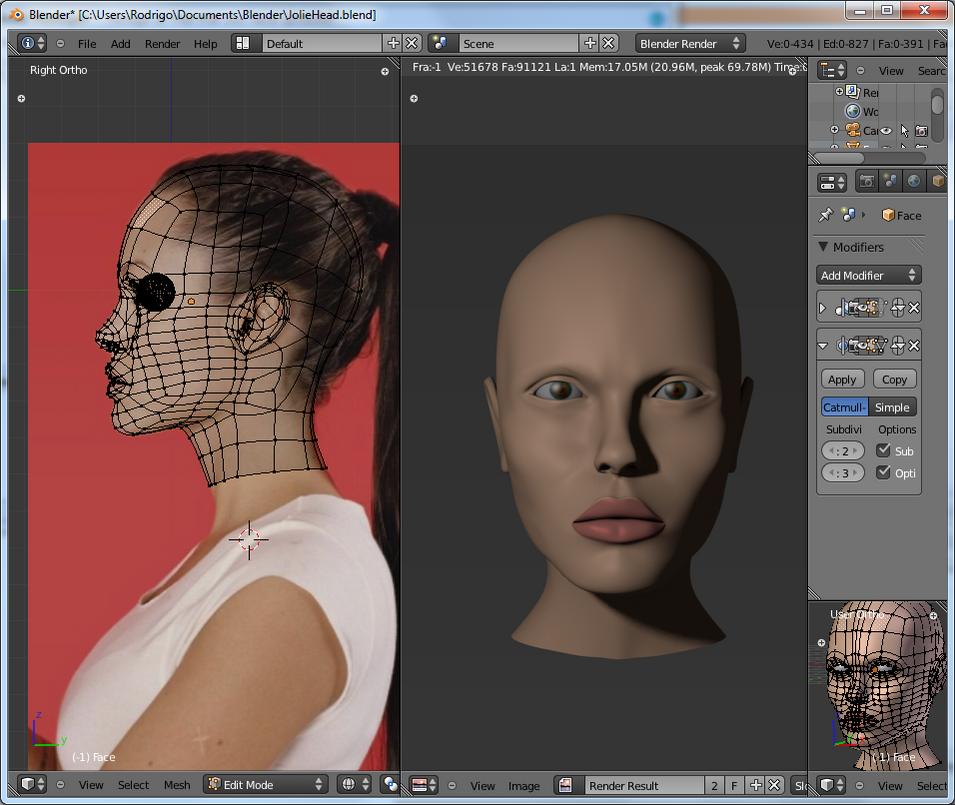
I’m trying to make an ‘Angelina Jolie’ face. The objective is not to be photo-realistic but being able to look at the model from any angle and immediately recognize the face. Even if it goes a little cartoonish its ok.
Right now i’m at ‘generic woman number 572’ phase. The face looks good although I still cant get the eyes right. The edge loops turned out awful but I dont want to go back until I get a good base mesh, then I can just use it as the background picture for a new mesh with hopefully better edge loops (animation is next).
I have horrible observation and after 2 days of work I just cant see any more tweeks to the vertices I can make.
Can you help me spot the changes that make a face recognizable?
I would recommend studying the planes of the head, and trying to establish stronger volumes in your model. Right now you’re just placing verts at random and hoping to line them up with the the ref. With some practice though you’ll come to understand the structure of the head better, which will help in creating models.
For this model in particular, try looking at a skull, and picking out the major landmarks (the brows, cheekbones, chin etc), then focus on making sure that these landmarks are represented in your model. Go beyond your ortho refs and try and make your model “feel” right.
Good tip about the planes of the head. Only knew the subdivide edge loop technique (and poorly). Do you recommend starting a new mesh from scratch or is there a way to salvage a poor base mesh?
The hairs are another good question. Im tring to add hairs but the texturing and lighting of the hair particle system is really hard to make the hairs look good. As soon as I have them right I’ll post the result. Should the hairs make the difference in face recognition or should the base (hairless) mesh be more than enough for the brain to identify a face?
side note: dont know why the image attachment is not showing the thumbnail in my post (the image is there if you click the link placeholder). Is there a trick to using the internal forum attachments I should know?
As a sculptor I would say maybe try and use the mesh you have for sculpting and figuring out the forms and then retopologise over the top. If you think certain bits of the mesh work then keep them and try and remodell the rest, but you’ll be less constrained if you start from scratch.
Hair is tough, it does make some difference in identifying a face (moreso for people with long hair) but not a great deal. If you can’t recognise a likeness without hair, then adding hair won’t help that much.
I noticed that women generally have the chin smaller than the forehead.
Thanks @ben for the links about planes of the head. That seams to be an interesting approach.
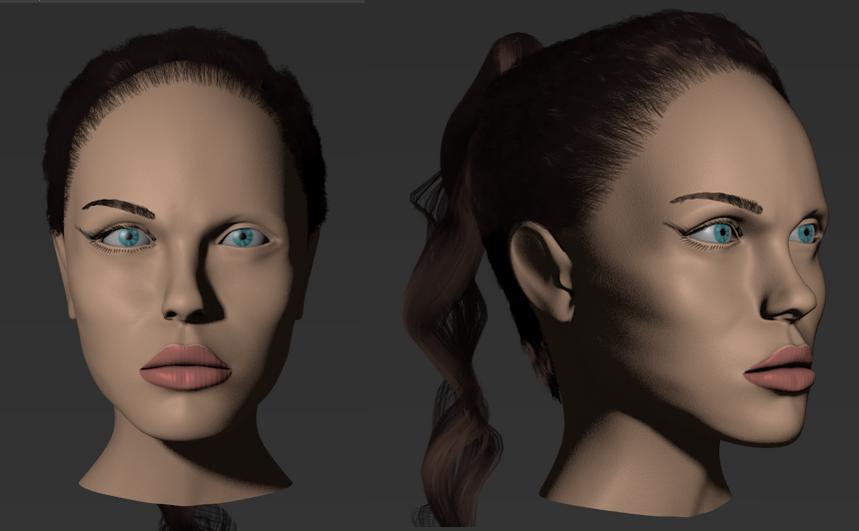
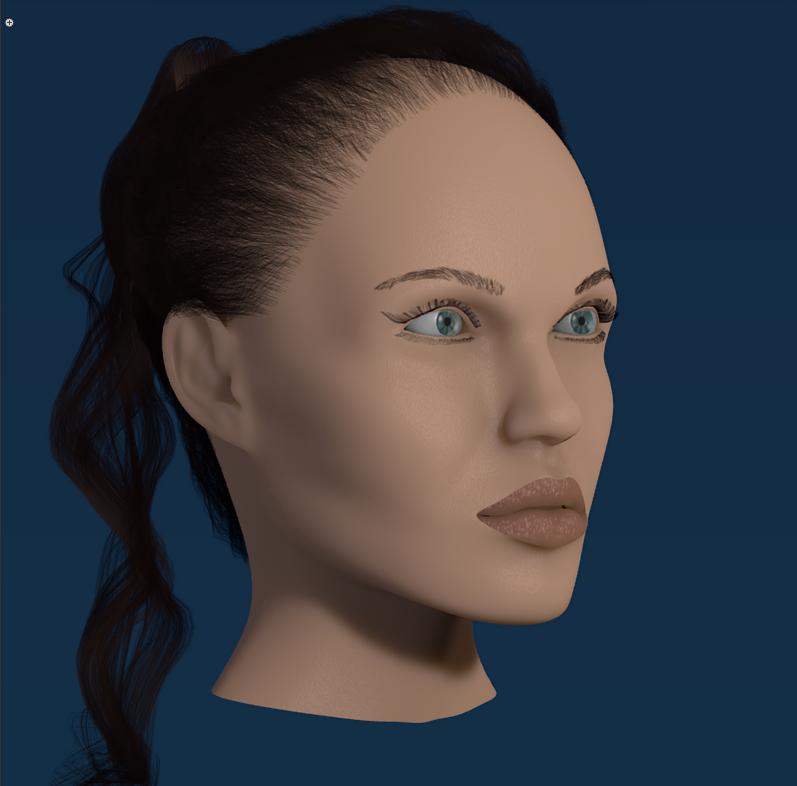
Added some hairs to the model. You should be wandering why only one side of the face has eye lashes and brows… well apparently there is no way to x-mirror particle systems along with the base mesh. I tried all the combinations (except the right one perhaps) and could not make it work. The hair works because I separated an emiter mesh for the scalp.
Could do allot better but was tired after allot of trial and error. The problem with hairs is that only after a render can we see if the hairs look good, mainly because of the material setting but its still much much better than the older Blender version.
So basicaly added:
Scalp hair
Pony tail (sort of)
Eyelashes
Eyebrows
Bluish iris texture
Some makeshift skin pores
Some makeshift lips cracks (huge fail here)
Like I expected, recognizability didn’t improve. The face looks decent but no way near angelina’s face. Why angelina by the way … besides the obvious reasons its just easier to get reference photos off the internet.
btw… Anybody knows good tutorials on setting up a nice base lighting settings? I hate trial and error a ton of times before I get the brightness and shadows to show if my materials have the correct settings.
Next stop: Scrap the base mesh and try out some different sculpting techniques from the videos in blendercookie. One thing I noticed is they use allot more loops than I thought were necessary… details seem to help even for young wrinkle free faces. Ill keep this one just to validate proportions… This may take a while
PS: Sorry the thumbs are not working. Just click on the broken link and it opens. Dont know what to do about it, apparently the thumbnails have a lag before showing
Your eyeballs are just slightly to small for the sockets. This always plagues me when I try to socket eyes too. It is a nice woman’s head and looks like it’ll be very expressive in an animation.
Been reading allot on facial anatomy and checking as good tutorials as I can. I started by reading up on the planes of the face. It seemed really interesting until I tried to apply the information I got to blender. Thats when things got dicy
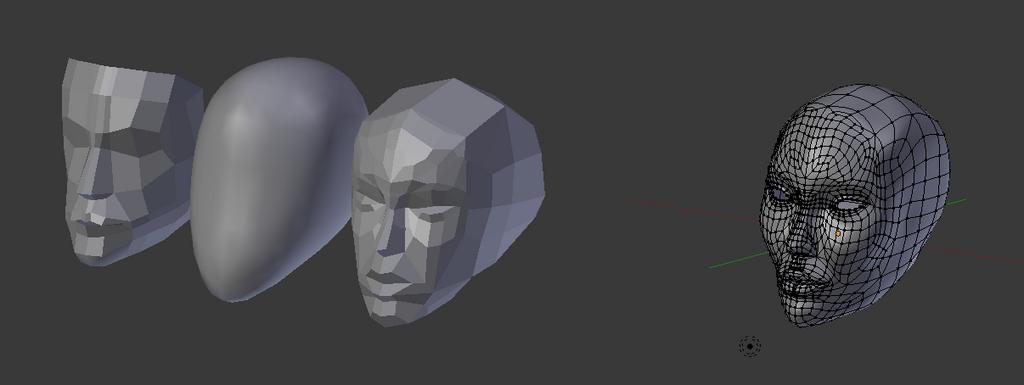
I started by making a face literally out of planes and then connected them to form quads as best I could and that gave the result youll see on the far left.
Then i made a simple subsurfed cube (1 subdiv) to model the shape of the head, just to get a feeling of it.
Then I started to sculp the forms. First the major landmarks, nose, lips, eyes and chin with low detail and then inside the forms created I tried to fill in detail.
Well, thats when things went down the drain: Trying to keep the volumes and positions correct while scuplting detail while subdividing in a way to keep topology in a manageable state is damn hard and its probably near impossible for someone without art background like me.
Here is the resulting model (don’t laugh too hard):
Reading up a bit I found that Loomis (the author of the planes of the face method) was an excelent illustrator. His method is great for leaning and very adequate to making a face out of imagination. However to model an already existing face… its not the best method. It just leaves too many connections undefined. By the way this opinion was not made by me but by the article I was following: learning-to-see.co.uk/feeling-the-form
At the same time I watched a great (ongoing) tutorial on blendercookie about the female form. I beleive the method showed there, that is not the usual ‘subdivide and extrude from a cube’, is more appropriate. I will try to follow that.
Here is the link for the first in the series: blendercookie.com/2011/05/06/modeling-the-female-body-series-part-01/
Some details like the tear duct of the eye and the iris are invaluable to face recognition.
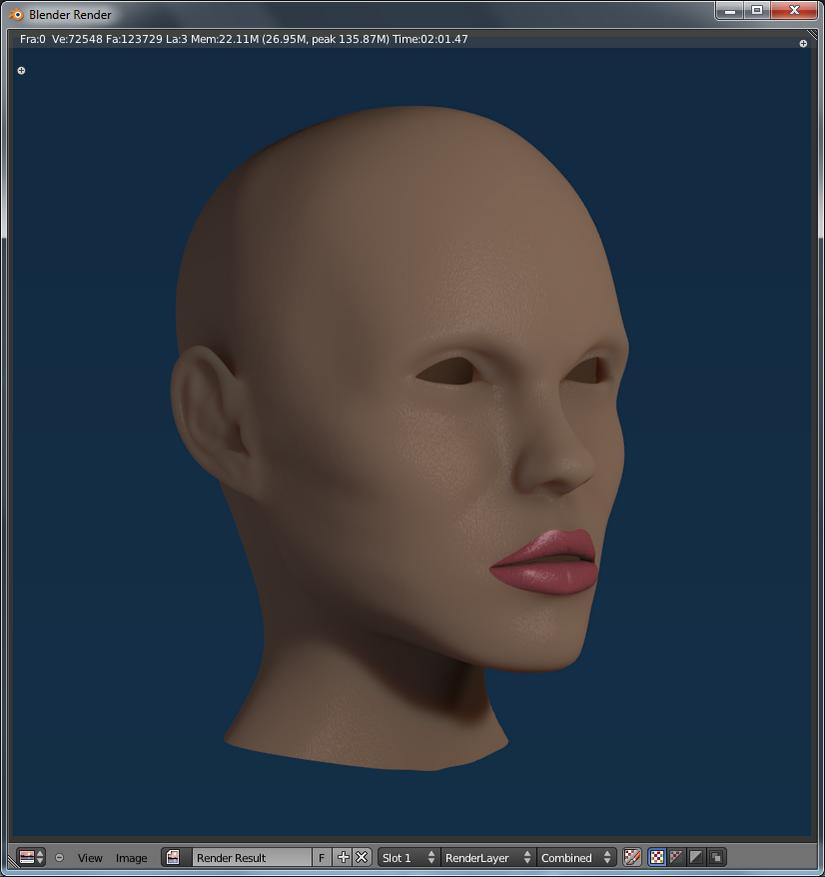
With it I make a few more adjustments to the model I posted earlier and worked mainly on realism.
And this was the result:
Problems (Help will these will have my eternal gratitude):
Lips are hard as hell to create a procedural material, may end up having to model the crevices.
Hair particles are not casting shadows.
Scalp is way too visible: More childs or should make a 2nd particle system for a furry scalp (eyebrows look fine for example) ?
Need a way to create color imperfections with procedural textures to increase realism of the skin.
Dont know if I need to model a opaque skull for the SSS to look more realistic. I think the back of the skull is lighting the front right now
Nose and tear duct should be darker but SSS is eating up shadows too much.
Freaking hair has no way to mirror like geometry has. I have to replicate the chages fron the right to the left. Its good for realism but terrible for workflow.
Eyes are still weird. I need help spotting the wrong details.
By the way I know I can slap a UV projected texture of angelina and it will probably look fine. I actualy have another model far worse than this one were I did that and the face was recognizable. But for this WIP I consider it cheating, in fact I want to avoid as much UV texturing as possible (iris is an exception and lips may become one too).
Next steps:
Model the ear correctly
Fix the lips
Fix the eyes
After I get better perception of the skull:
Fix the face cheeks (front perspective is just weird)
Fix the jaw
Check if the skull is the right size
Adjust the transition to the neck
PS: Add www to the urls cause I still cannot post urls on the forum
That took longer than I thought. Looks great with all the details modeled right into it, probably can improve a little. Its hard to get references for ears for a specific person so I had to extrapolate most crevices from other ears.
While the main structure of the ear is the same, since the ear is designed to channel sound into the auditory canal, ears differ allot from person to person. for example angelina has almost no ear lobes and are only noticeable when she wears earings that weight them downwards.
Hopefully this will help with recognizability.
With this last render I also noticed the skin is still too “waxy” from the SSS. Must get rid of that, she looks like a mannequin doll.
The lips are almost there but SSS is killing all the shadows so the color looks dull. Cant even notice the modelled wrinkles I added
Thankfully the bumpmap wrinkles are showing ok.
I even tried to model a skull to try and make the inside of the head as dark as possible… didn’t seem to help.
Think I got the skin material decent now.
Did allot of other small adjustment the biggest being the head has a slightly smaller width now so she looks more feminine.
Btw, one thing that helps allot in spotting facial feature is reference photos where the subject is smiling hard or any other pronouced expression really. It helps bring out the muscles in the face.
You cant model a neutral face based on them but they help looking at the reference photos and spotting the important but subtle highlights.
I have been seting up the camera to 200mm to avoid this problem but I have to deal with it sooner or later.
The problem is reference photos are taken by a camera but I can only work with them in orthogonal view. The correct thing to do would be to work in perspective view, unfortunately blender only shows background pictures in orthogonal or camera view.
But… in camera view I cannot adjust the position and scale of the photo
I think I’m modelling way too close to ortho perspective and that is why I cant get the face to look right.
I generally opt for 80mm or higher for portrait shots. You can see the effect in the 3D view immediately though, so just play with it and try to match it up.
Remember that blender is currently hardcoded to a (completely random) 32mm sensor size anyway, which isn’t used by any camera manufacturer. So there’s no point trying to get the exact value from a photo as it won’t have the same effect in blender anyways. Just eyeball it.
Thanks Ben, that was exactly the information I was searching for. Appears 200mm is not that exaggerated for head and shoulders portrait.
I would love to be able to eyeball these things but I’m from a engineering background and not an art background, so I kind of need to see numbers.
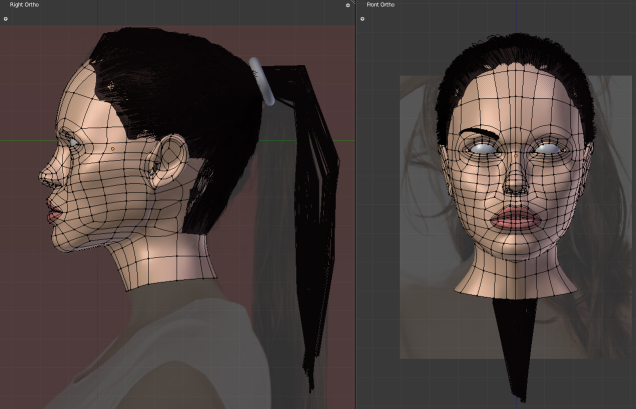
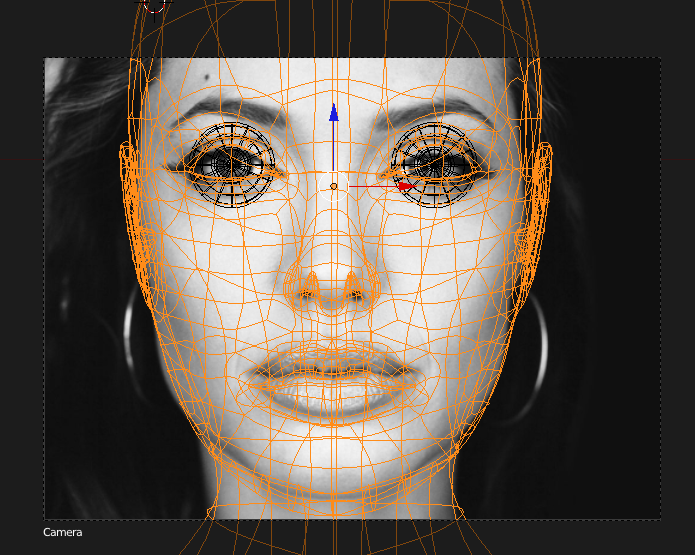
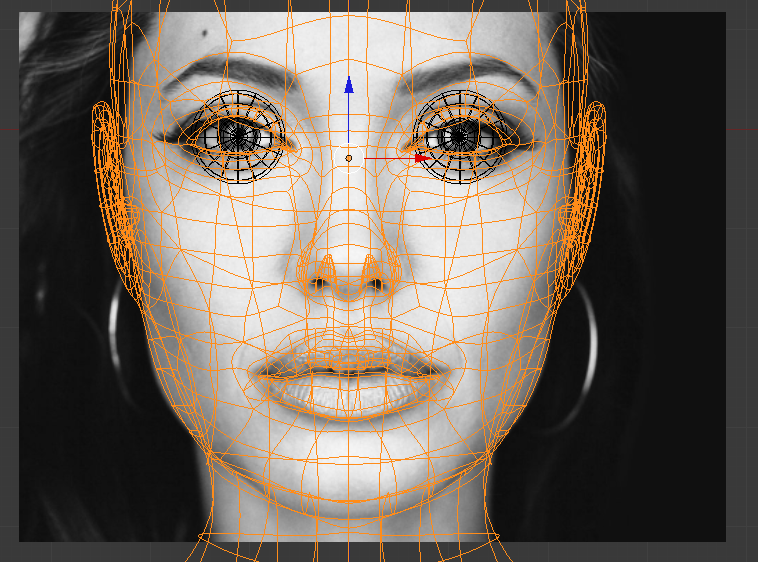
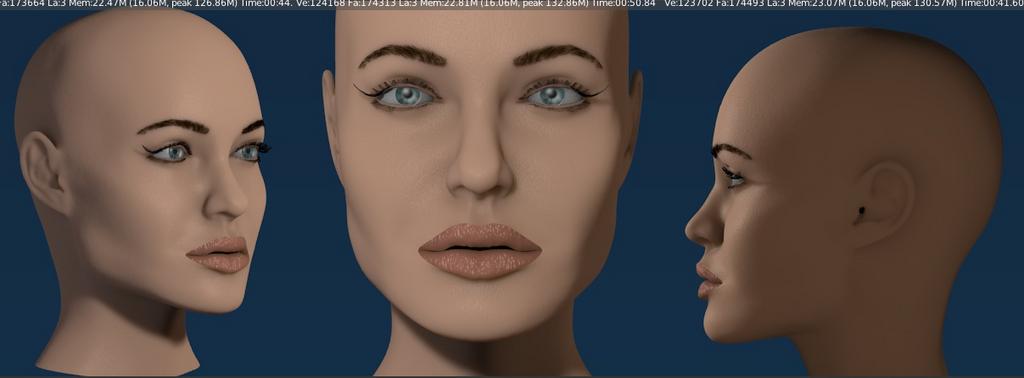
So everyone can see the diference it makes, here are the wireframes agaist the reference photo.
No wonder I got weird results, especially on the frontal camera. Side camera seems to be more forgiving or maybe its the brain that compensates better in side views.
As a side note, been watching a ton of your tutorials Ben, and learning allot. Kudos.
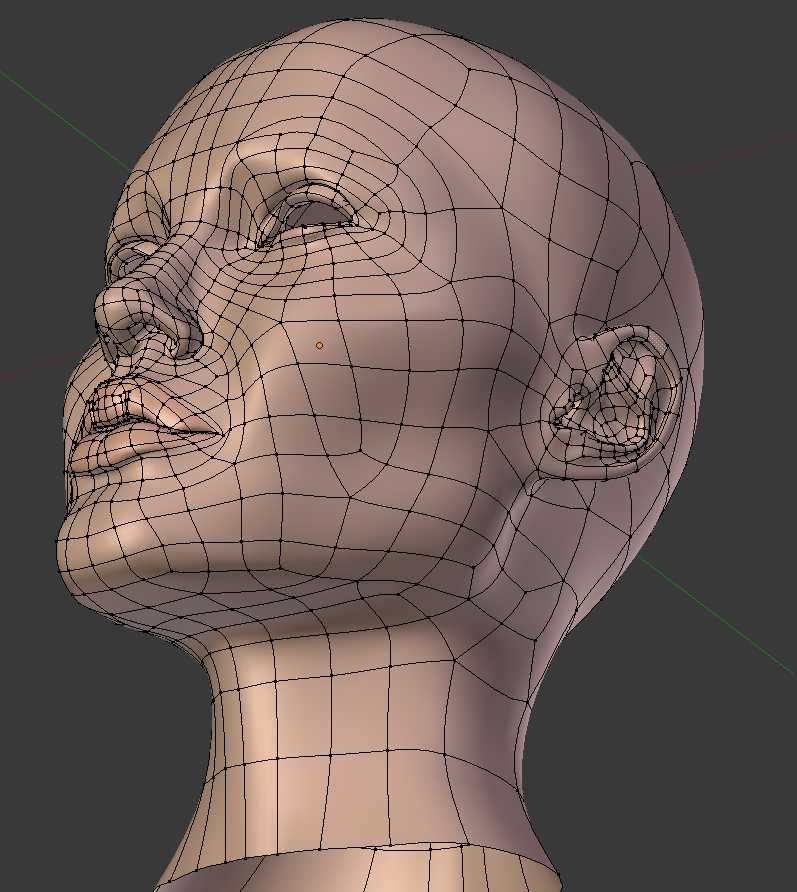
Finally, I think I’m on the right track now.
After some extensive readjustments I got rid of the perspective bias and now the render has some likelihood.
I am starting to get a little biased by looking at a ton of reference photos so Ill let you judge how close this is:
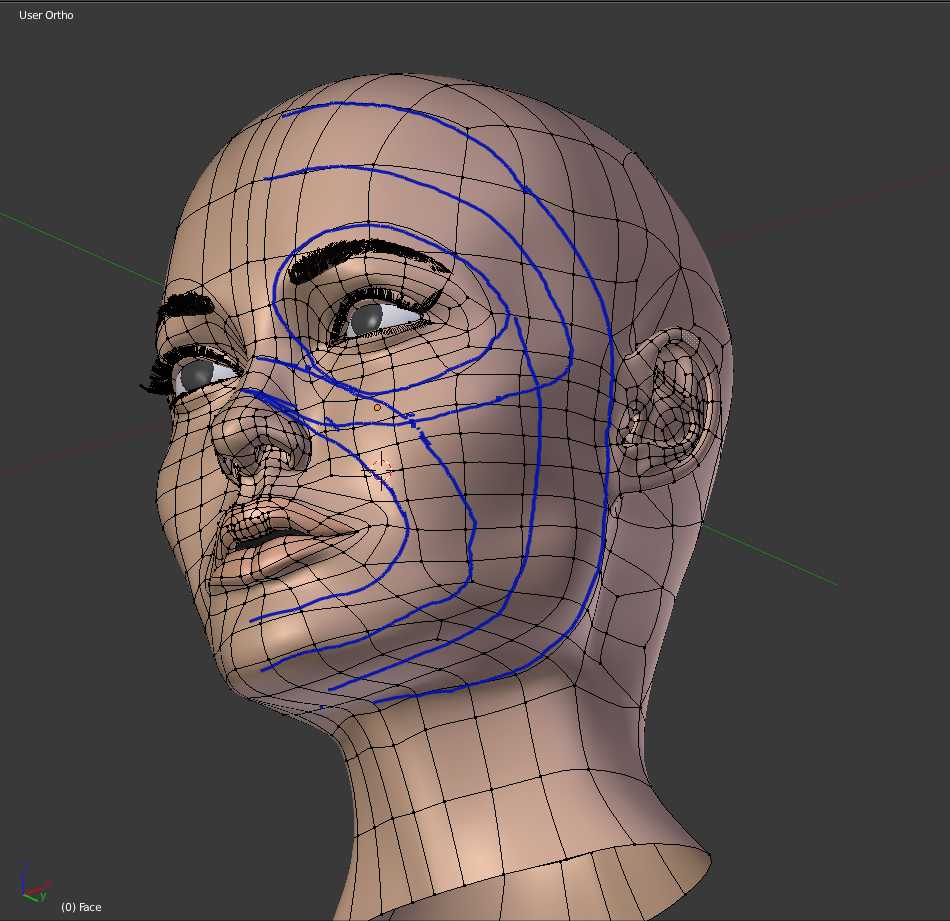
Still a ways to go but now I need to retopo the large areas of the face. Ill post the edge loop plan when I get to it so you can see how bad the topology is right now.
A few tricks I learned and would like to share with anyone with the same troubles:
SSS presets are rubish, if you use it for skin first thing you do is to crank down the ‘scale’ to 0.03 (assuming your face has arround 2 blender units) then turn it up if you want more waxy and turn it down if you want more dry
SSS kills bump maps and shadows, lower scale helps to counter but still one has to exagerate a bit, without SSS the render I posted would look like a dryed up mummy.
You can set the error (SSS) to about 0.2 or higher, only mess with it for closeups or higher quality, it has a huge impact on performance if a large part of the viewport will be SSS materials.
Particle hair has a ‘strand render’ option that is way faster but does not cast shadows. If your hair is small (eyebrows , eyelashes) you can leave it off all the time, but for hair dues… my render goes from 1 minute to 20 minutes.
Shadows will make the hair look nicer but also darker
You can set the ‘traceable’ option to off on the lens and still get the reflection and refraction from mirror and transparency. This avoids the lens casting shadows on the eyeball. I almost went crazy trying to solve this one.
On topology: If you are left with an odd number of vertexs to connect you will be stuck with a triangle. If you are left with an even number then you can allways fill with quads. In a mesh made out of quads, if you are left with a tri then there must be necessarily another tri somewhere. You can use edit mode > Select > triangles to spot your problems. Not the end of the world but just nice to know there is allways a way to fix topology. I have a few recipes Ive picked up here and there. After I retopo Ill try to post my cheat sheet :).
I’m still looking for a soft way to transition from the skin material to the lips. Might be solved when I apply a color texture for pinkish hues, makeup and things like that.
Wow! tremendous improvements!
Here are a couple of good discussions dealing with sss. One of them is Ben’s ^ (thank you Ben). If you haven’t read these already you might find some benefit in them.
Still got a few loose ends I don’t know how to get rid of like the diamond on the bottom part of the cheek where 3 vertical loops have to become 1.
Could get allot more work done after that since if a loop is not where is supposed to be its hard as hell to reposition creases and shapes.
Then I worked on the realism a bit:
The eye got new materials. (HDRI and SSS makes a difference)
The ear got more realistic depth (working on ortho made it look too flat)
The nose and lips were retouched (cant get those lips right)
The eyelashes were redone.
Well… I guess I retouched pretty much everything, eheh.
I think Im pretty close to a cool checkpoint. I may post a few breakdowns of the settings I used so you can point wrong stuff. I always welcome critique.
But I’m starting to think what I will move towards. Here are 3 choices I’m leaning to:
Tomb raider pose: Model gun, model clothes.
Beowulf, grendels mother: Model environment, model wet materials.
Face animation: Face armature, better topology, improve overall realism.


