I’ve started giving some time to lighting and materials, so I’m putting whatever I learn to use with the only decent model I have.
I couldn’t do a decent render of this car last year when I made it because of lack of skill and seriousness.
I’m hoping to change that here.
Criticism on the materials, lighting and rendering are quite badly wanted.
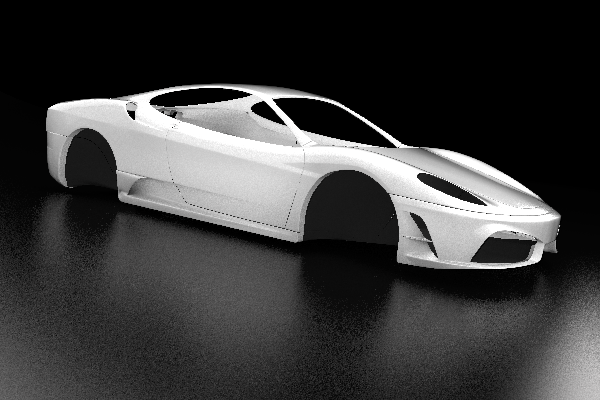
well, the floor should be somewhere between the two.
for the first image, it looks like the objects (or textures) being reflected need to be brighter (more emit…)
Ya know what’s missing? Tribal designs and crazy over the top decals
I think you made a great choice with the dark environment, when I was rendering this model that was ultimately the choice I ended up making myself. I’m a fan of ground reflections, but I’d advise setting the max dist parameter to something like 3, so the reflection fades out nicely instead of showing the entire car. Also, instead of using blurry reflections, you can use a cloud texture with a very small noise size (maybe 0.002), and set it to a very low nor value to simulate blurred reflections. It’ll speed things up considerably.
Also, if you are going for a studio setting, a good HDR map is essential. PM me if you need some. An alternative to this is the classic white plane above the car trick, which I’m sure you know about.
I’m going to be coming back to this to give you some more feedback, so I’ll shut up for now. Looking forward to seeing more progress!
Thanks for your comments everyone. My scene was all ready and set up and then I ran into a problem.Lets hope there’s a solution or else I’ll have to do all the hard work again.
Hi 0ptikz! Great to hear from you.
I’m using Yafaray for these so I have only three choices:- (unless, of couse, I’m wrong)
Less blurry,more blurry, perfect reflecting.
I think having less blurry (or sharper) reflections for the ground combined higher reflectivity could help me get close to what you are talking about. I’ve attached the last test render that I would have gone on to render, is that OK or needs changes?
A bit confused about the HDR thing though, isn’t it supposed to simulate lighting and reflections of outdoor environments. Maybe you can enlighten me there as my knowledge about rendering is still very limited.
Ya know what’s missing? Tribal designs and crazy over the top decals
A bit confused about the HDR thing though, isn’t it supposed to simulate lighting and reflections of outdoor environments. Maybe you can enlighten me there as my knowledge about rendering is still very limited.
Generally speaking, yes – but it doesn’t have to be just outdoor environments, there are plenty of hdr maps that simulate a studio environment. When I initially replied, I had assumed you were using the internal renderer, so a lot of the advice I gave doesn’t apply.
Come to think of it, if the intent of this project is to study rendering methods, it’s possibly a bad idea to use hdr images anyway. Just curious, you do know the emitting white plane above the car trick, right?
Thanks.
Yes I do know about that trick, although I implement it as a meshlight (not sure if thats the right way). It’s been there in all renders in this thread.
Here’s my setup.
Three planes- top, side, and front as meshlights + AO
And few area lamps to lighten some dark parts.
Do tell me if I’m wrong, or if there’s a better way.
Do tell me if I’m wrong, or if there’s a better way.
There’s generally accepted guides to doing things, but I wouldn’t say that deviating from this can really be considered ‘wrong’. As long as the end result is a kick ass render, who cares what method you use?
Anyway, have you tried increasing the camera lens value before rendering? I found that the Scuderia in particular looks nicer with Higher lens values. It really helps to highlight the contours of the car.
I noticed a few weird things in the end and tried to hide them with (crude) post-processing.
There is still room for improvement though, and I will render this again if there are any suggestions.
@0ptikz - Thanks for that tip. The car does indeed look different with a high lens value. I should have thought of it before. I’ll try it in the next render. I’m thinking of a rear shot, but have to get a decent carbon fiber look first. How’s the attempt in this one (rear view mirrors)?
I’ll also try both BI and Yafaray for a little comparison. Should be a good learning experience.
Any color/environment suggestions for the next one?
Also, should I try a different camera angle with this or move on to the next scene?
EDIT:@0ptikz - I keep forgetting every time. I had to ask you. How’s that animation project going? I really hope it was completed.
Any color/environment suggestions for the next one?
Also, should I try a different camera angle with this or move on to the next scene?
I think it’s really important to spend more time post processing the image. I see this all the time…people spend hours, days or even months creating a nice model, but once they render out the final image, they only spend a few minutes tweaking things in post pro. It baffles me because it is one of the most important stages in creating an image.
Here’s an example of one way I might post process that render, it might not be to your taste, but that’s the beauty of post pro – You can really stamp your own personal mark on it, and make it stand out from the crowd.
EDIT:@0ptikz - I keep forgetting every time. I had to ask you. How’s that animation project going? I really hope it was completed.
It’s been put on hold till I get my quad core pc in the next couple of weeks. This old beauty is on it’s death bed. It’s served me well for six years, but she can’t keep up any more
Truth be told, I’m really excited as I have a lot of old projects that need completing. I just didn’t have the computational power to do them justice. Anyway, forget me – Let’s see more renders. I want to motivate you to make something that should go in the forum gallery!
I love that image! When I conceptualised that render I wanted it to have a similar feel, but it got a bit lost in the process.
I’m also working on my 2D skills, though they aren’t up to the mark yet.
May I ask what you did, roughly speaking, to achieve that “glow” on the cars body. Surely it isn’t a simple brightness/contrast change.
That’s just specular glow. I create a duplicate of my image in photoshop, then crush all the dark and mid range colours using levels, leaving just the brightest part of the image. It’s just a case of a adding a gaussian blur and then setting the layer to ‘screen’. I usually use multiple layers, with different blur amounts.
Also, colourising the blur can make things really interesting. When you crush your levels, usually what’s left is just white, so adding a slight blue tint using the colour balance tool can make it stand out a bit more. I went for a red / purple colour in the image I posted because I thought the colours were complimentary.
Of course, you can do all of this directly in Blender’s compositer if you don’t have photoshop
Just wanted to say that I’m busy improving myself, learning new things (which does get quite overwhelming at times). The next render may take a bit of time, but will be 10x better. So stay tuned.
What approach would you use for motion blur? The inbuilt vector/motion blur or post processing? Especially if everything except the subject has a bit of motion blur?
What approach would you use for motion blur? The inbuilt vector/motion blur or post processing? Especially if everything except the subject has a bit of motion blur?
I never get particularly great results with vector blur, and old fashioned mblur takes forever. Do it in post. Here’s a really clever trick for motion blurred tires in photoshop, and it will look better than if you used vector blur.
Nice. That should do it for the tires.
What about something like this or this, where the amount of blur needs to depend on how far the object is, with distant objects being blurred less.
I’m sorry if the answer is obvious.:o


