This is via keyboard input clamp? Sliders typically bottom out, while input sometimes is unclamped. Could you confirm?
This is literally a one line fix if it is clamped. I am pretty sure if you post a bug report it will get fixed immediately. Worst case pop into IRC and I will see if I can get someone to commit it.
Not that I have ever seen any artificial lighting before, but I would speculate that folks might be surprised how much artificial lighting happens in motion picture / stills photography work. cough.
Yes I confirm it’s keyboard input clamp, min -10, max 10, and not soft_min and soft_max.
I’ll get onto making a bug report tomorrow. Thanks for your help.
Nice presentation Fabien. I need to experiment more with the lighting in my Scene I guess. Are you still working at DICE and is Blender a common tool used there? And will you update your photographer addon?
I am still not sure how to find correct Albedo values for let’s say Aluminum or a black plastic material.
What I learned is that my albedo values should never go above 0.8 (White snow) or below 0.04 right? So if I want white snow I would just put 0.8 for RGB? Is there a site with resources for more materials than the one in Wikipedia? Thanks guys for all the valuable insight.
I am using those HDRIs and only if I keep the strength at 1 I get a Scene referred value of 0.18 for my Grey Card in an interior. Am I doing something wrong or is that correct?
Yes I still work there We use Maya for all our assets, it’s our bridge to the game editor. But artists are free to use the tools they need to do the job. We photoscan, we simulate… Maya can’t do it all. Blender is becoming more and more interesting for hard surface, so maybe people will start using it in the future, who knows?
I use blender very occasionally for lookdev at work, I have used it to bake Mirror’s Edge city map because maya UV packing was terrible at the time, and mental ray didn’t support 32k*32k renders, which Cycles did, and was what I needed for the mobile 2D version of the map.
Yes, I will update the Photographer addon, especially now that Brecht fixed the exposure clamping. I have a couple of fix coming as well as the new exposure calculation. Then it will be porting it to 2.8 once the Python API will be locked in September.
Probably exists somewhere I guess
For an occasional user you are doing a lot for the community with your addon. It’s always nice to get some feedback from an industry professional.
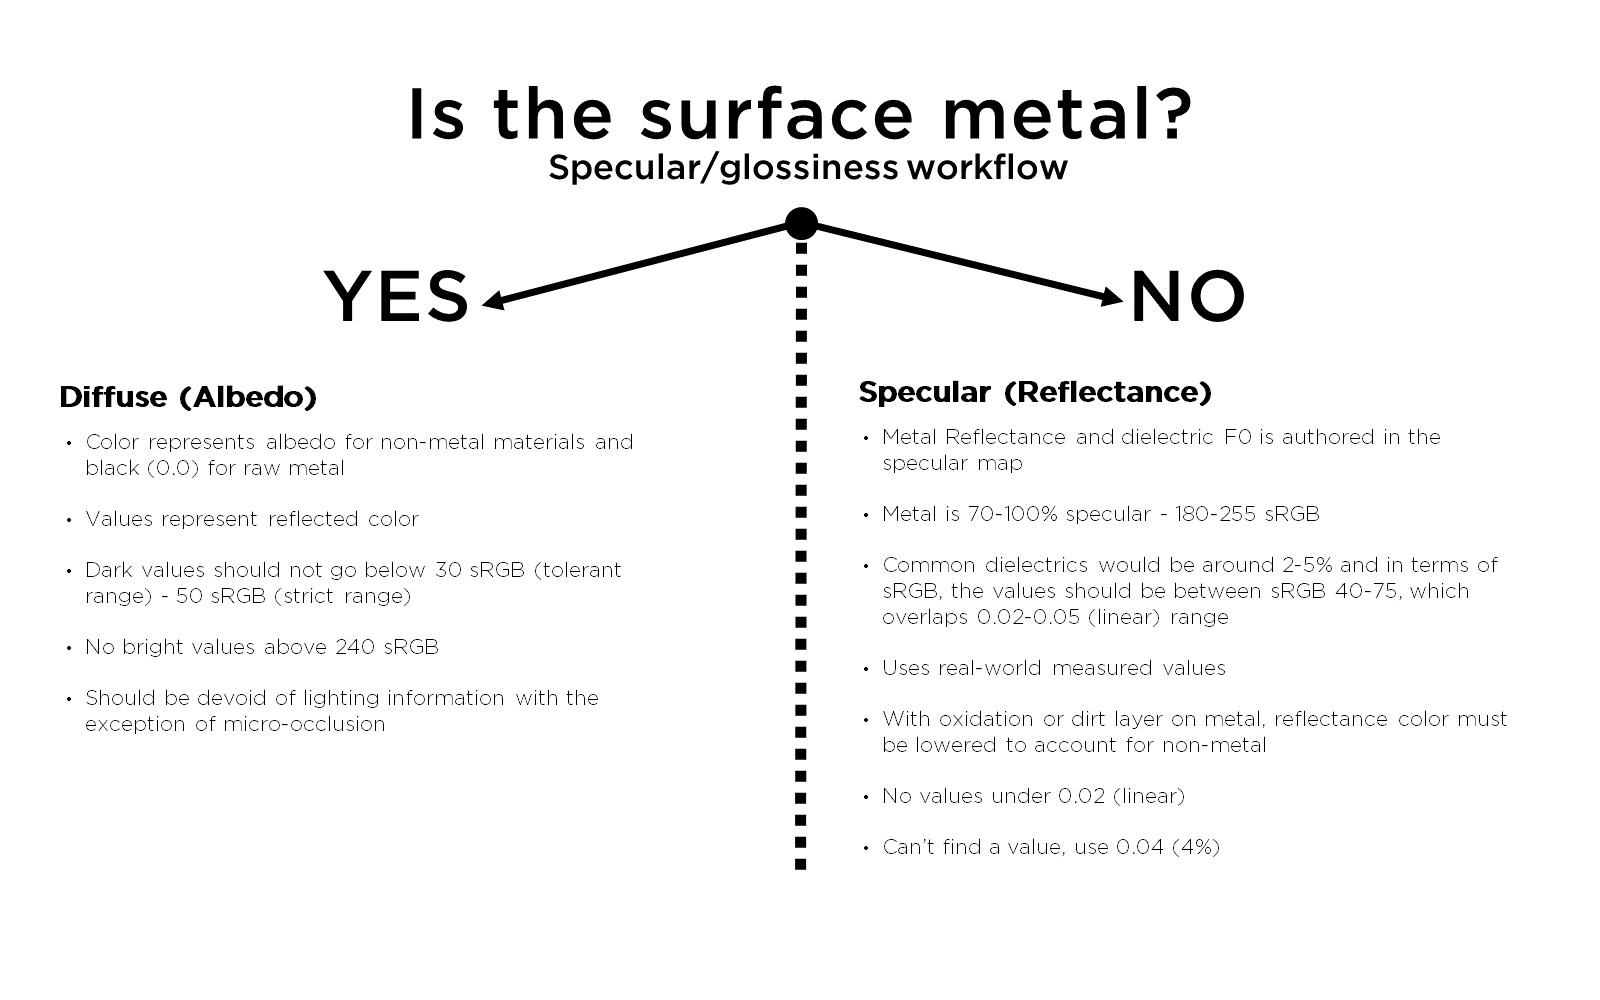
I know most of the PBR resources since I am using Substance painter. But I find the specular slider in the Principled Shader very confusing and it feels inaccurate most of the time. Whenever I set it to a light value of just 0.01 or lower its already too much reflectance. Another problem is the RGB values. How do I translate the 0-1 Slider in Blender to the 0-255 values?
The city map is pretty neat. I like the camera movement when scrolling around.
The specular value on the Principled BSDF isn’t like the “specular” control on some PBR shaders (like what the Substance guide refers to as “spec/glossy workflow”). It’s just a slider that varies the dielectric-side IOR between 1.0 (when set to 0) and 1.8 (when set to 1). It’s just to give you some extra artistic control, like when your art director tells you stuff like “The reflection is too bright and distracting on the helmet, turn it down a bit”. The overall reflection intensity is also affected by roughness, so normally you want to leave that slider at 0.5 unless you have a specific reason to change it. You can also use it if you have a surface with a specific IOR in mind, like water has a lower IOR than plastic, for example.
The main thing though, is don’t feel like you’re supposed to be painting and exporting a “specular” channel to put there. You’ll rarely need to change it, and when you do it’s usually just setting it to a different constant value.
This is where I start to hit a blind spot. My go to scene has two paintings, on canvas. There’s the diffuse, and a canvas bump. If I don’t turn the specular down (and I mean right down, though not to zero) I get a horrible reflection from the light source sufficient to blow the diffuse out.
In the real world, this wouldn’t happen. There would be some specularity, but at 0.5, it simply kills the texture.
So for PBR, do we keep it and blow it, or start lowering it until it’s more pleasing?
From your description, it sounds like the roughness value is too low. As roughness goes up, reflectivity goes down. It’s not like the old-style “specular size” controls, or even the simple glossy BSDF in Cycles, where it just makes the highlight bigger. It actually reduces the intensity of the reflection as well. How shiny a real surface gets is determined by 2 things, how smooth the surface is, and what refractive index it has. Roughness controls the first one, specular controls the 2nd one. Most everyday items don’t vary in IOR all that much, so usually you just control roughness.
So you should get in the habit of controlling shininess with the roughness control, and only use specular if you need to dim the reflection without changing blurriness/highlight size.
I have another question since I am still confused. On this blogpost it says you get more accurate lighting if you cramp up the sunlight to much higher values.
Now in this stackexchange post at the bottom there is a grey card to measure. If I load this and remove all the lights and environment lighting, then add a sunlight I get a scene referred value of 0.19 on my grey card only if the sun is at a strength of 2.1
Could somebody explain why it is suggested to use such high values for the lights? Even if my place this grey card in an enclosed room values above 30 for my sunlight are unreasonable to get a scene referred value of 0.19.
That part of the Blog post really confuses me till now.
Don’t mix and match contexts. All things being equal, equal ratios of lights will yield identical results via adjusting the strength of the light versus the exposure of the camera.
The first article is talking about illuminating the scene as a creative choice, using independent lighting sources. This will yield different ratios of light. The reason for “crank up the lights” is that the post is coming from a pre-Filmic grounding of lighting techniques, where light ratios were artificially restrained by the pixel pushers to avoid making nasty looking imagery. Perhaps the sun coming in from a window is artificially constrained by the pixel pusher, relative to the lamps, for example.
So when adjusting the relative ratios between lights, it is important to creatively think about those ratios. In an HDRI, all of the ratios are “baked” and move lock-step as you change the strength.
Exposure is, again, a creative choice. If one chooses the strength of an HDRI or the Film / CM exposure controls, the net sum is the same; a changing of exposure. The two are equivalent here due to the reasons of fixed ratios listed above.
However, if there are independent lights in a scene, the creative evaluation of exposure is based on the individual intensity of those lights, and the impact on the scene with those relative ratios will dramatically change the light transport and, in turn, dramatically change the resulting output. The ratios are not fixed, and an increasing of a light in a scene relative to another will change the light interactions.
I updated the Photographer Addon, I’d recommend to update for accurate exposure. Sorry for messing it up the first time, shouldn’t have assume it was correct without proper testing.
Secondly, maybe something that will help you: I am currently building a library of “physically correct” light textures and I’m planning to release them soon (maybe for a small fee, not sure yet). They will be HDRI textures of lamps that are not pre-exposed, not white balanced.
Some will even come with models and tweaked cycles lights for improved performance (mesh lights sampling isn’t as good as lights), and a node group to adjust White Balance and Intensity.
To me it’s really important to use HDR textures for lights rather than simple lights, your reflections and glow intensities will look 10 times more realistic with no effort.
It is meant to be used with the Photographer addon and will respect light ratios between fixtures, and HDRIs if these are also not pre-exposed, and not white-balanced.
Here is a quick render with one of the lamp and HDRI from the Theta:
The files only know relative values - a streetlamp would be correctly scaled compared to the sun (if unclipped). But the absolute scale isn’t known to the file. Here is how I set the strength of a sun&sky system, using the photographer addon:
Using the sunny 16 rule, set the addon to fully manual exposure; ISO100, 1/100" (or closest) shutter speed, and f/16 aperture. Those settings on a manual camera would ensure proper exposure of a frontlit subject on a sunny day (screw off any filters if you want to attempt it for yourself, or compensate for the amount of light they take).
Add a sun & sky and adjust their settings up (a lot) until it looks about correct. Turn off sun & sky and add an unclipped HDRI, and adjust the strength until it looks good.
You can also flip it around if you want to create indoor lighting assets but don’t know correct exposure settings:
Use the addon to set the exposure names the scene setting you’re trying to create, like i.e. indoor or office lighting.
Then adjust the lighting assets so they provide good looking lighting for that exposure setting.
If you use the sun/hdri version, creating PBR materials be sure to lookup an albedo that is close to what you’re creating, from a PBR cheat sheet.
If you’re using mixed lighting, say both sun and indoors, you’ll typically find that when exposing for indoors, the outdoors is completely blown out. Now you start applying the tricks they have to use in film; dim down the outdoors (simulates ND filter on the windows), add supporting light rigs to practicals (a candle light is often enhanced with additional lighting to make it “work”, i.e. if you want it to act as fill or rim lighting it alone isn’t able to do the job).
Hey @CarlG thanks for the help. How do I add a sun and sky. Do I just create a sun lamp and then use a background with light blue? Or a Hosek/Wilkie Sky texture? Or could you maybe share a scene to set it up with if it isn’t too much trouble.
I recently created a scene with generic lights and used DONTNODs color values for Aluminum (245, 246, 246) and it is way too bright. Not sure what I am doing wrong here.
Sun lamp and Hosek / Wilkie Sky texture, yes.
Those values sounds like integer RGB values and look fine albedo wise for aluminium. But blender operates in 0-1, you should probably try 0.961, 0.965, 0.965.
Does this mean the addon only properly works in 2.8 with the update to it? @chafouin
So I have gone through some of the threads and this one as a whole with some questions still left.
I asked this before, but what do you mean with setting the strength to the time of day? If my HDRI is taken at say 12pm. Is there a strength value to put or a rule to find this value?
I still don’t understand the term scaled in this case. Sorry, I am not a native speaker. Could you elaborate on this again? And are HDRIs from HDRI Haven clipped or only properly usable as EXRs?
Sorry if some of the questions seem dumb but I am trying to understand what I am doing inside Blender.
Perhaps a better way to think about scene referred values, such as those in an EXR, is to think of the values as data and less as an “image” in a traditional sense. That is, in the scene referred domain, there is no real notion of “white” nor “black”. Once we accept this, we can see that the data in the file doesn’t represent any actual values, but rather describes the relationship between the values. That is, an EXR only represents ratios of the three lights and their relationship to each other, and no defined “ground truth”.
If we understand that, we can also begin to understand that the default encoding for an “image” EXR has no explicit relationship to the chosen view transform. Looking at a thumbnail? The EXR might not align with the needs of the thumbnailer’s assumptions. Trying to view the EXR in an image viewer? The image viewer might make assumptions that are incorrect for the data.
If we were to take the maximum value in an EXR, then add another brighter source, the value would be higher. Likewise, if we descend down into the darker parts of a capture, we can easily see that there is no lower bound either. Again, there is no notion of black or white[1] in a scene referred set of data. Those notions are defined entirely by the view transform / exposure / etc.
Once this is understood, it is easier to understand scaling the scene values. If we have a particular value that we need to land at a particular code value of a particular view transform, we can apply (2^NUMBER_OF_STOPS_OF_ADJUSTMENT)*IMAGE_VALUES to scale the data properly. That is, aligning image data and keeping the linear ratios between the values must be achieved by multiplication. This is precisely the method that proper exposure compensation uses to shape the data prior to a view transform, or shape the data itself before saving to an encoding. This is scaling the data.
[1] This is also why it is absolutely broken thinking to force one’s mental model of RGB colours to a scale of 0.0 to 1.0, or worse, the absolutely dumb 0 to 255 encoding; colour data isn’t consistent across encodings! Understanding how scene referred data relates to display referred, and avoiding awful terms such as “HDR” (unless referring to the dot HDR file format) and “Gamma” (unless referring specifically to a physical display) is nothing more than confusing rubbish.