I have a large model and a texture I want to apply. Each time I go into edit mode blender goes down to 0.17 fps and goes unresponsive. Spent an hour and still couldn’t get it to work.
Is there an alternative workflow for applying textures to large models?
Can you give some more detail?
If it was a large model of a stone statue for example, I might suggest box mapping some stone textures. You do not need to enter edit mode for this.
You could also consider decimating the model firsts.
If it was a character sculpt I would suggest retopologizing it and baking textures from the hires to the low before contining to texture it.
it is a large photogrammetry model. The model was decimated using oculus medium. I really dont want to decimate it any further and loose detail.
The texture is just 1 image file created from the photogrammetry software. You are absolutely right in the type of model dictating the workflow. In this case I had a textured mesh and now I am manipulating the mesh with a sculpting tool and then want to reapply the textured mesh. perhaps there is a way to do this without entering edit mode?
Ok,
you can apply the texture in the node editor.
If you get past the basic colour part of this video (its about a minute in):
It shows how to apply a texture. Note that this is for ‘cycles’ which you select at the very top of the screen if it is not already enabled. (it will say ‘blender render’ if its not in cycles)
be aware that if you do any ‘dynamic’ sculpting in blender your model will have lost its UV mapping. Normal sculpting should be fine, but some areas may appear stretched.
After I do this, the model is just black. I give up with blender. I am going to just pay for a photogrammetry tool that can do this simply. with blender it’s too complex.
Blender can be a real pain for users who don’t quite understand how the texturing system works.
Are you using cycles render or blender render they are very different.
1,Your object may not be uv mapped so the entire mesh is only using one pixel of the texture which might be black.
2.Your mesh may not have the correct material assigned.
3. Are you in GLSL or multitexture shading mode? They display things differently.
4. Any lights in the scene?
5. If using cycles, your nodes may not be connected properly.
I am following the video posted in this thread exactly.
There is a light source shown… that is, until I go into render mode. then it says (1) Lamp, but I dont see it the same as when I was in whatever mode it was before that. when I switch to texture mode or solid mode I see the lamp again.
I will try to go over my understanding of skywalker113’s points 1 by 1.
I dont know what uv mapping is. how to know if this is my problem?
I selected the type of material in the video earlier in this thread
I dont know what shading mode is. it’s whatever is default and/or set by doing things in that video earlier in this thread
yes/maybe/i dont know. the lamp shows up in modes other than rendered. discussed above in detail.
I followed the video earlier in this thread and only hooked up the color node.
Before I go through instructions releated to your model we should make sure you are using a version of blender and are using cycles for rendering. Otherwise the instructions to follow will make no sense.
Are you using blender 2.79? not 2.8 it is not an official release yet and is very different.(I do not use it yet)
If no: download version 2.79
If yes: Open blender and load your model file.
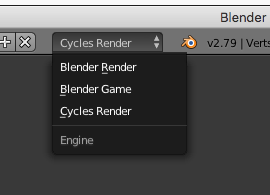
At the very top of the screen to the right of the menus for file etc, you should see 3 boxws, one saying ‘Default’, one saying ‘Scene’ and the last one saying ‘Blender Render’ or ‘Cycles Render’
If this says anything other than ‘Cycles render’ click on it and choose ‘Cycles Render’
Now to answer your questions above:
UV mapping is what controls how a flat image is laid over your 3d model.
Your model should have a UV map already as you said it came from a photogrammetry program.
to double check:
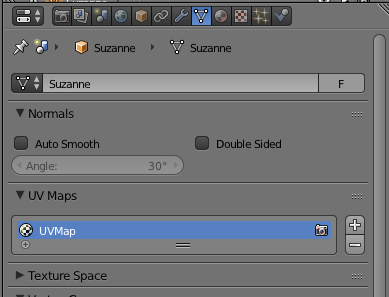
Select your model. ![42|388x290]
in the panel on the right look for an icon that is a triangle. its between the spanner and the red ball icons.
click on it and scroll down to ‘UV Maps’. If you see anything in that list you have a UV map and don’t need to worry. If not its possible your UV map was removed or not imported. so re import your model.
Ignore GLSL and multitexture. They do not apply to cycles rendering.
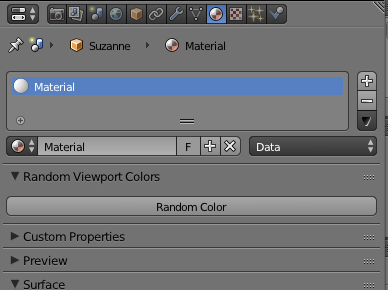
Now for the material.
The red ball icon I mentioned earlier. Click on it. Are there any materials in the list? is there more than one?
If there is more than one material this might be causing the issue.
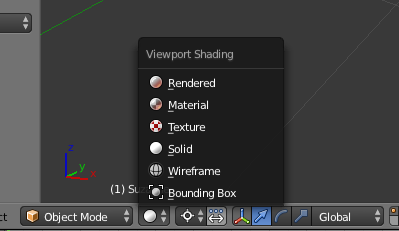
At the bottom of the 3d view there are the ‘Viewport shading’ options. If you click in here and choose rendered you should at the very least see a grey version of your model with better lighting than the standard view. If everything else is correct you might actually see your textured model.
Check those and let me know how it goes. If you still have issues and you don’t mind sharing your file that would be the quickest way to figure out what the problem is.
 ![42|388x290]