Does that mean you’re using both the GPU and CPU? If so, try it with only the CPU.
1 Like
Thanks for all the tips. I’ll have to troubleshoot it piece by piece in the morning.
Edit: So, I let it run only on the CPU overnight and it works. It seems one of my background meshes is extremity heavy polygon-wise, so I’ll see if I can retopo that to save some memory. I’ll also maybe reduce the whitewater particles by 15-25% to try and further get the size down so it’ll fit on the GPU. Plus it should make the render times generally a bit faster. This is at 128 samples at 75% HD resolution, so it will get bigger for a final render, so I need to trim it all down as much as possible. Some frames are taking up to 10 minutes already which just won’t cut it. It needs to be 3-5 minutes. This shall be a fun exercise 
I rendered this from the console also. I have two Peak Memory numbers. One is around 7.6Gb, and the other is 14.5gb. Why are there two, and which is the correct one with regards to the GPU?
The Bubbles seem to be taking quite some time. Is there any reason why they’re heavier than the other particles? I guess due to their transparent material, right? (I’m using the built in materials.)
I’m not sure exactly what the differences are. I’ve always assumed the larger peak value is the one to use, but I could be wrong.
The built-in bubbles material will be using a transparent shader. Transparent bubbles can look nice, but take longer to render and can require more samples for a clear render. In renders that contain a lot of bubbles, I usually just set this material to a white diffuse shader which renders quickly.
1 Like
It doesn’t seem to be, since I was able to render the images on my graphics cards, both of which have 8GB.
I’ve since played around and I’ve found that Optix isn’t playing nice with a subdiv modifier I have on an object and sometimes renders it just black, or doesn’t use the adaptive subdiv correctly. Optix also didn’t render the material on the foam correctly.
So far, by decimating the said object, switching to Cuda, and using the command line option, I can render everything on the graphics cards now. Peak memory is at 9GB and 5GB respectively for the two values, so the second value must be the real value somehow.
In general, I will reduce the overall particles I guess, as there are a lot of objects that still need materials, but for a test render to see how the fluid behaves, I’m happy enough for now. I’m down to around 3 minutes per frame. Much more acceptable render times.
Edit: Just a quick note.
The command line render also shows me some kind of references to other addons that I hvae installed, but not using in this scene. I’ll try turning them off and see if that also helps to speed up the render as I’ve no clue as to what it’s doing.
Thanks for the help, I had kind of worked out how to do it but as I was using the demo to see if it could do what I needed I was unable to add the second inflow, I had being trying to solve the banding but im guessing that is the issue as my set up was almost identical, but looking at it seems I will be purchasing as its a far better price than something like realflow

There are two outflow objects for the setup. One way to get around the demo limitation of just 1 outflow is to merge the two outflow meshes into a single object (Select both object, ctrl+j to join).
And just a performance tip: lowering the ceiling on the simulation domain so that the box fits tightly around the effect can greatly improve performance. Documentation here: How large should I make my domain object?
Maybe you can tell me what this error is off the bat, without a file. I’m rendering from the command line on two GPU’s and the CPU with a tile size of 32. Usually about halfway I get this. The thing is, I’m not using Optix, I’m just using CUDA, as one of the cards is a GTX1070
OptiX CUDA error CUDA_ERROR_LAUNCH_FAILED in cuStreamSynchronize(cuda_stream[thread_index]), line 671
OptiX CUDA error CUDA_ERROR_LAUNCH_FAILED in cuMemcpyDtoH( (char *)mem.host_pointer + offset, (CUdeviceptr)mem.device_pointer + offset, size), line 1605
Fra:642 Mem:8169.51M (0.00M, Peak 9847.33M) | Time:04:24.94 | Remaining:01:24.64 | Mem:7409.71M, Peak:8003.52M | Scene, View Layer | Rendered 1245/2040 Tiles, Sample 64/512, Prefiltered 1183 tiles
Error: OptiX CUDA error CUDA_ERROR_LAUNCH_FAILED in cuStreamSynchronize(cuda_stream[thread_index]), line 671
Fra:642 Mem:8169.51M (0.00M, Peak 9847.33M) | Time:04:25.02 | Remaining:01:24.69 | Mem:7409.71M, Peak:8003.52M | Scene, View Layer | Cancel | OptiX CUDA error CUDA_ERROR_LAUNCH_FAILED in cuStreamSynchronize(cuda_stream[thread_index]), line 671
Fra:642 Mem:1563.17M (0.00M, Peak 9847.33M) | Time:04:34.40 | Sce: Scene Ve:0 Fa:0 La:0
EDIT: I just tried with CPU only and I got the same error which makes no sense to me.
Edit 2: I turned off all of the white water particles and it renders fine on the RTX card, yet this is the same scene that I rendered last week using GPU plus CPU. Granted, I have added more textures to the scene, but that’s why I thought rendering on both GPU and CPU would be no problem then.
These look like the types of errors you will get when running out of VRAM. I am not sure why you are still getting Cuda errors through CPU rendering, though. Searching for CUDA_ERROR_LAUNCH_FAILED brings up a quite a few Blender Artists threads that may help with troubleshooting: https://blenderartists.org/search?q=CUDA_ERROR_LAUNCH_FAILED
Whenever I encounter a cuda error in Blender, I always restart the application. I’ve often found that the same error persists when further testing (even in an empty scene) if I do not restart Blender.
EDIT: Another note: when starting a command line render, you will need to save the .blend file for any changes to take effect. The command line render starts by opening the saved .blend file.
Yeah, I learnt a while ago about making sure to save.
I’ll give it another play through over the weekend. It’s just super frustrating at the minute trying to get it rendered out, even test rendering a few frames. I was hoping that a GPU plus CPU combo would be the winning ticket for me. There was an NVIDIA upgrade during the week. Maybe something to do with that 
Edit: I found this article which looks interesting and could be a solution. If the cards are trying to do massive computations, this might just be the problem, and the solution. https://www.christoph-werner.de/2017/12/31/blender-fix-for-cycles-bug-launch-failed-in-cuctxsynchronize/
This seems to have done it!
It all seems to be working fine after following these instructions. What it basically is, is a timeout for the graphics cards. Dual GPU and CPU, 32x32 tile size, rendering works a breeze now. I’ve noticed the peak memory is also way lower, so I’ve no clue what that’s all about. But due to that being under 8GB, I ran a GPU only test at 512x512 (my usual optimal tile size). That seems to have crashed with no output from the console. HWMonitor tells me that the 2080 is using 96% of its memory, and the 1070 is using 79% of its.
I’ll maybe test some other variations during the week when I get time, but since it’s working on the combined GPU/CPU setup, I can let a render run unattended for the next while.
I hope… lol.
1 Like
Pier/ocean test scene.
@RLGUY can’t wait for blending flip fluids with ocean modifier or another flip fluids’ ocean toolkit. It’s much needed function.
1 Like
Very cool, thanks for sharing!
Large ocean scenes that combine FLIP Fluids with the ocean modifier is quite a popular request that we get, so it would be great to have an ocean toolkit within the addon. We have some plans and rough ideas for this. Recently I have finished following a course in Phoenix FD for creating large ocean effects (RedefineFX: Advanced Water Course). It gave me a few ideas for how we can create some helpful ocean tools for the addon.
One of the current problems for combining simulation with the ocean modifier in Blender is that the procedural tools for seamlessly blending the ocean and fluid meshes can be a bit tedious or complicated to set up right. I think we will need to add some tools within the simulation to bake the ocean geometry directly into the simulation mesh. This may require us writing our own version of the ocean modifier so that it can integrate well with the rest of the addon. Ideally, we would like to have tools to automatically generate and set up the blending of simulation and ocean meshes with just a few clicks.
Other features of the ocean toolkit could include:
- Add functionality for open boundaries and a water level - The domain could be automatically filled up to the specified water level. Open boundaries would allow fluid to flow in and out of the domain to maintain a consistent water level.
- Add functionality to animate the position of the domain object - scenes with a lot of fluid take a long time to simulate. In a scene where the camera follows a moving boat object, a great optimization would be to exclude simulating fluid that is outside of the camera view. A domain that can move position throughout the animation to follow the camera view can be a way to boost performance for these types of scenes.
3 Likes
@RLGUY, thanks, great info  I think internal Flip Fluids’ ocean toolkit is better idea and has more VFX possibilities. Do you think, we can have it (ocean tools) in 2020?
We’ll have to wait and see what we can accomplish this year in development, but hope to at least get a few handy ocean tools into the addon! During the past few months I’ve been making a lot of architectural improvements to the codebase that will make future features easier to implement and always keep these large features in mind. There can sometimes be unpredictable hiccups during development, especially when required to re-write Blender functionality, such as our own ocean modifier.
An example is a large force fields feature that we have been working on for quite some time now. The Blender force fields were not flexible enough for our use and from what FLIP Fluids users want, and we have needed to write our own force fields system ourselves. This has caused quite some delays due to unexpected issues and complications.
Thanks to the enormous amount of support from the Blender Community, the FLIP Fluids project has been able to continue full-time development for the past 20 months! As the project grows and becomes more complex, a brief weekly update will be helpful to communicate to you what we have been working on, provide links/references to changes in the addon, and let you know about new documentation topics and learning resources. By digitizing and organizing scribbles from my log book, this will also help me keep track of the many tasks that come up during a typical work week.
Here is the 7th week of our development blog! Weeks 1 to 6 are not yet available for viewing. We’re working a website to host the blog which should be online within the next few weeks. I’ll continue to add the weekly update to this thread as well.
Weekly Development Notes #7 – Bug Fixes And Caching Improvements

Covering the week of February 3rd – 7th, 2020.
Hey everyone, this is Ryan here with this week’s development update of the FLIP Fluids addon for Blender! Our volume of support requests have been lowering over the past month after catching up from our Winter break and after adding some helpful documentation topics. That means more time for code development! This week I had a chance to fix some older bugs and improve how the simulation cache is stored.
Boat Doodle
This little boat doodle was created while testing some changes to the FLIP Fluids cache (described in the next section). Based on Derek Elliott’s Boat Animation .
https://gfycat.com/opulentcelebratedgrayling
Here is an OpenGL render of the scene to show how this animation works:
https://gfycat.com/liveblackadouri
A domain with an inflow at one end and outflow at the other creates a ‘conveyor belt’ of liquid to flow past the boat. The highlighted object is set as a custom meshing volume in the FLIP Fluid Surface panel to generate the fluid island shape.
Important note: there is also an outflow behind the inflow to create an air-gap between the generated fluid and the domain wall. Without the air-gap, there can be a sort of a suction force against the domain wall that prevents the inflow from flowing consistently.
FLIP Fluids Cache Improvements
The FLIP Fluids addon stores all of it’s simulation data into files on your computer in a location called the cache directory. I had a chance this week to fix some some bugs and make some improvements to how the addon stores it’s cache files.
Bug Fix: Allow special filesystem characters to be used in Blender object names
Issue report located here: #462 NotADirectoryError when exporting objects that contain special filesystem characters in the name
When you set a Blender object as a FLIP Fluid object (such as an Inflow/Outflow/Obstacle), the addon exports the object’s data to files located in the cache directory. There was a flaw in how the addon stores these files: the files were saved using the name of the Blender object. This could cause errors if the object name contained special characters reserved for your OS filesystem, such as: \ / : * ? " < > |
For example, if you had an object named AlembicExportFromMaya:CharacterRig on Windows, this would generate an error in the addon:
NotADirectoryError: [WinError 267] The directory name is invalid: 'C:\\Users\\ryanl\\AppData\\Local\\Temp\\untitled_flip_fluid_cache\\export\\AlembicExportFromMaya:CharacterRig'
In addition to special filename characters, there are also reserved filenames on Windows OS. Try to name a file after any of these names and you will find that it is not possible:
CON, PRN, AUX, NUL, COM1, COM2, COM3, COM4, COM5, COM6, COM7, COM8, COM9, LPT1, LPT2, LPT3, LPT4, LPT5, LPT6, LPT7, LPT8, and LPT9
From Microsoft documentation: Naming Files, Paths, and Namespaces
To fix this issue, object names will now be stored on the filesystem by ‘slugifying’ the name, which is a technique used in generating URLs for webpages. The Blender object name will be converted using a whitelist of characters and truncated to 48 characters:
abcdefghijklmnopqrstuvwxyzABCDEFGHIJKLMNOPQRSTUVWXYZ0123456789_-
Characters not on the whitelist will be replaced with a dash - . To avoid collisions in edge cases (two different object names translating into the same slugified name), a 16 hexdigit hash based on the original object name will be appended to the end of the filename. Here are some examples:
| Object Name | Slugified Name |
|---|---|
| Cube.001 | Cube-00145c72b5baa3ac7e7 |
| MyFluidObject | MyFluidObjecta3c4a8f8028486da |
| CharacterMesh() | CharacterMesh–353e4a838993eb7d |
| CharacterMesh)( | CharacterMesh–0378c26633a7bb14 |
| con | con7ed201fa20d25d22 |
This bug fix will be included in the next version of the FLIP Fluids addon (> 1.0.7). Until this fix is available, a workaround is to not use special filesystem characters for your FLIP Fluid objects.
More Cache Fixes:
- Bug Fix: Issue #477 OSError: [Errno 22] Invalid argument when simulation contains large amount of fluid/particles – If you try to run a very very large simulation (around 120 million particles), the cache files can be very large and there is a possibility that you could encounter an error when reading/writing the cache files. Depending on your system, there may be a limit to how much data you can write or read at once. This issue has been fixed by reading/writing files in smaller chunks instead of all at once.
- Improvement: added a fail safe in the case that you run out of storage space – At the end of each frame, the simulator stores a file that contains all of the current simulation data that we call a savestate . This is how the addon is able to resume the simulation after pausing. If you happen to run out of storage space, there is a possibility that this file will not be completely written and become corrupted and you would not be able to resume your simulation. This has been fixed by not deleting the previous frame savestate until the current frame savestate has been completely written. In the case that you run out of storage space, the last savestate will still be intact and you will only lose 1 frame of progress!
Tracking Technical Support Requests
One of our main focuses during development that we pride ourselves on is providing quality support for our users Monday through Friday! Support is a very important aspect of maintaining the FLIP Fluids project. The types of support requests and volume we receive let us know how our users are using the addon and give us ideas for how to improve the addon.
Starting in January, I have been keeping a log of support request volume to see any patterns. If we’re spending a lot of time handling support for common issues, this could indicate that an area of documentation or learning resources is lacking in information. And this time spent on support takes away time from code development, which is also a very important part of our development.
Here is a daily heatmap covering January 6th to February 10th:
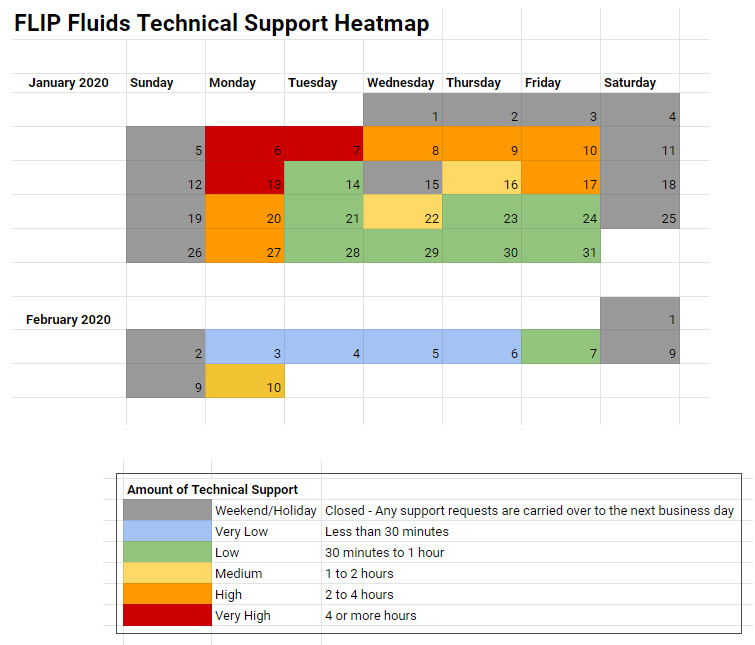
The large volume of support at the start of January can be attributed to catching up after our Winter break. There were a few topics that I found myself repeating during January and spent some time updating the wiki/documentation on some well-needed topics. Later into January and beginning in February, I found myself needing to spend less time on support due to catching up after the break and also being able to link to quality documentation topics that help solve our users’ issues.
More Development Notes
-
Testing AMD ProRender compatibility – We had a question whether FLIP Fluids is compatible with AMD ProRender. After testing, it looks like all FLIP Fluids features are supported and no changes for compatibility are needed. However, there are some performance issues when rendering a large number of whitewater particles (3million+), which rely on Blender’s instancing system. These issues are outside of our control and it looks like this is a known issue in ProRender, so hopefully it can be improved.
Rendering a large number of particles in our tests required a larger amount of RAM: 14GB in ProRender vs 5GB in Cycles. This did not affect amount of VRAM required and seemed consistent between ProRender and Cycles. There was also a longer render setup time: 105sec in ProRender vs 15sec in Cycles.
-
Bug Fix: #488 Playback Offset gives inconsistent results – A bug that would cause incorrect frames to be loaded if the playback offset was set to 1 or -1.
-
Bug Fix: #489 Heavy compositing uses the wrong cached frame during render – A bug that could cause the loaded FLIP Fluids frame to be switched during render if using the compositor.
-
Fixed some problems in our product Example Scenes. Locking the Blender interface (Blender > Render > Lock Interface) is required during render to fully prevent crashes. Some example scenes were missing this option, which could lead to crashes and confusion! This has been fixed and re-uploaded to the Blender Market.
-
Restructured our development repository. As the codebase and project grows, we need to become more organized in our development. I spent some time cleaning up our repository, merging a few older feature branches, and we’re now using the Gitflow Workflow.
9 Likes
Our now homepage, flipfluids.com, is now online! And here’s this week’s FLIP Fluids development update #8. Previous updates can be found on our blog page here: https://flipfluids.com/blog/
Weekly Development Notes #8 – Using Savestates In Your Workflow And Blender 2.82 Mantaflow Release

Covering the week of February 10th – 14th, 2020.
Hello everyone, this is Ryan with this week’s development update for the FLIP Fluids addon for Blender! We had a lovely long weekend here in B.C., Canada so I’m creating this weekly update on Tuesday rather than Monday.
In this post, I’ll detail how some of the FLIP Fluids addon workflow features used in our Valentine’s Day animation, as well as cover some common misconceptions on the topic of the new Blender 2.82 release of Mantaflow.
Valentines Animation
https://gfycat.com/unsteadyqueasyeelelephant
This was a quick little doodle to end the week for Valentine’s Day on February 14th! We had some questions on how this animation was created, mainly on how the bulging effects were achieved. I used a few of our FLIP Fluids workflow features to help setup and run this simulation and I’ll add some details on the process of creating this simulation.
Zero Gravity
To prevent the fluid from falling towards the ground, the simulation was run in zero gravity. The gravity vector can be set in the FLIP Fluid World panel under the Gravity subsection. The gravity value can be set to use the Blender scene gravity, or your own custom gravity value. For zero-g, simply set a value of (0, 0, 0).
High Surface Tension
To get the fluid blobs to contract into a cohesive sphere as they change shape was achieved by enabling theSurface Tension Solver in the FLIP Fluid World panel. A relatively high value of surface tension was used to make the animation feel as if these were smallish water blobs floating in space.
Tip: How do I determine what surface tension value to use? For this type of simulation scenario, increasing surface tension has the effect of increasing the speed at which the fluid contracts. You will want to experiment with different values to get the right speed an feel in your scene. I suggest starting with a simple blob with some varied curvature, such as a long oval/ellipsoid. Simulate at a low resolution to quickly get an idea for how quickly the fluid will react under different surface tension values. Use Blender’s OpenGL renderer to quickly generate a video of your simulation to see an accurate result of your animation speed.
Tip: You often do not need a very high domain resolution for these types of zero gravity surface tension effects . The fluid motion in this scenario is not very complex, the fluid geometry is quite rounded and predictable, and you can often achieve a satisfactory result in a quick amount of time at low resolution. This animation was set up at 65 resolution for testing and produced quite a nice result in about 8 minutes of simulation time. For the final simulation, the resolution was doubled up to 130 and took 1h45m to simulate. Bumping up the resolution added a bit more detail and produced a better mesh, but there was not a very large increase in quality.
Bulging Effects
How did we get the fluid to bulge like that? It’s actually quite simple! Inflow objects were placed within the interior of the fluid and set up to emit small pulses of fluid towards the outside of the fluid blobs. Here is an OpenGL render to help show what is going on inside of the fluid:
https://gfycat.com/hollowwavyamoeba
Here are some notes on the inflow features used:
- By default, inflow objects do not have any effect on the simulation when completely submerged/surrounded by fluid. To get the inflow to push around jets of fluid within the blobs, the Inflow Constrain Fluid Velocity option was enabled. After enabling this option, the inflow objects will push around fluid at the specified velocity speed.
- To get the inflows to push fluid in a certain direction, target objects were set in the Inflow settings. When a target object is set, inflows will emit or push fluid in the direction towards the target at the specified speed. The target option is a feature that makes it easier to set the velocity direction compared to specifying the (x, y, z) vector manually. Using an Empty Blender object is a good choice of object to use for inflow targets due to the simple geometry.
- The inflows only emitted fluid in small bursts of about five frames in duration. Inflow objects can be started and stopped by keyframing the inflow Enabled option. When this option is disabled, the inflow will not emit or push around fluid.
Tip: Nearly all options and settings in the FLIP Fluids addon can be keyframed. If you right click on the setting and there is an Insert Keyframe menu item available, keyframing this option is supported within the simulator.
Workflow Tip: using savestates to re-simulate from an earlier frame
Our FLIP Fluids addon ‘ Savestates ‘ feature was essential to the workflow when creating this simulation. Our simulator creates savestates (also known as checkpoints) to your simulation cache. This allows you to resume simulation from an earlier frame with updated settings, not just from the last frame or the beginning. By default, the simulator saves a state every 50 frames. This value can be set in the Savestates settings in the FLIP Fluid Simulation panel (Documentation here).
Note: The Update Settings on Resume option will need to be enabled. This ensures that your simulation setup is updated with new values and objects when resuming the simulation (Documentation here).
But how did I use this feature in my workflow? I used this feature because I did not know where to place inflow objects in advance. To create the bulging effects, inflow objects needed to be located within the interior of the moving fluid, but the only way to know where the fluid would be is to run the simulation. That’s where having the ability to go back in time, update the simulation setup, and re-run the simulation from an earlier point came in handy! Here was my general workflow for this simulation:
- Simulate about 100 frames
- Playback the simulation and scrub through the timeline to determine where I want to place an inflow, or multiple inflows.
- Keyframe the Inflow Enabled on and off for a duration of about 5 frames.
- Using a previous savestate, re-simulate from a frame just before I added or moved new inflow objects.
This process was repeated until I was satisfied with the full simulation result.
The savestates feature can really help speed up your workflow when you want to see how the effects of changing settings will affect the result in the middle of the simulation. By using this workflow feature effectively and in appropriate situations, you can save a lot of time by avoid having to re-simulate from the beginning of the simulation. This feature is also helpful for correcting errors in the middle of a simulation, such as if you forgot to enable an object as an obstacle for example.
Example .blend file
Need help getting starting with this type of simulation? Here is a simple .blend file setup using FLIP Fluids v1.0.7 and Blender 2.8. The setup has been simplified so that you can run the .blend file in our free FLIP Fluids Demo addon!
zerog_surface_tension_example.blend (953 kB)
This simple example will use an inflow to push a blob from one end of the domain to the other using the techniques described above. Simulation time: less than two minutes!
https://gfycat.com/slightsecretamericanbittern
Blender 2.82 release and Mantaflow!
Last week, Blender 2.82 officially released on blender.org. I am most excited about the new FLIP solver added to Blender called Mantaflow! This is a huge upgrade to the previous built-in fluid solver, Elbeem.
Lately we have seen quite a few misconceptions on what Mantaflow and the FLIP Fluids addon have in common and their differences. I’ll try my best to clarify some of the common misconceptions seen over the past weeks.
- What does FLIP mean? FLIP is the name of a simulation technique that is popular in computer graphics simulation systems and stands for FL uid I mplicit P article. The FLIP simulation method can be found in other simulation systems such as Houdini FLIP, Phoenix FD, Maya Bifrost, Mantaflow, and others.
- Why is our addon called FLIP Fluids? Simply put, we provide a simulation system that implements the FLIP simulation method to simulate fluids. The project was originally named Blender FLIP Fluids, but of course we had to drop the Blender trademark from the name when releasing the product. The name was shortened to FLIP Fluids (not very creative, eh?). A unfortunate side-effect of this simple name is that it has led to confusion when discussing topics such as the Mantaflow FLIP solver.
- Mantaflow and the FLIP Fluids addon are the same thing (false). Mantaflow and the FLIP Fluids addon are separate development projects managed by separate teams. They are similar in the way that both simulation solutions use the FLIP simulation method, but are very different in the way of which features and workflows were implemented in the software. We choose to focus our development on features and workflows that improve on the usability and stability of the built-in Blender simulation tools, including the new Mantaflow tool. We also choose to narrow our focus strictly on liquid simulation effects while Mantaflow covers both liquid, smoke, and fire simulation.
- Blender bought the FLIP Fluids addon to include in Blender (false) . This is not true and this common misconception may be attributed to our simple name and the fact that Mantaflow is also a FLIP solver. Our development is fully funded through sales on the Blender Market. Mantaflow’s integration into Blender is funded by the Blender Foundation. A comment on the difference between how the projects are developed and funded can be found here here.
- FLIP Fluids will no longer be developed now that Mantaflow is released (false). We’re fully committed to continue development of the FLIP Fluids addon for at least the rest of 2020 and very likely further. We receive so much support for this project from the Blender community and our users love what we are doing. It’s our pleasure to be able to continue development!
What are the Benefits of the FLIP Fluids addon?
Last week, we were asked what the benefits of our FLIP Fluids addon compared to Blender’s new built-in FLIP solver, Mantaflow:
@FlipFluids What are the benefits to your FLIPFluids addon, compared to Blender’s new built in Flip Fluids solver? Are they the same? is one faster? can one handle more complex simulations? Curious what you have tested.
Our response can be found on this Twitter thread here.
Hi Mason, I have been testing Mantaflow during the alpha/beta. We have received some feedback from our users testing Mantaflow and have seen a lot of comments on this topic from Twitter/Reddit/Instagram/Forums. I’ll try my best to detail some of our benefits and strengths.
Since release, funding through market sales has allowed us continue development full time for the last 20 months. It’s these thousands of hours of continued development that has furthered the usability, optimization, stability, and expanded features.
Usability: A large focus of our development is in usability and workflow features. Providing tools to help artists create simulation effects quickly and painlessly. Recently we have re-designed our product page to better highlight our usability features: https://blendermarket.com/products/flipfluids
Stability: Our fluid engine rarely ever crashes during simulation. Our beta testers really stressed our engine, putting it into situations we had never expected. Stability has been mentioned frequently as something that helps our users to run complex and long running simulations.
Customer Support: Another large focus for us is providing responsive support Monday – Friday. We have maintained a 5 star rating on the Blender Market and many reviews mention our helpful support. Communication with our users is very important for us to help improve our addon.
Documentation: Upon release, our documentation was a bit sparse. Over time, through support and feedback, we were able to better understand our users’ needs. Adding and improving on many topics, filling out our settings/UI docs with helpful notes and tips on common issues.
FLIP Fluids and Mantaflow are both simulation tools that use the FLIP sim method. There will be strengths/weaknesses for both software solutions. Mantaflow is a huge improvement for Blender’s fluidsim tools and is attracting many new users to Blender for simulation effects.
Mantaflow has only just been officially released in Blender. There is room for improvement in usability and stability at the moment, but it’s great to know that the Blender Foundation is funding further development of the integration to improve and expand on the simulator.
More Development Notes
- Last week we added some final touches to our homepage and launched flipfluids.com! That’s where you’re reading this blog right now!
- Bug Fix: we had a report last week that moving obstacles were not pushing around fluid if there were a combination of regular obstacles and inverse obstacles in the scene. The fix was very simple within the engine and the cause of the bug was just a simple logic error. This is a serious bug and unfortunately there is no workaround to get around this issue at the moment. Due to the severity, this bug may prompt us to release a new version of the addon soon (v1.0.8) that contains this fix. In the upcoming week, I’ll focus on getting the addon ready for a new release, including a few other minor bug fixes and small quality-of-life features.
7 Likes
Hey,
I really love the work you’re doing! I have a question/suggestion:
Can you separate the meshing from the actual fluid sim? In Houdini you can do the sim with just particles and then fine tune the mesh without having to resimulate. It saves quite some time. I don’t know if that is at all possible, but it would be a nice touch. Also, would it be nice ( again, if possible ) to let foam, bubbles and spray calculate after the initial fluid sim. Again, I don’t know if that’s possible but it would be awesome if it could be done.
The new version of Blender, 2.82, has this. But it seems to be a bit rough around the edges, or something. Part of it is that I think I’ve been spoiled by RLGUY making Flipfluids so easy to use
2 Likes
Thanks! This is a large workflow feature that we have slowly been chipping away at since release in May 2018. We have a progress thread here: Decoupled Baking (bake fluid, mesh, whitewater separately).
I have not had a chance to actively work on this feature in quite a long time, but we have been working on a lot of code changes and cleanup that will benefit implementing this feature in future development.
![]()
2 Likes