FLIP Fluids Addon: A liquid fluid simulation tool for Blender

No, the Exporting Animated Data stage is controlled mostly by Blender and is before the simulation actually starts processing. This stage is saves the Blender object mesh data into files on your HDD/SSD and is similar to a regular Blender export such as through File > Export > Alembic (.abc).

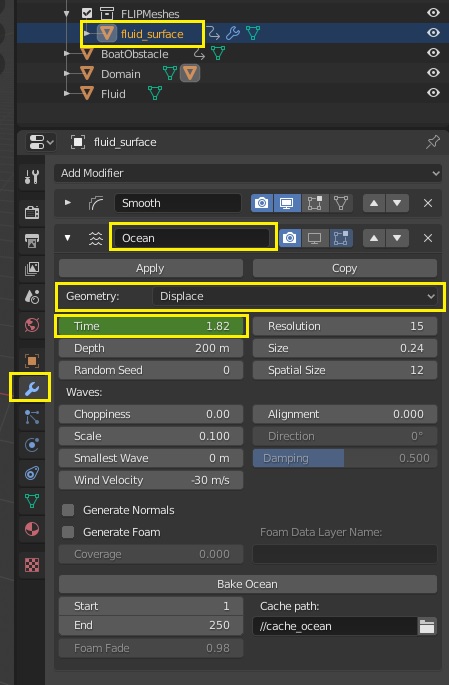
The time spent exporting mostly involves Blender evaluating frame changes and evaluating the modifier stack. If it is taking hours to export your meshes this could indicate excessive geometry. Note: if your meshes contain subdivision modifiers, the addon exports using the render settings. Sometimes we have seen setups using many subdivisions in the render resulting in millions of polygons, which can take Blender a long time to process.

In most cases, the the Export Animated Data stage should take no more than a few minutes.

See this topic for more reasons why this stage could be taking a long time: Scene Troubleshooting: Exporting animated objects are taking a long time!.

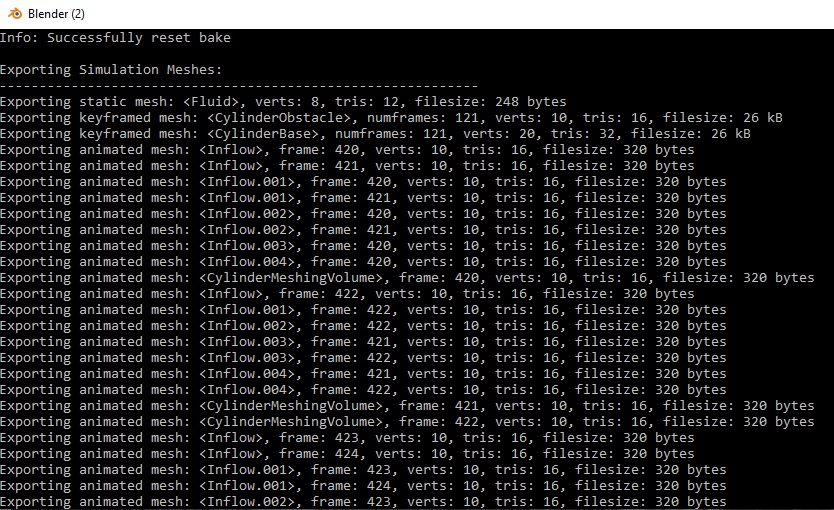
The Blender system console window (Blender > Window > Toggle System Console) shows some information duirng the export stage. This info can be used to check the file sizes and triangle count of your exported meshes:

Feel free to attach a .blend file or send to [email protected] and I can take a look for any problems.

@RLGUY

Would Alembic (.abc) file be faster in Exporting Animated Data ?

No, the Alembic format cannot be used to export data for the simulator. I only used it as an example of of an exporter that already exists in Blender. We use our own compact file format that is a bit smaller than Alembic files.

Check out the latest Two Minute Papers episode which features Blender and the FLIP Fluids addon! Two Minute Papers is a series that explain the latest and greatest research in a way that is understandable and enjoyable to everyone.

This episode covers the simulation method that we use in our whitewater feature. I am so excited to see one of my favourite YouTube channels explaining one of my favourite simulation papers!

The Unified Spray, Foam and Bubbles for Particle-Based Fluids paper described in the episode is one of my favourite papers due to how well written and in its simplicity in the method. Having a paper that was accessible to me as a beginner in simulation programming was insanely helpful when the FLIP Fluids simulator was in very early development.

13 Likes

Hi, I have a hopefully small question, how would one go about setting up a body of water exactly as in this video, essentially I want to set up a fixed boat and have an ocean/river flowing across the domain so it looks like the boat is moving but the camera is fixed with the boat? im fairly new to blender as using it side by side other apps. https://www.youtube.com/watch?v=5fmOFCWCOUY

Hi, this type of effect involves combining the FLIP Fluids simulation mesh with the Blender Ocean Modifier. The Blender ocean modifier generates ocean-like ripples and this is used to add a displacement to the simulation fluid surface as a post-processing effect. You can also control the speed of ripples to flow in a certain direction to give the illusion that the boat is moving.

I am not 100% sure, but I think the boat in the linked video may also be moving forward slowly to generate the wake. Here is an animation of the boat without the ocean modifier displacement from the same creator: https://youtu.be/Nhxkkfijbcg

Here is an example setup of the ocean modifier on the fluid_surface object:

  • The Geometry is set to Displace so that it will displace ripples on the fluid_surface mesh
  • The Time parameter is keyframed to increase over time so that the ocean evolves/animated through the animation

Here is a simple .blend file setup of this type of effect: ocean_modifier_example.blend (885.4 KB)

Example animation without displacement: https://gfycat.com/wealthycostlyarawana

Example animation with displacement: https://gfycat.com/spectacularimpossiblearabianoryx

There are more advanced setups to use the ocean modifier to add extra detail to the simulation. Here is an example animation and breakdown of Artell Blender’s Dolphin animation which is set up to only displace liquid at a certain waterlevel and not to displace liquid above/below the waterlevel: https://youtu.be/4ePy4AGf6cY

And here is a tutorial series from Tom Allen (same creator as your linked naimation) that describes a complete workflow for extending the ocean modifier beyond the simulation for an infinite ocean type effect: https://www.youtube.com/watch?v=8_aPHD9qe74&list=PL4yF0Jhb_TK4B0mIKuO_xflj_D9XLpOVU

Hope this helps!

Thanks, It did actually answer the next questions I had, (I had found the ocean modifier but couldn’t get it to animate as didn’t understand the time part although I hadn’t yet looked at any docs). I agree in the video you linked he was moving the boat, but in the video I linked you can see its not moving at all and the water is flowing around the rear underside of the boat just in front of the paddle (if you look close), I would then hazard a guess that maybe he has used an inflow and outflow and maybe a fluid body to prime the middle as well, the problem I had when I tried this was it created a big dip as the inflow creates a large wave, it takes quite some time to level out the sim from this wave, and it levels bellow the initial body, although now thinking about it, perhaps the paddle is actually what is driving the simulation to look like its moving with the water flow and if it ran long enough you would see the foam bounce back from the rear wall, probably why the sim extends off camera. well another idea popped into my head while typing that, maybe I can make a long domain, and the move an outflow and inflow along the length, therefore cutting down the geometry in a large domain, as long as it deletes the foam etc as well

This sounds like it could work and will help optimize the simulation. An outflow deletes both the liquid and the foam/bubble/spray particles.

One option that may help is the inflow Constrain Fluid Velocity option. By default, when an inflow is submerged it wont push the fluid. When the Constrain Inflow Velocity option is enabled, it will enforces all fluid inside of the inflow to match the inflow fluid velocity, which helps push the fluid when submerged. Documentation on this setting here: https://github.com/rlguy/Blender-FLIP-Fluids/wiki/Inflow-Constrain-Fluid-Velocity-Additional-Notes

I recently finished a Phoenix FD course (RedefineFX: Advanced Water Course) to learn more about the software and to see how we can improve the FLIP Fluids simulator for large scale effects. A very useful feature in Phoenix FD for ship/wake simulations is that the domain/grid can be animated to move forward with the ship/camera while automatically generating new fluid as the domain moves through the scene. This is a great feature for workflow and optimization and hope I’ll be able to find some time to add this as a feature in a future update.

4 Likes

well interestingly I stumbled on this as well, precisely what I need, looks like it starts with a full body on the initial frame as the wake doesn’t start until the first motion, sim seems very stable near the camera so not sure how the incoming is set, https://www.youtube.com/watch?v=5LXAMlzrNpc

Hi,
is it possible to use the whitewater “particles” as smoke sim emitter somehow?
As I understand it these whitewater particles are simply vertices onto which icospheres are instanced to.

Now, apparently the smoke sim (old one, not mantaflow) does not recognize instanced objects. Is there a way around this?

I am not sure if you can emit smoke directly from vertices. I have seen a mist effect using a smoke simulation in this animation: https://youtu.be/N_Bx62UX7ME

From the video description:

The mist was derived from a smoke simulation from a very short lived particle system emitting from the spray particles.

So it sounds like a workaround is to use the whitewater particles as a particle system emitter, then use the particle system to emit the smoke.

Here is an example .blend file for how this can be set up: inflow_boat_example.blend (967.2 KB)

https://gfycat.com/likablesomberbarnacle

  • A fluid object initially fills the domain with fluid.
  • An inflow object emits and pushes fluid to ensure a constant flow.
  • The velocity of the Inflow and Fluid object are set to the same speed so that the start of the simulation begins with a consistent fluid speed.
  • An outflow object is placed at the right side to remove fluid.
  • An outflow object is placed at the left side to ensure that there is an airgap between the inflow and domain wall. Without the airgap, there can be a suction/pressure force against the wall that can inhibit the inflow of fluid.

1 Like

I tried that but I can not get the particles to behave correctly. I assume that might be because Flip Fluids destroys the whitewater mesh each frame and rebuilds it in the next frame. Perhaps the particle system doesn’t understand this and does some weird things.

I think that is why in the video you posted the smoke does not look like it is emitted continuosly but in little singular puffs. You can see that at the crest of the wave. The smoke is not emitted during the substeps, so fast moving objects emit frame by frame in a, well, “spotty” way.

I just simulated a Flip Fluid sim with the demo version. It took two days. Now I just bought Flip Fluids but the “Flip Fluids Demo” Watermark is still in this simulation.
Do I have to simulate again or is there some way to remove the water mark from this specific two days simulation?

Yes, this will be a problem with this workaround. There is no continuity between particles in a vertex mesh so Blender will be unable to interpolate the motion between frames.

If we implemented whitewater as a particle system, this would be much better, but that is a complicated task in Blender. Eventually we would like to do this, at least to support motion blur rendering for whitewater, but there will be limitations due to how particle systems work in Blender. Some more info in this documentation topic: https://github.com/rlguy/Blender-FLIP-Fluids/wiki/Motion-Blur-Support#potential-workarounds-for-the-future

Implement whitewater particles as a Blender particle system . Particle systems can be rendered with motion blur. The Blender Python API is currently not flexible enough for us to directly control the motion of a custom particle system for the whitewater feature. For this reason, the whitewater particles are implemented as vertex meshes, but unfortunately these cannot be rendered with motion blur. A workaround could be to have the simulator store (or convert) the whitewater simulation directly as a Blender Particle System Cache. This may require some reverse-engineering in order to understand the format of the particle system cache files. A downside of this method is that there can be some severe performance penalties for particle caches with a large amount of whitewater particles. Particle system cache files are much larger than our own compact file format and can lead to slow frame loading. However, this route may still be very useful for smaller amounts of whitewater.

A simulation cache generated with the FLIP Fluids Demo addon will have the FLIP Fluids Demo text baked directly into the fluid_surface mesh geometry. This text is permanent within the cache, so it will still be visible when loaded into other versions of the addon. So you will need to re-simulate, unfortunately.

You may be able to remove the text using a boolean modifier, but this may not work well if the text intersects the surface mesh.

1 Like

An update on the glass hoodie render that might interest you, i cleaned up the topology and now it works!

in another test where the inflow stops and let’s the fluid slash around for a bit it seems to be losing volume, i assume it’s just normal due to simulation errors with the geometry right? it’s great though i can finally finish this project

Re:Rendering large simulations.

I’ve just completed a fairly huge simulation, with over 15 million particles for some frames (it was the dam file that I sent to you) and now I’m having serious trouble rending it out.

I’m trying to render it at 75% just to get a feel for the whole sim. I have an old 1070 with 8GB and a 2080 Super and I can get some frames rendered using Shift F12 and then after some frames it’ll give me a Cuda error. I’ll restart Blender, click Shift F12 and off it goes again for another 10-15 frames before it stops again.

Does the GPU not reload or refresh it’s memory per frame? I’ve tried to turn on the CPU also and it still happens, that I get an out of memory error. I have 64GB of RAM in my machine.

As for using Optix, it doesn’t even load everything on to the card.

Any suggestions for getting this rendered without having to babysit it the whole time, and, what will it be like once I put textures on the rest of the scene?

I know I could break the scene in to two render layers, but then my reflections and refractions in the fluid wouldn’t be the same, or am I missing something about that with the compositing side of things?

Have you tried a smaller tile size?

Rendering with CPU instead of GPU is one option, if there aren’t any others for getting it to work with the GPU.

One way to diagnose the problem is to check the stats panel using the Frame Info view

  • A: If the particle count is decreasing quickly at the end of the simulation, this would indicate that there are problems resolving collisions with complex geometry.
  • B: If the particle count remains relatively consistent, this would indicate that it is volume loss caused by numerical/simulation error that is common in the FLIP method as fluid settles.

The solution for A and B is usually to increase the number of substeps. For example, increase the minimum substeps (Advanced Panel) to about double the number of substeps reported in the frame stats info. This setting can be keyframed near the end of the simulation to avoid extra computation at the beginning. This does not always resolve the issue if the problem is A, but usually fixes the issue if the problem is B.

2 Likes

Blender will only load the GPU with what is needed for rendering. It should not store old data from the previous frame. An exception to this (in my experience) is that Blender might not free the GPU memory after a CUDA error and I usually have to restart Blender to continue rendering correctly, which you have mentioned that you did.

The FLIP Fluids addon will also clear mesh geometry from memory after a frame change, so Cycles should not have access to the old mesh data from a previous frame.

Particle rendering requires a lot of memory for Cycles rendering, and I have noticed even more memory for EEVEE. In my tests, it seems to be about 1GB of memory for every 1 million particles using Cycles.

Note: if rendering with two GPUs, you will be limited by the card with the least available memory. So if you have 5 GB free VRAM space on the 1070, but all available memory on the 2080, you will still be limited to the 5 GB.

It is odd that you are running out of memory on CPU also, which should have access to all 64 GB of RAM on your machine. I have been able to render about 24 million particles using under 32 GB RAM on CPU rendering.

A common topic on Blender forums or bug reports is “Out of memory error but I still have a lot of unused memory!”. Since this is a general Blender rendering issue, you may be able to find some troubleshooting tips by searching on this forum, or on Blender stack exchange, or through Blender bug reports.

The Blender developers usually recommend incrementally removing/adding things to your scene to diagnose the issue. For example, you could try rendering with 0% of the whitewater particles, and then try increase to 25% while watching peak memory usage. The percentage of whitewater particles to render can be set in the FLIP Fluid Display settings panel. Shader setups can also cause large memory issues. Subsurface scattering and volumetrics can use a lot of memory.

The most stable way to render is through the command line. This can really help reduce the amount of memory since Blender does not need to use the interface/viewport. Command line rendering will also display more info and you will be able to see which stage that the render generates an error. More info on command line rendering can be found here:

Or if you are on Windows, there is an operator in the FLIP Fluids toolshelf menu that will automatically launch a new command line render window:

1 Like