Hey Olof,
Sorry for the delay, There it is ;
WIP
Just wanted to share a test video sequence I just finished. There still much to do, but I find the result very encouraging. Also , I wanted to take the time to elaborate more on the blending method I use (node tree + description below). Feel free to ask question or propose workflow improvement!

To do :
Ocean info
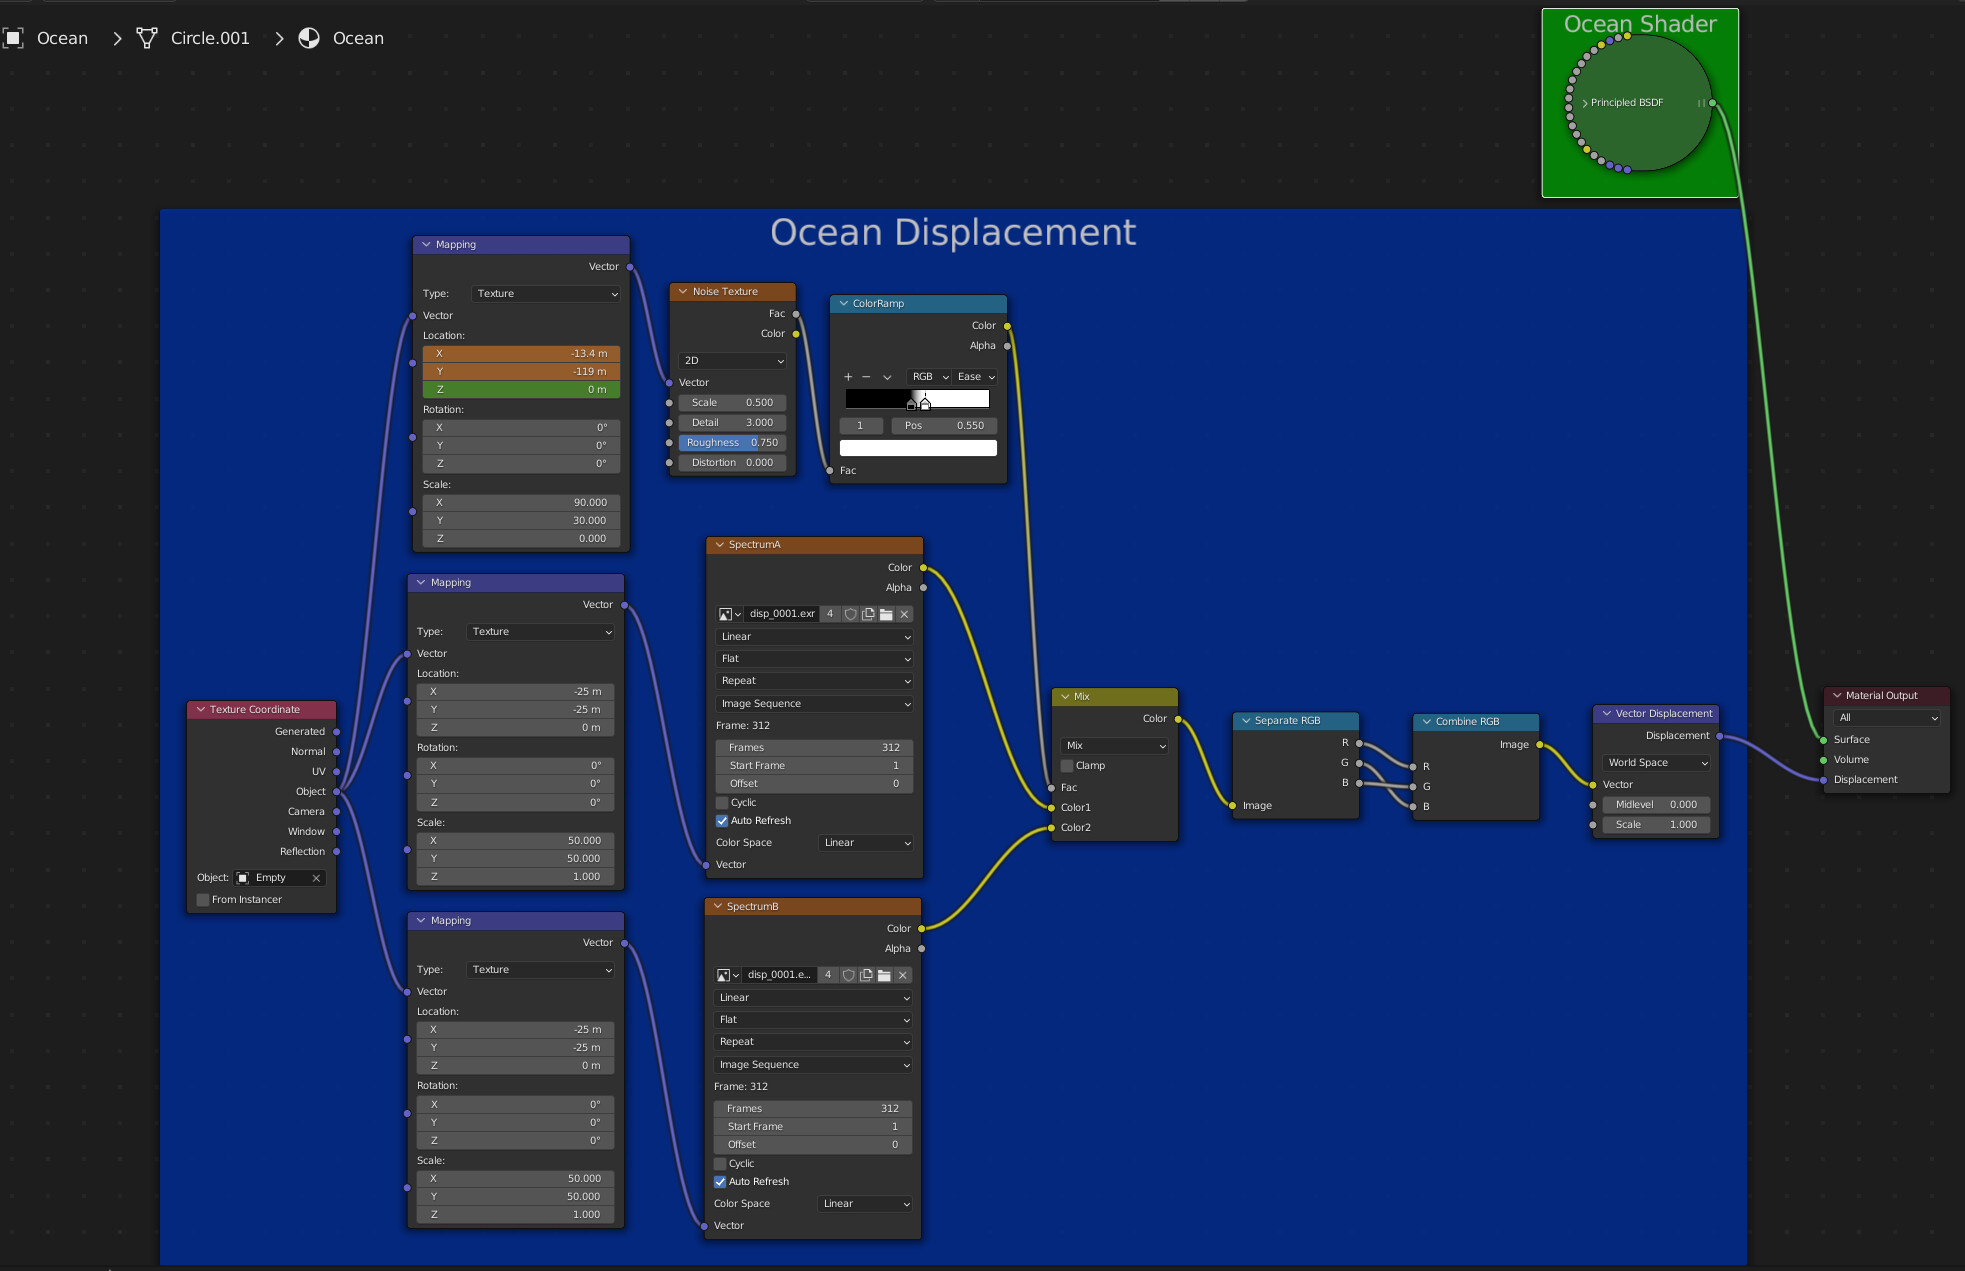
Ocean Shader Node
The 2 generated ocean displacement are masked by a noise texture to try to eliminate the tiles repetitions. The noise texture location is animated and scaled uniformely to mimic wind direction influence.
Ocean Plane Modifier stack
Need to be using experimental cycle render to be able to use the adaptive subdivision option. See ocean youtube video of dylan neil for more in depth information. Youtube - Dylan Neil
Flip Surface info
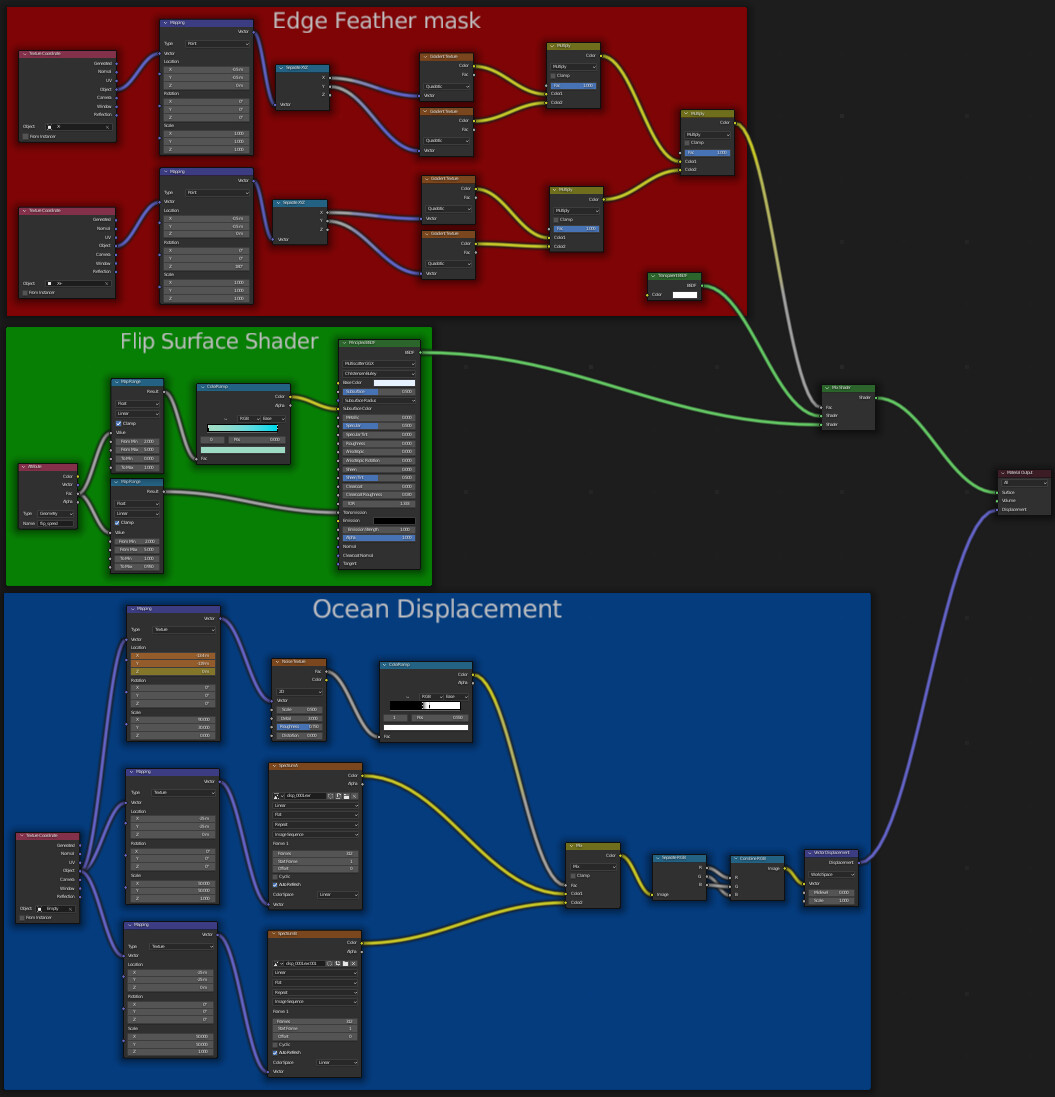
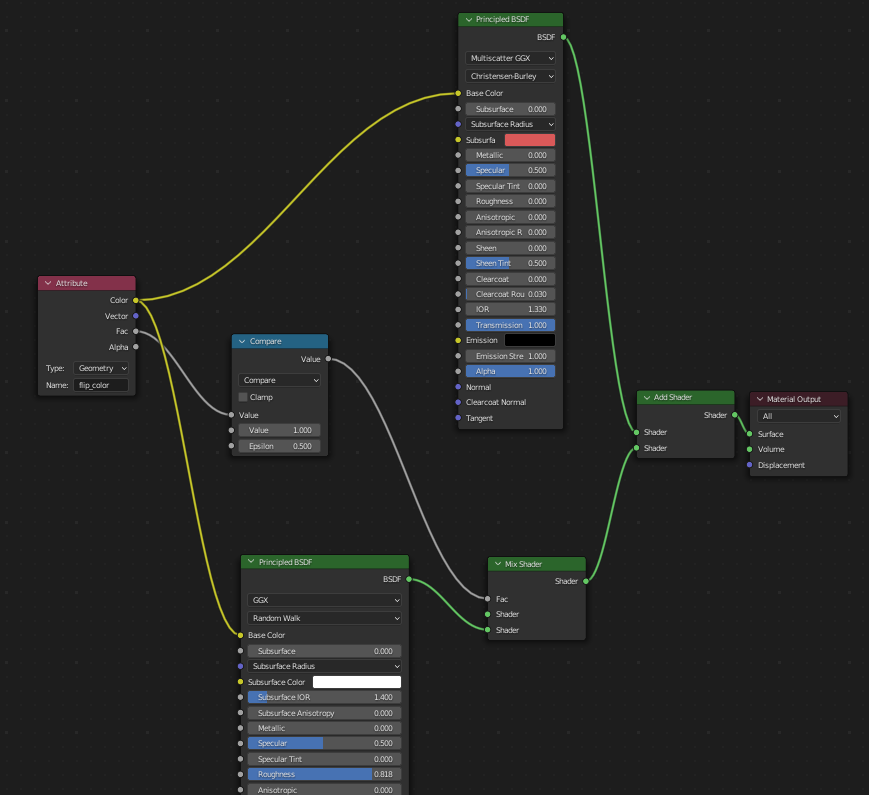
Flip surface shader node (enlarged screen shot below) :
The node tree is similar to the ocean shader , only exception , the feather edge mask nodes and the speed attribute node that change transmission/ss scattering color.
Zoom (Flip surface shader node)
the Opacity of the fluid is greater when the speed is greater. It does mimic foamy water at high speed area. I think that vorticity would make more sense in this case (to be tested).
Zoom (Flip surface shader node)
Same as the ocean displacement
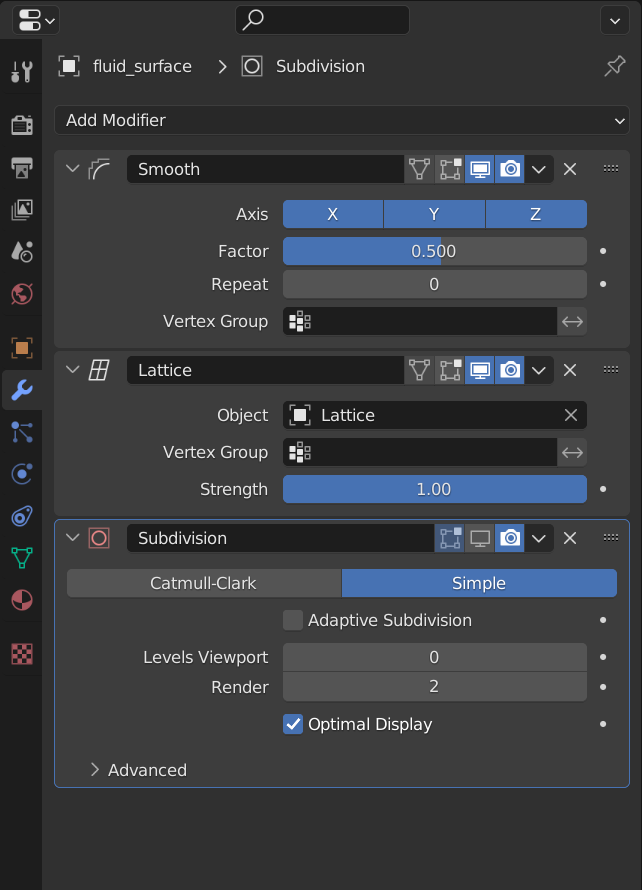
Flip Surface modifier stack
I do not use adaptive subdivision on the Flip surface , as seen on the ocean modifiers. Adaptive subdivision doesnt support custom vertex attributes yet (e.g. speed) T92622 . Notes that, it does eat a ton of ram using it on high polycount mesh ( like the surface generated by Flip). To keep the displacement detail constant between the ocean and the flip surface, i need to add some subdivision to it. Make sure the subdivision is at the bottom on the stack, it greatly improve render speed (as of blender 3.1, Optix & Cuda only).
Regarding the Lattice modifier, refer to this Twitter - Francis Jasmin
White Water Geometry node
The white water is displaced by the same displacement map combination as the ocean & Flip surface. it is only a conversion of the shader node displacement to geometry nodes displacement.
Hi @ArchiCraig
Thx for the detailed explanation of the shaders and every other parts !
That is quite interesting ![]()
I wonder if you could provide your scene eventually so that others can look at it ?
I think you could export an Alembic (.abc) file of just one frame of your sim so that we could have the whole scene, without the 15 gigabite of the whole simulation !
I would love to play around and see how you have setup your scene.
How did you made the simulation ? Just a very long flip liquid with the boat ?
Have a nice day !
ps : thx for the link to my twitter !
This is a great post, thanks for sharing!!
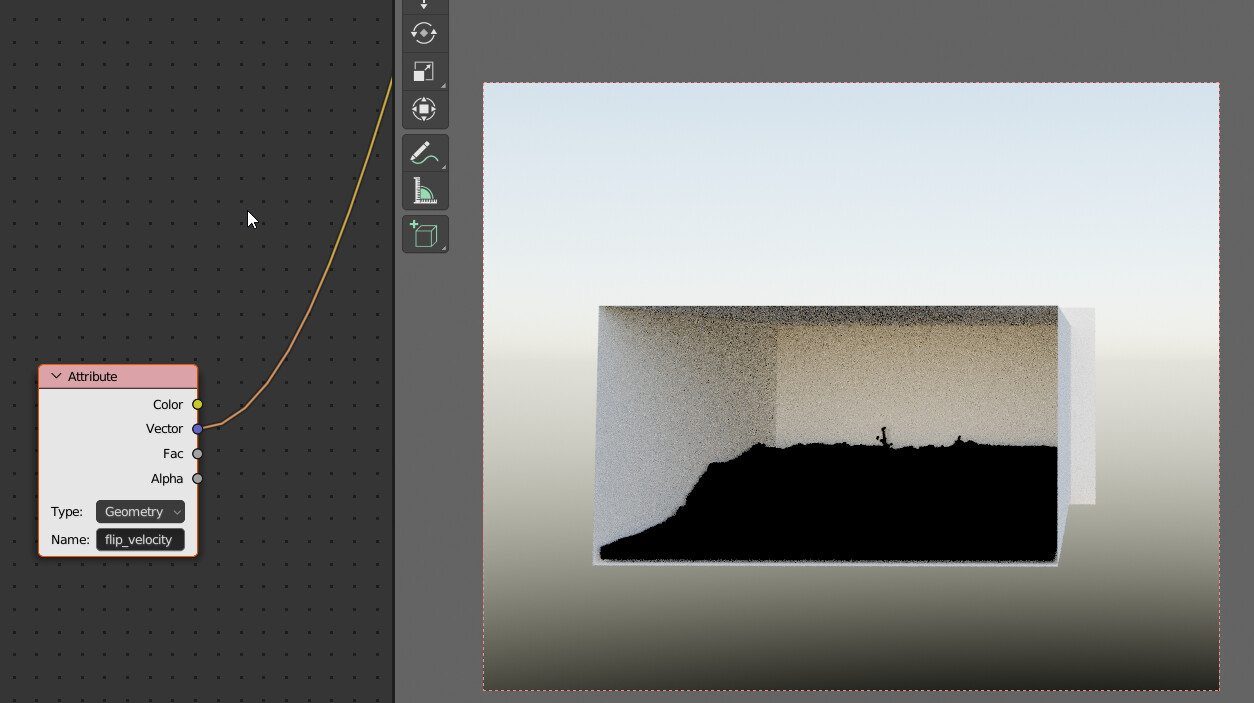
Hi! I am doing some test with flip fluid and I was trying to check the flip_velocity attribute out, but something’s not working properly.
As you can see the attribute seems empty… any help please?
I am using flip fluids 1.3.1 on blender 3.1, win 10
Hi, would you be able to attach the .blend file (or send to support@flipfluids.com) so we can take a look at the set up?
Some things to check are:
Here is a basic example .blend:
velocity_attribute_example.blend (1.2 MB)
thank you! I thought they were being generated automatically, but I had to turn on the experimental stuff! ![]()
Hi! I have a question how to get something done in FLIP fluids (amazing add on btw, truly).
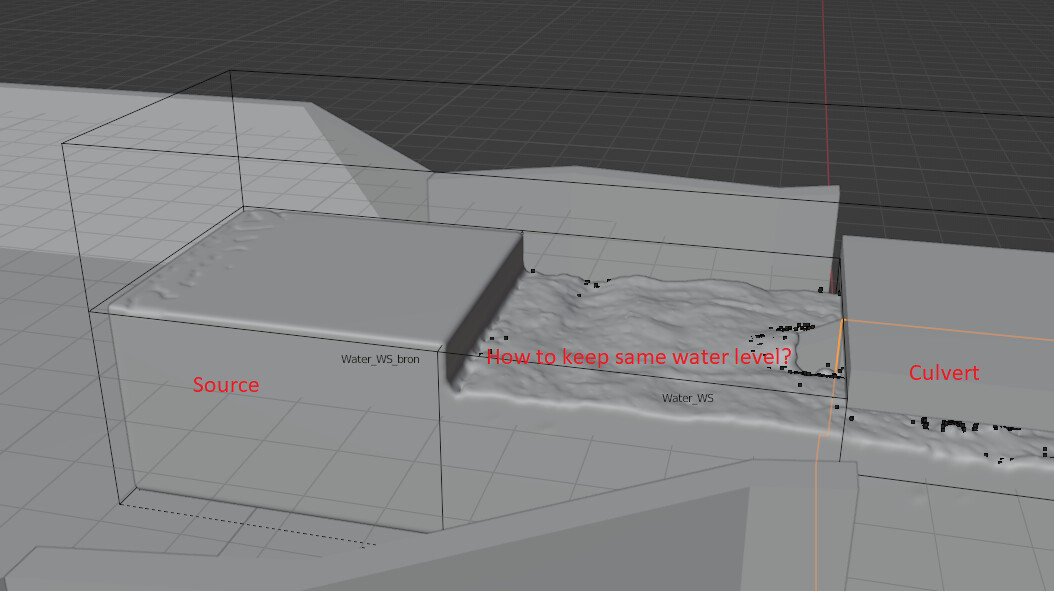
I’m trying to demonstrate how a culvert system works. In this case, there is a lake that represents an inflow, then there is a culvert with sliders controlling the water flow, and then there is an outflow which is also a lake with a constant water level.
How do I make an inflow such that it keeps a constant water level that is equal to the level of the lake? See picture below, now I have this step down which does not give me the accurate flow rate and it looks weird…
You would expect the water level to remain more horizontal until it hits the culvert.
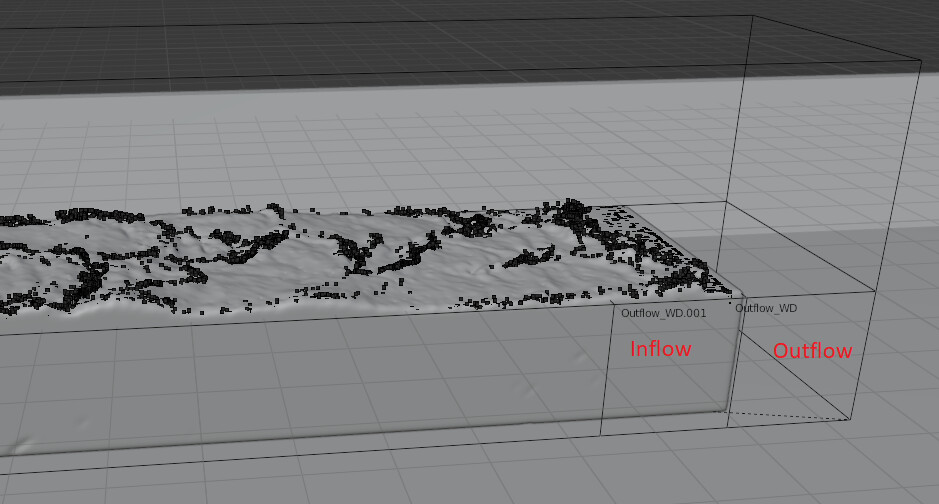
Same goes for the outflow, but I managed to fix it there by adding an additional inflow with the same level as the lake, just before the outflow (if not, the water stays super critical and there is no hydraulic jump, no there is, which is really nice).
Thank you!!
Hi! By default, inflows will not emit liquid in parts where the object is submerged. They will only emit liquid into empty air. This is what would be causing the level drop after the inflow because they can only emit when it is partially above the water level.
The Inflow Constrain Fluid Velocity option may be something to try. Then this is enabled, the inflow can push submerged liquid forward if a velocity is set. This option can be useful for enforcing a constant inflow rate.
Note: The constrain fluid velocity option may not work correctly if the inflow is emitting in a direction opposite of a domain wall that it is touching (the suction force against the wall will negate the inflows ability to push liquid forward). In this case, a thin outflow against the wall can be used to create an airgap so the inflow can emit freely.
A simple alternative to modifying the set up, if it is applicable, could also be to hide the level drop by only meshing parts of the liquid further past the inflow. The Surface > Meshing Volume options can be used to selectively mesh regions of the liquid that are inside of a set object (such as only mesh liquid that is inside of some cube).
Hope this info helps!
FLIP Fluids version 1.4.0 improves compatibility support for the upcoming release of Blender 3.2, adds bug fixes, improvements, and more!
This version also adds new features such as basic color attribute mixing for creating colorful liquid effects, new surface force field customization options, and expanded command line tools to improve your baking and rendering workflow while maximizing stability.
https://gfycat.com/scholarlybountifulkoodoo
Past release notes can be found here
Just testing the flip_color attribute and color mixing stuff - very cool!
What would be great for a future iteration would be if you could transfer colors from the UVs of a mesh somehow, although I’m not sure how you’d go about it.
Thank you! It does help. Basically if I understand you correctly, I have to calculate the flow rate myself and set the velocity of the inflow to that value. I will try some things out and I let you know if it worked out.
Follow up questions, or perhaps idea for future versions:
Is it possible to connect a lower resolution domain to a higher resolution domain and have them act as one domain? Or place a higher resolution domain inside a bigger lower resolution domain? This way, it would be possible to create larger scenes where there are smaller elements that require more detail. This would save immense amount of calculation time.
Is it possible to connect an ocean modifier as boundary condition, so you can render a beach with an infinite ocean with a seamless connection to it? The ocean modifier has some really accurate wave generation (JONSWAP spectrum), for which FLIP Fluids would then be able to be used to render the transition between ocean and coastline. This would create some highly realistic beach scenes in which you can see the infinite ocean.
Also, I would like to report two bugs. Maybe they are known, maybe they are not ![]()
Sometimes when rendering, it misses the fluid surface and you end up with an empty frame. It’s quite labour intensive to find the missing frames and rerender those.
Sometimes it’s stuck on updating the fluid surfice while rendering and then it just keeps renderig one frame… this is really annoying, especially if you’ve waited over a day to finish rendering all (1000+) frames, to find out that it got stuck after frame 200 or so…
Yep, these are things that could be considered in future development.
I’ve thought a lot about #2 and there are some difficult tasks to tackle to get this right. As an addon we only have access to the geometry data of the ocean modifier and not its internal values which is required for this type of feature. To generate the required data we would need to re-implement the ocean modifier within our simulator.
Another difficulty is that as an addon we are also not to create new modifiers and would need to implement this system separate from Blender’s modifier system. We would need implement this feature in a way that it can be flexible and easy to use by the artist while still being able to interacting with other features of Blender.
Sometimes when rendering, it misses the fluid surface and you end up with an empty frame. It’s quite labour intensive to find the missing frames and rerender those.
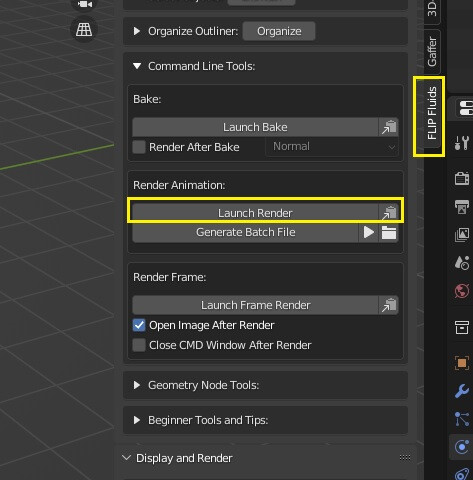
This is caused by a long-standing design issue in Blender where large amounts of geometry may not be synced correctly with the renderer due to conflicts with the viewport. The workaround for this issue is to render from the command line. The command line tools in the sidebar menu can be helpful for this:
More info:
- Sometimes it’s stuck on updating the fluid surfice while rendering and then it just keeps renderig one frame… this is really annoying, especially if you’ve waited over a day to finish rendering all (1000+) frames, to find out that it got stuck after frame 200 or so…
This could also be caused by the above issue.
We also have received a recent report that a conflict with the Photographer addon can cause this type of issue, so disabling this addon if it is installed may be a solution (or rendering from the cmd line as an alternative).
It seems that an interaction with the Photographer addon can put Blender into a state where it can prevent other addons from running their frame change/update scripts. A side effect of this is that it will produce duplicate frames in our addon. I suspect that this is a bug in Blender that should be reported, but we have not been able to reproduce this conflict on our systems yet which would be required for reporting.
In the latest version of the addon we added a workaround to attempt to bypass the error that prevents our frame change scripts from running, but I am not sure if this would solve the problem as we are not able to test this on our system.
This type of issue can also be caused by enabling the Render Properties > Performance > Final Render > Persistent Data option. This option should either be left off when rendering a simulation or to render from the command line.
Hope this info helps! Let us know if you have any questions or find out more information about the issues.
*This comment uses automatic translation. Forgive me.
Thanks for the great update, RLGUY!
Regarding flip_color, we believe that there are certain colors and densities that are easier to transition to.
Is it possible to set this individually at this time?
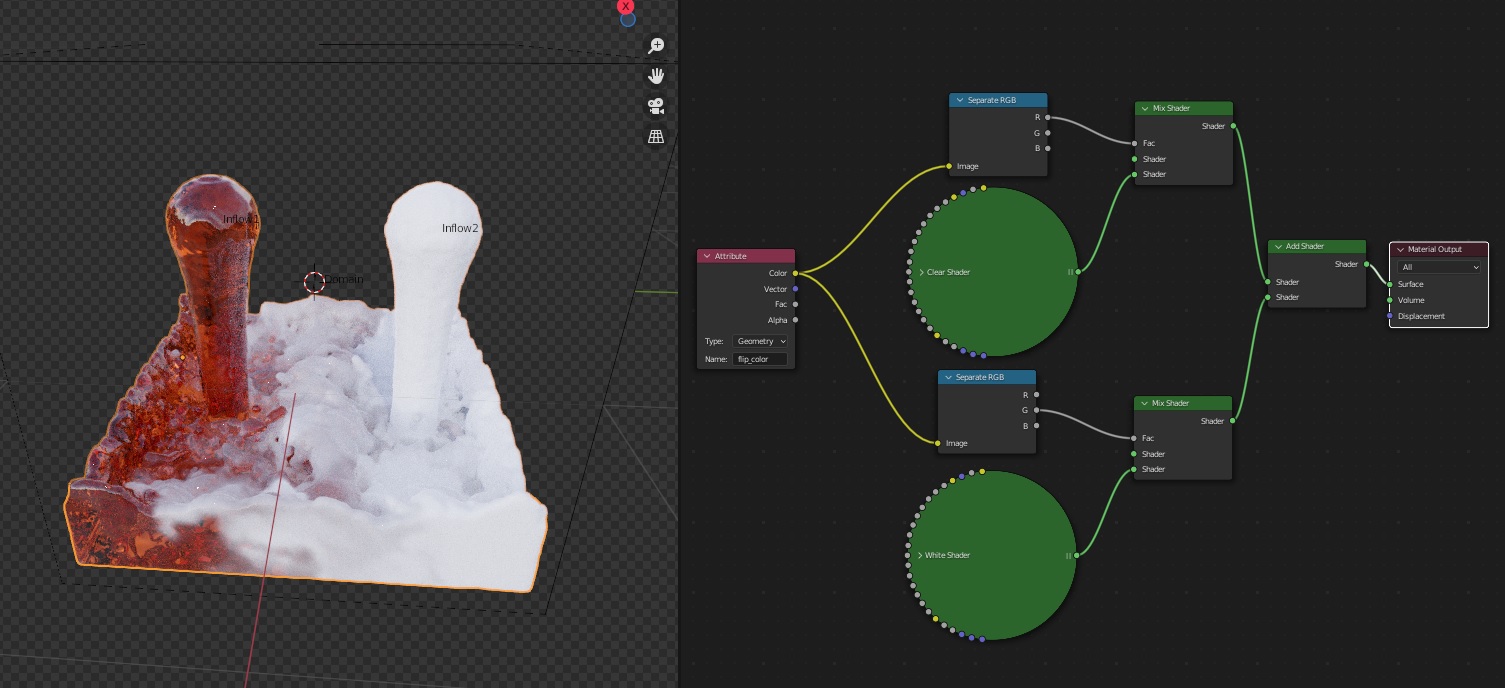
Hi, If I’m understanding correctly I think there is a trick that can work for this to use the color attribute to mix multiple shaders.
If you set the each inflow to either pure red (1, 0, 0), green (0, 1, 0), or blue (0, 0, 1), the RGB channels can be separated in the shader and used as a mix value.
Here is a .blend file with the set up:
mixing_shaders_with_rgb_channels.blend (2.6 MB)
This should work for mixing up to 3 shaders together (1 shader for each RGB channel). I’m actually working on a feature right now that is similar to this technique for mixing more than 3 shaders and this will come in a later update.
Hope this info helps!
Very cool.
My questions have been answered.
Thanks for the great add-on!
Thanks again RLGUY for the elaborate answer to my questions! I understand implementation isn’t easy, yet I think both will be of great added benefit for a wide variety of users. I will email you for an official feature request!
Another question. What part of the navier-stokes equation are you solving and what parts are you omitting? Is there some documentation on how you are solving it?
Edit: never mind, I think I found your explanation here ![]()
http://rlguy.com/gridfluidsim/
Yep, that page contains the equations we’re solving/approximating for:
The last viscosity term is ignored when the viscosity solver is disabled.
The current FLIP Fluids addon simulator was originally based on that simulator, but some of the methods have advanced or changed in the current simulator. I’ll add some links to the solving methods:
And for more resources, I found these books very helpful:
Awesome information! Thank you so much! Again, amazing add-on.
Sorry to bother you with another question / bug report… During a very long simulation it got stuck. To reset it, I cancelled the baking process. It said “DO NOT quit Blender”. I let that run, but after an hour or so, it didn’t change, so I figured that just froze as well so I did a hard quit… Did that move just break my bake? I seem to get the following error when trying to restart… Any way to save my bake, or do I have to rerun the whole thing?
Edit: if all of the bugs I’m reporting are known, would it be an idea to create a known bug page on your wiki? ![]()
Edit2: managed to save my bake by overwriting the flipstats.data file and all files in the export folder from the cache folder!