Yeah, I understand your prolem with modeling- I don’t like it either, and I always end up sculting the simplest boxy shapes just not to have to model them 
All that 3d scanning stuff looks very interesting, I think it’s really the future of CG. Have you seen the current WIP game “The Vanishing of Erthan Carter”? They used 3d scanning for almost all models in-game, and the realism is incredible - no more endlessly tiling textures, revolutionary gameplay, it’s looking very promising.
The gun model fits perfectly into the environment.
Regearding the holos, I think this kind of blue half-transparent look is pretty overused. Maybe some particles? You could map the footage of the targets on a plane and use it as a texture to control the particle size. It would also give a quite interesting effect when they get hit, with particles spreading all over the place and regathering to form another holo?
Just a proposal, I think this could be done using keyed particles (to make one particle system transition to another), but I dont know much about particles at all.
Very ambitious project, and very realisic so far!
ghost - I understand what you mean, this thread is a bit all over the place. I suppose I prefer to jump around to keep things more interesting, because I work relatively slowly (compared to many others I’ve seen working, at least!). Also, because there’s no script to share, or even dialogue, I’m the only one that knows what’s supposed to happen. I do have a big sketchbook of camera shots to help guide me, though, so it’s not as careless as it may sound. Of course, the real fun happens when all the assets are done, and I can move the camera around wherever and however I want, and hopefully find new angles I hadn’t even thought of.
Regarding what is modeled in Blender- The gun (from Blend Swap), the hatch (the one thing modeled by me) and all the various Tears of Steel assets were created in Blender. The actual firing range mesh (which in reality is just a truck loading dock) was the one thing created in PhotoScan.
harley - The only reference I could think of was also Princess Leia’s hologram! I tried searching for more holograms/holographs, but neither search yielded anything useful, nor did my research into any movie I could remember that had something like that in them. These days it seems most holograms in films are just for displaying images of data, and not people so much.
Funny enough, after reading your post and looking up the actual Star Wars scene with the hologram, I found this tutorial:
which looks a lot better than anything I’ve done so far!
And no, I haven’t tried animating anything yet, as I’ve been doing all my compositing in Photoshop so far.
suboptimal - I think I have actually heard of that game, because they mentioned their use of PhotoScan and it came up in a search result recently. It does seem very interesting, I wonder what it would be like to play with a VR headset! I knew scans were used for character creation in games sometimes, but never have I heard of an entire map being created from it. Really cool stuff, thanks for sharing the link!
Also, while I’m mentioning VR, I’d like to add that I’m interested in making some of Classy Dog’s future films compatible with such a device. Whether 360 degree movies will prove to be a gimmick or something that endures alongside “traditional” 2D films, I think it would be very interesting to experience for the first time. It’s just a matter of waiting for the technology to mature a little and integrate into the internet.
Your particle idea sounds really cool, I like it! I hadn’t considered using particles in such a way, but if I can figure out how to do it, it would look great! And you have a good point, the blue transparent look is a bit cliche. I suppose I should at least try making them a different color. One thing I’d really like to try is making the holograms look like they’re made up of grids of lots of little floating particles, with some actual thickness to the targets (because currently, if the camera looks at the targets sideways, there obviously won’t be any thickness to these planes). Maybe this is even what you were talking about. I’ll look up some of the things you mentioned!
I was unsatisfied with how the array of holographic generators was looking from my last post- it just seemed kinda of chaotic and messy. Originally I thought it should look like a bunch of different parts were cobbled together from different resources; which is a reasonable idea, but ultimately I just didn’t like the way it looked. So I went back in and took out everything but the smallest model, and now I think it’s a lot easier on the eyes.
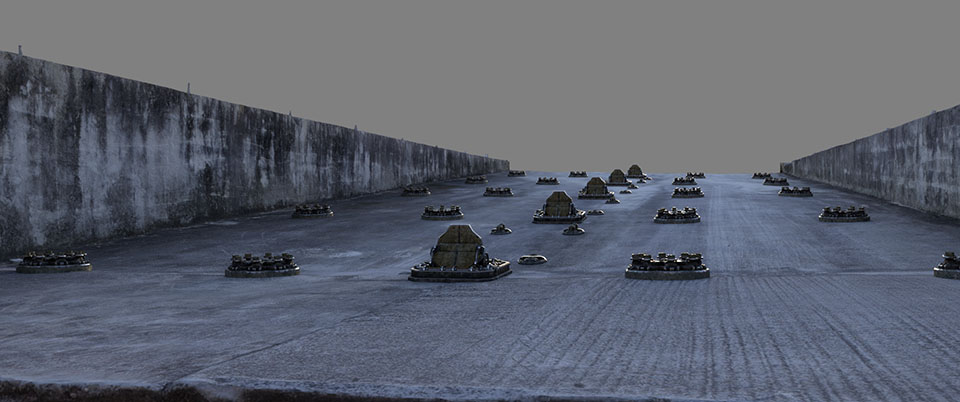

I wanted to make sure I got this right before I started adding anything else to it (cables, pipes, etc). I also extended the camera clipping range (I was actually cutting off the last row of models in the previous post), and added another row of target generators in the front.
Also, I have a question- In Blender 2.64 (the version the Tears of Steel assets were created in, I believe), all the materials render properly; but in 2.67, the version I’ve been using, one of the materials renders with the test pattern visible. I don’t know why it’s doing this, I can’t find anything in the nodes. Would anyone be interested in looking at the file for me and telling me what I need to change to make it render properly?
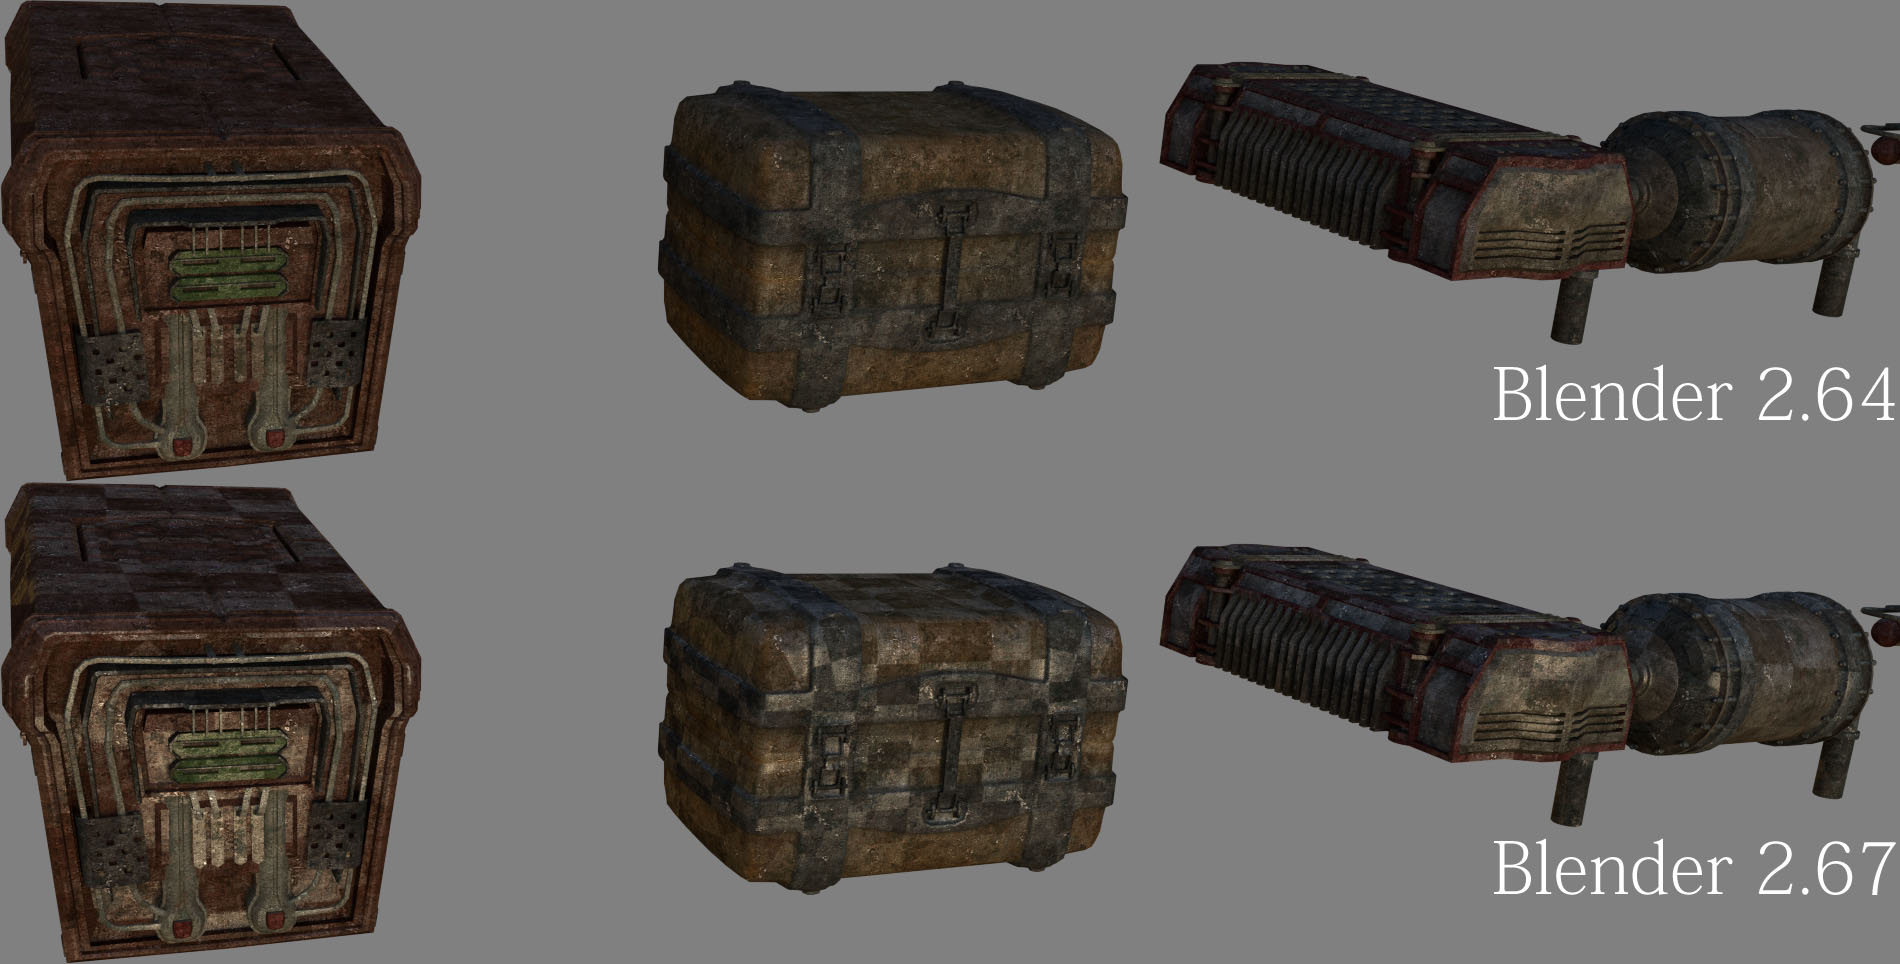
Would anyone be interested in looking at the file for me and telling me what I need to change to make it render properly?
I would be glad if you let me have a look at it. From a first thought I would think that there is a checker texture somewhere.
Edit: I have a cloud access too. Which file of the TOS Assets does contain this props?
Thank you, minoribus, I appreciate you taking the time to look for me! The file in question is in the production files > models > props > lib folder, and is called lib_tech_greeble_kit.blend . The models are on two layers; each layer has its own material. The objects in layer 2 ( I believe) all render properly, but layer 1’s objects use the second material, and these are the ones which don’t render properly for me. All objects are placed in the same spot, so it may look like there are only two models at first glance.
Thank you again for looking into this for me!
Edit - Specifically, the material is gtk-boxes.001.
Oha, that will take a while, because the whole production files are 3.6 GB as a zip file. I’m currently downloading it.
Just couldn’t resist taking a stab at it James. I used cc_scatter at the very beginning to break him up in little pieces, of course the scanlines, some animated noise, glow, and duplicated the layer a few times and started mucking around with blend modes. I think in a lot of ways transparency is critical to sell it.
minoribus - Thank you! I’m sorry, I thought you may have already downloaded the Tears of Steel assets previously. I would have sent you the sole file myself had I known.
harley - Your test looks very cool, I really liked the noise and the scanlines. Were the scanlines created using an AE filter, or did you have to set them up manually? I’m honored that you took the time to create this, I feel I’m watching your inspector after he has traveled into the distant future. Maybe the hotel has a hot tub time machine of its own!
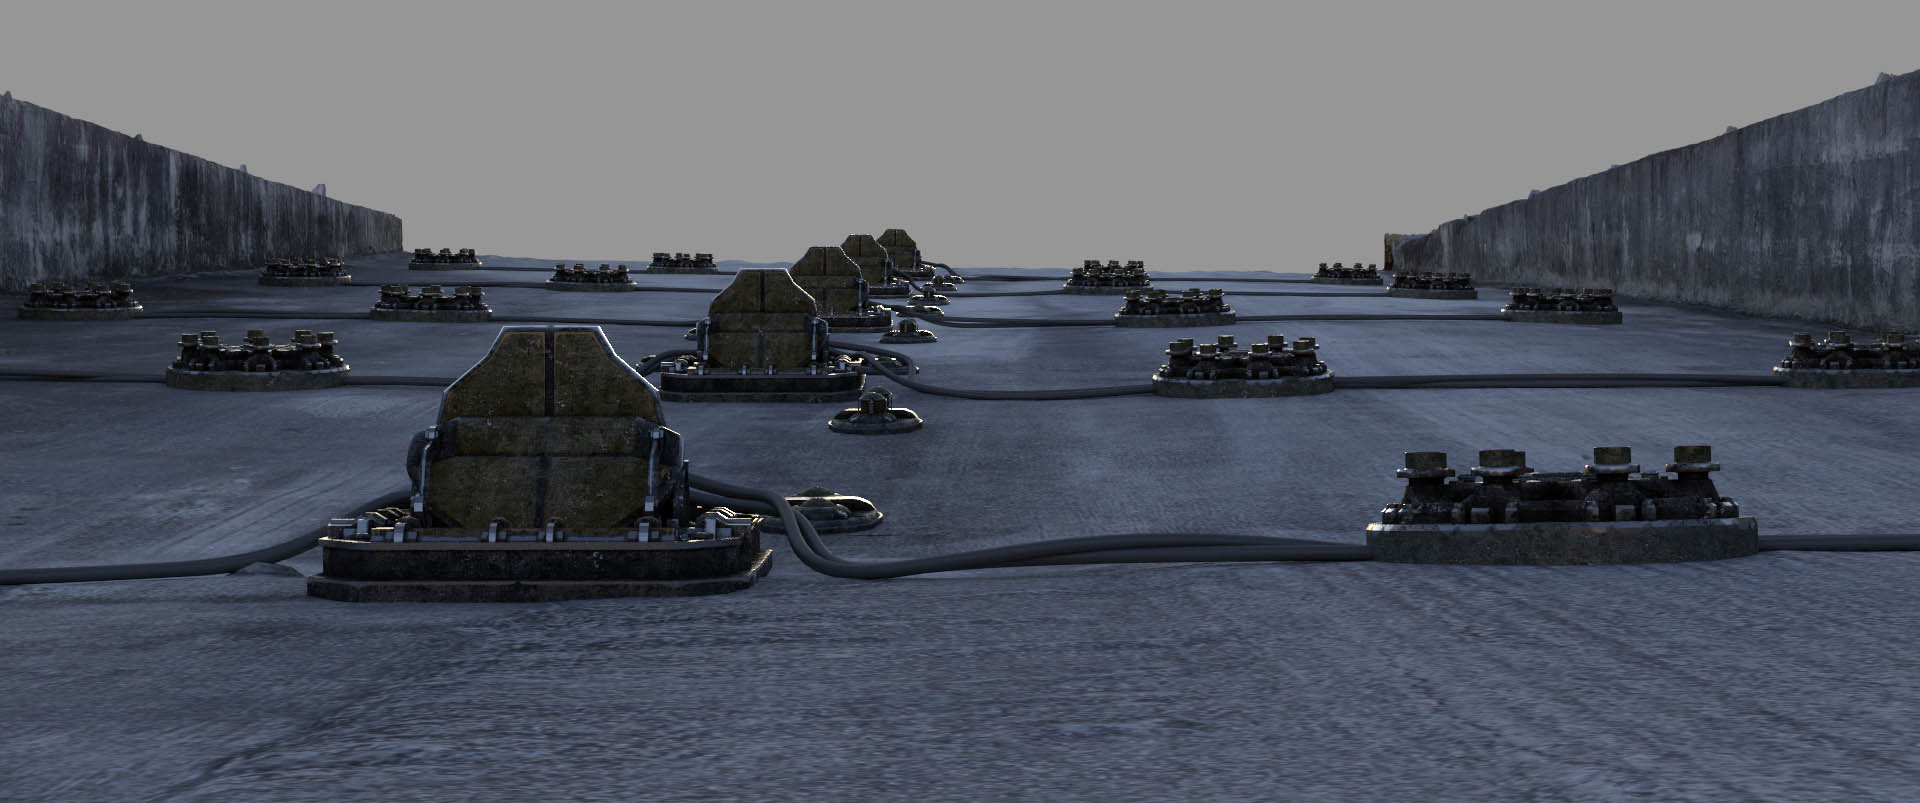
I only had a couple hours to work on the model today, but I’ve got the heavy cables started:

The first three rows are done, just two more left. Then I’m going to touch up the hatch and add some things to it. I think it can be greatly improved!
minoribus - Thank you! I’m sorry, I thought you may have already downloaded the Tears of Steel assets previously. I would have sent you the sole file myself had I known.
No problem, James - it was on my to do list anyhow to look into these files ![]()
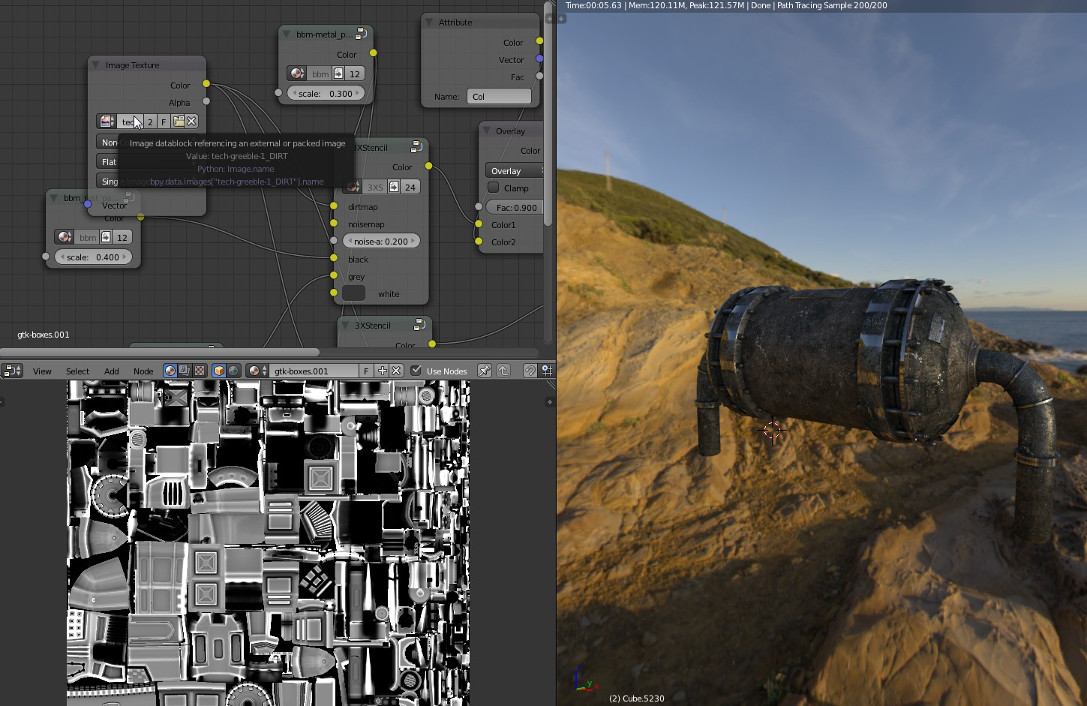
I found it. The items on layer 1 in the specified file use a material called gtk-boxes.001 as you said, James. This material uses an image texture as input for several other node groups. And that texture is set to “tgk-tech-greeble-1-dirt.png.001”, which is actually a checkerboard image.

After you set this to “tgk-tech-greeble-1-dirt.png”, which is located at “production_files\models\envs\lib extures” it renders very pretty.
I tested this with 2.7, but I believe that it should be the same under 2.67 because I also had the checkerboard effect in the first render. Now the question is, why do we see the checker texture? Perhaps that is something tat has changed on the way from 2.64 to 2.67.
I hope this solves the problem now, otherwise please tell me ![]()
Hey James… I used a third party plug in for the scanlines. But I did see some tutorials where people making them with regular AE filters. One of them they used the grid filter and colorama, but I didn’t watch the whole thing. If you do end up using scanlines and get in a jam, send me a PM.
minoribus - Many thanks for taking the time to solve this for me! I feel silly for not having thought to simply check the images being used in the UV Image Editor; I only tried poking around in the material nodes. I agree with you, I think it must be attributed to some difference in the way nodes work between 2.64 and newer versions. Now I’ll be able to use all those extra props in the film as well! Thank you again.
harley - I appreciate that! You’re about the only other person I know on here who uses AE in the workflow, so if I get in a bind, I’ll be sure to send you an SOS!
Work continues on modeling and texturing the hatch and cables. I don’t have anything new worth rendering, but here is a little celebration about our Happy Wheels video:

That video finally passed 100,000 views after about 10 months. That’s enough people to fill up the University of Michigan’s football stadium! Thank you to everyone who’s supported us!
Well, damn Harley that is the oldghost when he was the young ghost. Hard hat and all.  Fascinating effect through and looks great.
James lets go back prior to the hologram if you would. I’m just trying to catch up with what you are doing. Let me attempt to go line by line if I may. I have a feeling you are jumping from Blender to AE and possibly Photoshop here.
(1) The gun is a photographed model textured in Blender?
(2) The base which raises up was modeled in Blender?
(3) The loading dock is a photograph enhanced in Blender?
(4) The background will be 2 dimensional but could also contain several Blender 3d models?
And, all of this will require the camera tracking features in Blender? Does that sound like what is happening or am I completely clueless. And, if so I bet others might be also. Interesting thread but not having After Effects and only having used camera tracking once it’s easy to get lost in here.
No problem, ghost, I’m happy to clarify!
(1) The gun is a model I found on Blend Swap, and is actually what made me start thinking about the whole short film. You can find it here: http://www.blendswap.com/blends/view/68770
It didn’t come with any textures or materials, so those I created myself, using the dirtmap script to speed up the process.
(2) The base (or the hatch as I’ve been calling it) was modeled in Blender by me, pretty much the only thing I’ve modeled myself so far.
(3) The loading dock was photographed in real life, but the 3D model was created by a different program called PhotoScan. It’s a photogrammetry program, which means you import a series of images, and then it analyzes them and calculates what the scene looks like in 3D space. It’s a very computationally intensive process, but can produce very accurate results (and much better than I could ever model by hand). Here is a video I did recently, where I tested the process with different types of objects and environments: PhotoScan Testing
Although, I do use Blender to create a lower resolution version of the resulting PhotoScan mesh, as the raw models are very high resolution and often require a little bit of clean up.
(4) The background will probably be 2D, especially for anything that is placed very far in the background, and anything that is only in one or two shots. But anything in the nearby area, and which we see throughout the film, will probably be a 3D element.
There won’t be any camera tracking required (thank goodness), since all the elements will be generated in Blender. That was something I decided right from the onset of the project, because I had just finished up the GTA video which required a fair bit of tracking in Blender, so I wanted to take a break from it.
I think possibly the confusion may be from me mentioning the identification and alignment of points in PhotoScan. There, the software identifies shapes and distinct patterns and matches them between images to interpret their locations within the scene, and this tells it what the shape of the model is. But no, there’s no actual camera tracking to have to deal with this time.
I know it gets confusing to follow when someone is using multiple programs in their work; it can be hard enough when they’re just using Blender! If I’ve left anything unclear, just let me know.
James I appreciate you taking the time. I’m up to speed again or at least enough to follow along. To use another Blender heads phase; ‘This is getting way cool’ And, congratulations on the 100,000 hits. Now I’m off to check your links out. I do some of my best work at 3 and 4 A.M. Sounds like you suffer from the same malady.
By the way young Andrew Price did a firing range animation using Blender Internal several years ago. But, already it’s obvious yours will be different. However, you might like to check it on Blender Guru. Once again thanks for the explanation.
ghost - Yes, I remember what you’re talking about, “The Ballad of the M4 Carbine” I believe it was called. Soon after I started working on this project, I realized the similarities between the two. I think that was part of my decision to have holographic targets as well, to separate the two works better. For anyone who hasn’t seen it, here it is:
Thanks for the kind words and encouragement! You’re right, I do prefer to work during the night; the only reason I’m even awake now is to drive someone to a doctor’s appointment!
I’ve got the cables all placed the way I want them. Now they just need to have an appropriately grungy material added to fit in with the rest of the scene. Oh, and also add some connections between the cables and the models so they look more realistic.


I’ve also decided to create a proper retopologized model of the firing range, instead of simply applying a decimate modifier to the high res. This is because the UV layout I get from the auto unwrap in PhotoScan is not optimal, and I’m losing so much pixel space. From a distance it looks okay, but once you get closer the difference between the greeble models and the photoscan mesh is very noticeable.
More to come soon, I have to rush off for now, though!
A quick update before bed, as I have to get up early in the morning. I hate getting up early. Anytime before noon is early.
I unwrapped the cables and gave them a texture. I might adjust this a bit, but for now it’s good enough.

I’ve also finished most of the work on the hatch, thankfully! This is not the final look, but it’s 95% of the way there. I learned how to use vert paint today, and that is what is controlling the overall color of the objects. I only messed with two of the doors tonight to see the effects, but I’ll correct and complete all the vert painting tomorrow.

I think the hatch is already looking much better. It should look really cool with some sound effects and smoke coming out of it when it opens up.
Well done, I like where this is going to. The White Valley Research Labs facility is taking shape. The cables and the hatch are looking good. And adding a bit of manual control by using texture painting really makes a difference. I see that you already made some variation in how the cables are bending. Perhaps the left side of the last image could use a little more variation. Some slight curves, perhaps?
Looking good James. I was looking at the cable in your target generators I believe it is. And, said to self he’s using some type of cable transit system to secure those cables.
http://www.youtube.com/watch?v=5UkgjM168C4
I just realized I’ve been showing the same side of the cables this whole time. I promise there is a little variation on the left side as well.
I completed the vertex painting on the hatch today, and now just some minor material tweaks are left on it. Tomorrow I want to work on the new hologram design and see if it can be improved. Then all that’s left is retopologizing the two scans, and building the outer set pieces.
The White Valley name is actually related to a future project I’d like to create. It’s a series of videos showcasing the research projects and inventions of a rogue laboratory, whose creations straddle the barrier between the insane and the sadistic. The name is intended to be reminiscent of the fictional “Black Mesa” company. I’m hoping we can begin work on the first episodes next year.
Also, I forget if I’ve mentioned it, but I’ve begun work on a tutorial covering the dirt map script workflow, and have gotten permission from Nikolò to include some of his images. I want the tutorial to be easy to follow and enjoyable to watch, so I’m really trying to design it well. It will include links to files to download and play with.
That’s all for now, time for bed!
Edit*
I just saw your post, ghost! What an interesting animation, I watched the whole thing. How did you find that? I found myself thinking, “How could I do that in Blender?” as I watched the various effects, such as the glue or sealant being applied.
James your cable entrances there made me think of it. It’s a water proof, fire proof system to move cables between two points where you want that type of protection. And, of course it is also a penetration device that secures your cable.
Examples of use would be between two rooms in a commercial building where there is a fire door separating the two. Or, between two compartments on a ship. That is where I used them. Or, and here is where your cables reminded me of it, between a side exposed to the weather into a dry area.
James the frames come in rectangular, square and round shapes. So they can be configured for one cable or hundreds by stacking or placing rectangular frames side by side. And, yes they can be a bitch to pack properly especially in a tight spot.
Two manufacturers have the market to themselves. MCI and Rox I believe it is. Really the only difference to a Blender artist would be the color of the blocks. One a light red and the blue you saw in the video. Hey, who knows what you might need one day using this program called Blender. What you have there securing your cable reminded me of a multi transit system. And, what you have is fine. But, one day maybe you will have to get more specific if you will.
Your animation is coming along just great. And, this has been a welcomed break from modeling a duct system. Minoribus would have had it done two hours ago using his elbows on the keyboard.
///
Respect! The texturing has gotten even better, I truly love the outcome of the hatch. These cables sell everything so well, the scenery is very believable. Great Job.