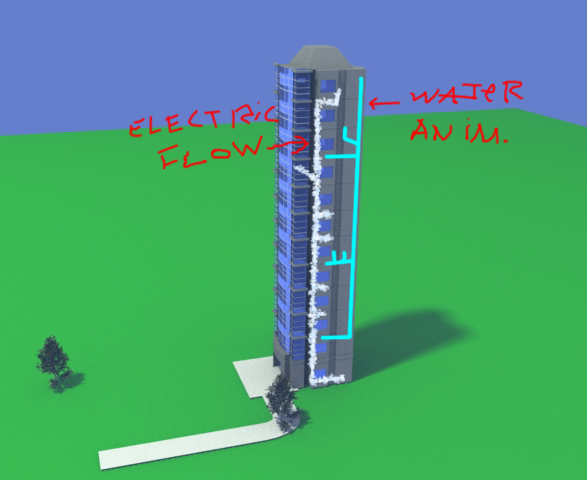
i need to create a simulation of the water pipes system and the electricity circuit in the interior of the walls of a building. It doesn´t needs to be a physics simulation, but i don´t know how to achieve this effect. What i m trying to do is something similar to the old Simcity game in wich the pipes under the ground got fulled or empty.
If I understand you correctly, I did something similar with gases flowing through pipes. Another artist created textures using ParticleIllusion which I mapped onto UV-mapped extruded plane – so it was all 2d. Then I created IPOs for the materials to get them moving correctly along the UVs. May not be what you want.
You may also get similar results with the geometry you already have and trying the UV Map node in the compositor. I’ve not used it enough myself to really advise.
Hey secundar thanx for your reply, i ve downloaded that soft, seems good.
Anyway i d like to do it all in blender; i m experimenting with the fluids simulation, and i d like to know if it would need too much render time to render as videowith the camera animated and all stuff… any advise will be really appreciated
hey secundar, i m realizing the complexity of the work you made with that coal proccessor.
i guess i could make something like u did; movin the cammera, stoping, showing a detailed proccess, and then continuing to the next stage. Could you gimme some tips on how did you mounted all the process?? i mean, how did u structured the different scenes of the project and the transitions to the interior of the fabric and from there to the details of the engine?? u made it all i blender??? with nla strips and the sequence editor???
About the fluid sim, i guess i can make them extruding as you recommended me, but the electricity can be made with an emitter following a path ¿wadaya think?
here is my video: http://dicot.dyndns.org:81/architecture/
Sorry for the late reply. I guess I missed your post so I hope this doesn’t come too late for you. I originally hoped to do some sort of proper breakdown of the project for blender users in general, even dreaming of writing an article for that magazine… but here it is in short:
All 3d work is contained in one blender file. Each scene contains one or more of the following to help keep things organized:[LIST]
Exterior (all outside stuff)
Interior shots 1 through 3 (one scene each)
Props/models such as the train cars and pieces of the interior (furnace, pipe peices, etc. Each model was marked and placed as a Group and placed into the main scenes (Exterior, Interior 1-3)
Layers and Compositing nodes where used in scenes (Exterior, Interior 1-3) to create passes to be composited in Shake (yes, I could have just used Blender but, at the time, I was more comfortable using Shake on this tight deadline). I did things like take ID passes and pipe them into an RGB node to get 3 separate mattes into one file to help reduce the amount of files I had to deal with. Lots of mattes were needed for controlling the renders of the smoke/water going through the system. I think I messed with EXR but found that with Shake it didn’t really make things much simpler.
Rendering was managed by FarmerJoe on a mixed Gigabit network (Mac, Win, Linux; Intel/AMD; dual, quad, and dual quad). FarmerJoe saved my sanity.
Final compositing was done in one Shake file with 3 trees/FileOuts.
All editing was done using Blender Sequencer. Output was PNG at 720p 30fps, 8 minute runtime – about 12,000 frames i think.
FFMPEG was used for converting to h264 .mov
Chapter markers were created initially on FinalCut Studio 2. Subsequent additions using QuickTime Pro.[/LIST]Main platform was Ubuntu 7.10_64 on a Mac Quadcore with 4GB of ram.
I think your idea of an emitter should work fine. The link you provided didn’t work for me.
Hey secundar! thank you for your reply. I really didn´t understand at all when you talk about the scenes managemnt and organization, it is very confusing to me ¿how do you separeate the objects by groups in the different scenes and then integrate them into one single composition to render?
Could you gimme some link or some more detailed explanation about Scene management?
I gues i ll have to explore a bit more about composition nodes too.
Thanx again
It all depends on the project, but the Coal Process grew on it’s own. Another employee did some modeling which I would import into a new scene in the project. After cleaning things up and applying materials I would add the model (selecting all it’s parts) to a new Group. This group was then “linked” via the DupliGroup feature (see manual) and positioned via it’s Empty.
All the piping parts you see were appended from another project into a new scene and integrated in the same manner. It also made sense to do the exterior and interior as separate scenes. Things stay more organized that way.
I think I also had 3 different interior scenes for the major camera moves. Most of the geometry was shared (linked) between them all. In addition to different cameras and camera animations there was additional geometry for different particle effects.
It was nice to let the blend file grow organically with the project. Mind you, I was using meaningful names for meshes and materials – as well as the scenes.
Blender’s library system is a great strength that new users should take time to understand.