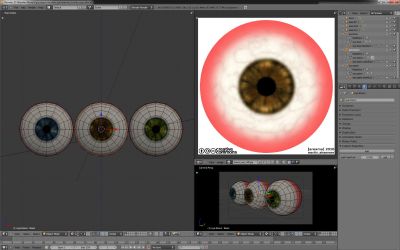
This might be the wrong section, as it isn´t really a big finished project rather than a one-dayer, and there isn´t really a subforum for free stuff, so here we go:
Eyes on: Eyes!
I often see very good portaits and head models, good sculpts, and often the overall appearance is killed because the eyes look dead and dull.
Naturally one could use photo sources to create eyetextures, but not everyone owns a 3d.sk account or similar and has a big repository on textures.
Drawing eye textures by hand, usually ends in a dead look, especially for new users.
So more less as proof of concept I took yesterday to create eye textures and the according eyeballs in GIMP and Blender.
The eye textures are completely procedural, I didn´t make a single brushstroke, all was done with filters, which, as next step might bring me to make an eyeball node material in Blender as well, but I think the GIMP file offers enough freedom for now.
The whole project is meant to be a contribution to the community, released under Creative Commons, BY-SA, so people get to use my eyes. I am not yet fully satisfied with them, I am open to C&C but I think they look decent enough for now.
–
For what you get here:
The GIMP file and textures:
The GIMP file is more less a template where you can use the layers and export your texture. It contains already the blue, brown and green eye, if you want more colors just duplicate the layers for the inner and outer iris color and color them accodringly.
There are two layers for the fine and rougher bloodvessles, playing with their Opacity you deceide how white or bloody you want them.
If you got no interest at all in it and just want the textures, I provide them as download as well, along with the bumpmap for the tearfluid.
The textures are currently 1024x1024 which might be overkill for the average project unless you plan closeups, but scaling down is always better than having to invent new pixels scaling up 

click image to download textures as .zip [249kb]
–
The Blender File:
Last but not least the .blend for those who need a complete eyeball. It doesn´t render too fast as it uses an environmental map for the reflections, raytraced mirror and transparency along with SSS for the eyeball.
You got to pay attention to the “Depth” settings of the tearfluid material.
The tearfluid mesh is set non-clickable in the outliner and the mirror and transparency is set to a depth of 4, which is rather render heavy. It really depends on how many transparent obejcts you have that intersect on the image. Basically the depth determines how many transparent/mirror lightrays are interacting. If you set it to zero for example, the transparency will not show anything behind it, just the background.
There are several approaches for eyes, I had two in mind.
The first one was the technique where the eye is one mesh and you create the lens with a transparency and make the pupil a seperate mesh and place it inside the eye.
The other approach was to make one mesh for the eyeball with the iris and create a second transparent mesh around it with the lens.
I chose the latter approach as I find it nice because you get to fake the tearfluid covering the eye, you can use a specular or bumpmap to simulate the uneveness the tear fluid has over the bloodvessles, giving an additional level or realism and you can control the mirror and specularity of the eye without touching the actual texture material below.
As goody I made use of the kickass driver system in blender 2.5.
In the object tab I added a custom animated property to control the pupil aperture via shapekeys.
If you load the UI with my file you should see it right away, else check the screenshot below to find it.
The .blend contains all textures, the download link will be at the end of the post.
–
Some Video:
–
Downlaods:
Blue Eye Texture 1024x1024 [75 KB]
Brown Eye Texture 1024x1024 [75 KB]
Green Eye Texture 1024x1024 [75 KB]
Tearfluid Bump Map 1024x1024 [35 KB]
All Textures in a .zip [250 KB]
License:
Creative Commons BY-SA
Attachments


 very useful!!!