Hello ,
Does any one know how to freeze transform the translate attributes in blender, I have tried apply scale… thingy but it only changes for the rotation and scales values …and not the translate ones
If you mean that you want the objects center to be set at the world origin then do the following:
Shift + c (centers the cursor at the origin)
then in edit buttons ----> “mesh” panel use “centercursor”
patchiouspatch,
did you try shortcut: [ ctrl + a ]
from the pop up window choose option 2:
Visual Transform to Objects Loc/Scale/Rot
I hope that works for you ![]()
P.S. Welcome to the forum!
1 Like
You might want to explain what “freeze transform” actually DOES, because I think it’s language used by another application that’s, unfortunately, not really transferable from one app to another.
It would be great if all apps spoke the same language.
what he/she wants is to translate an object for example in x:-3 and then apply and option to let the object in the same position but reseting the translation properties, so you will back to 0 but the object stays at the same place, you can do the same with rotation and scale, freeze transformations comes from Maya.
This is another “quirk” in Blender compared to other 3D apps … In Blender you cannot “lock transforms” directly because Blender follows a strict parenting hierarchy for all objects, any object that is not a child object of a child object of the world/global coordinate system will snap back to the 0,0,0 origin when you clear transforms unless the parent object has been transformed and is kept that way .
A workaround this would be to parent your objects to to a proxy empty and transform that to “lock” the transforms for the child object, or you could also insert a Loc keyframe (make sure you remember which frame you are on, and when you want to “clear transforms” use the arrow keys to advance/go back a frame) .
not sure if you understand the original question. in terms of matching the maya command ‘freeze transformation’, michael w’s answer is correct.
all it does is make the translate properties be 0,0,0, but leave the mesh in its current location.
If I understand correctly–
- Select mesh in object mode
- Shift c — centers the cursor
- Press center cursor in the Mesh Panel
Cheers,
GreyBeard
i think he wants to lock the object in space to be unmovable, for that you need to press n button in 3d view and a panel appears the just click the 3 lock buttons for loation or scale or rotation
“Freeze” or “Reset XForm” are tipical bad names for these functions.
Blender has very clear and logical names for these methods.
From what I gathered from “I have tried apply scale (and rotation - Ctrl-A).… thingy but it only changes for the rotation and scales values …and not the translate ones”, he is not asking a mesh level question, but an object level one . He is not asking how to change the object center of a mesh, but how to set the default 0,0,0 transform value to be changed to where ever he moves the object in the Global scene, just like when you apply scale and rotation all the scale and rotations set to 0,0,0 values .
all it does is make the translate properties be 0,0,0, but leave the mesh in its current location.
Well you can’t do that directly in Blender . The only thing that will get you 0,0,0 transforms is to Alt-G in Object Mode which will snap the object’s center to the world origin unless the object is a child in a parenting hierarchy . If you do what Michael W and Geaybeard suggest, your object center /pivot moves to the world origin of 0,0,0 . If you want to move an object/mesh center into a location other then the world origin and not have it snap back to the world origin when you clear transforms with Alt-G, you have to use the methods I described above …
Trust me, I figured those out by painful experience … I once added a bunch of hooks to make a face rig and got one of them placed oddly through a number of steps (while manipulating others as well so just doing Ctrl-Z a bunch of times was not possible), so I without thinking hit Alt-G (thinking the hook would snap back to where it was added, like armature bones), and bam ! the empty snaps to the global origin ! So I looked around for something like apply scale and rotation for transforms … But Blender doesn’t have one …
things like this is why blender is not so common into the 3d users/comunities, some of them they are going to be considered in 2.5, but this feature… I don’t think so, at least the haven’t spoke about it at the moment.
Are you serious? things like this are in all apps… IIRC motion builder would do the same behaviour and you would have to use the MB equivalent of armatures if you wanted to be able to reset position…
Blender has many faults and there are many many reasons it’s not so widely used, but I had to think a long time before replying to this as I’d use an armature for anything I had to animate or needed a specific pivot point… It’s just one of those things…
BTW It always amazes me how threads like this seem to run and run and the original poster is nowhere to be seen, probably never came back or read any of the replies! what a shame.
Most of the Blender users dont use Blender really. They just starting Blender and try something in 1-5 minutes, and when they cant make something in these minutes they says: why Blender dont working like 3dsMax or Maya or something.
When they starts 3dsMax or Maya or something and cant make that they wants they thinking “Max and Maya widely used so I am sure it is possible to make this”.
If you are reading Max or Maya forums you will find beginners too with strange questions. But in Blender forums most of the users are beginners.
1st of all… thanks to every one who wrote in … Michel W … thank buddy … but thats not what i had in mind … I should have been more specific ( i know ) …like Kernond said … and Sam , vertex pusher ( you must be into modelling ?) dude/dudet /… ur right thats what I was getting at …Thanks a lot … I shall give that method try … ( sure wish there was like one way option for this -may be in the next version huh?)…Thanks a lot you guys…
Michel W
“BTW It always amazes me how threads like this seem to run and run and the original poster is nowhere to be seen, probably never came back or read any of the replies! what a shame.”… you don’t need to be Amazed!!..any more … I am back and read all your posts … THANKS all of … its just that I really have little time on my hands now … so getting back to my post took a few days … … Peace ! … Thanks again for replying to my post
No probs and welcome to blender!
Hi there,
I was searchibg the same exact thing, because I used to be a Maya user.
Blender can do the “Freeze transform” of Maya :
> Select your mesh
> open the Object menu on the bottom of your view, and in the Clear / Apply submenu you’ve got what you need (all the shortcuts are there too)
Hope that helps…
Bye
Ive used maya before…
its select object in edit mode -> CTRL+ A
im using 2.6.2 by the way
2 Likes
This 100% want you want, been using Maya for years. Of all the things previously mentioned, this is it. Freeze transforms Blender equivalent.
ctrl+a > All transforms
Beautiful, thanks for the directions, everything else in this thread is so vague otherwise.
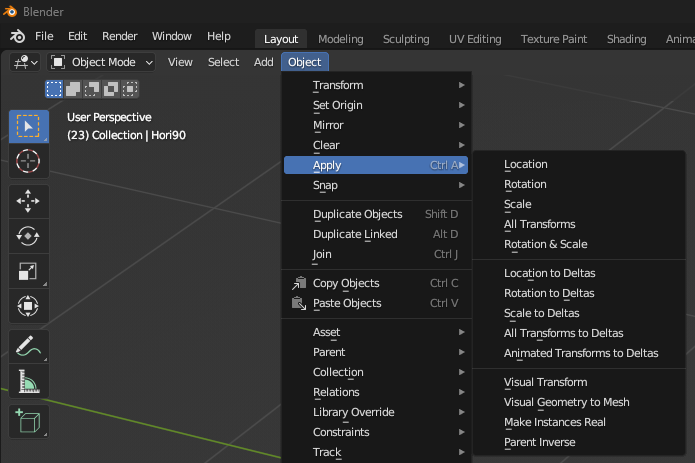
From those coming from Google -
I’m Currently using Blender 3.5, wanting to do the Equivilant of ‘Freeze Transforms’ in Maya
- Select your Object.
- Ctrl+A (For the Apply Menu) or by the Object menu
- Click All Transforms
2 Likes