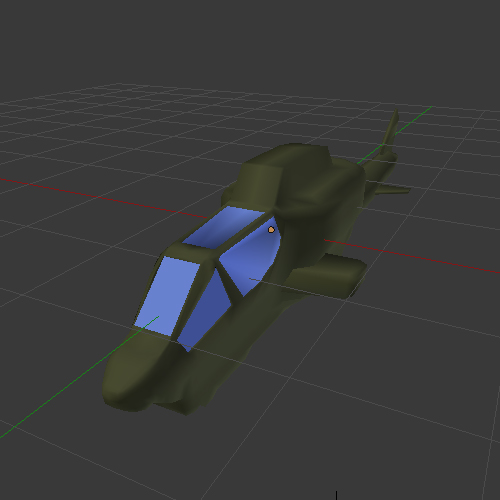
From start to finish, making a Blender Game (PDF)

In this series of PDF tutorials I will show you, from start to finish how to make a fairly complex game in the Blender game engine. You will need to have a few Blender skills such as basic modelling, but I do give lots of info about every other aspect of making the game.

At first your will be “plugging in” pre-written scripts to get your objects to perform correctly, but later I will be showing how to write your own Python scritps for the BGE.

I will be covering many aspects including basic A.I. game objectives, multiple missions, switching meshes and using dictionaries to store information. You will learn how to save and load games, as well as how to add a HUD and mini map to your game.

The tutorials are as follows:

  1. Making a game model using projected texture baking.
  2. Basic player movement for a helicopter.
  3. Weapons management, including enemy damage and player ammo.
  4. Coming soon.

Here’s the first tutorial:
BGE Tutorial Part One.pdf (1010 KB)

and here is the second:
BGE tutorial 2.pdf (880 KB)

Here’s the Blend file to go with Tutorial 2.

And the python script. Copy and paste it to your blend file and name it cobra.py

####################################################
### imports

import bge

####################################################
### get window info

def window_info():
    y= bge.render.getWindowHeight() *0.5
    x= bge.render.getWindowWidth() *0.5
        
    return (y,x)    

####################################################
### stop roll and pitch exceeding maximum

def max_value(own):
    
    max_setting = 80
    
    if own['pitch'] > max_setting:
        own['pitch'] = max_setting
    if own['pitch'] < -max_setting:
        own['pitch'] = -max_setting 
    if own['roll'] > max_setting:
        own['roll'] = max_setting
    if own['roll'] < -max_setting:
        own['roll'] = -max_setting     

####################################################
### apply movement and rotation
        
def movement(own,cont,cobra_motion,cobra_rotation):
    move_sense = 0.2
    rotation_sense = 0.00002
    
    location = own['pitch'] * move_sense
    roll = own['roll'] * -move_sense
    rotation = own['yaw'] * rotation_sense   
       
    cobra_rotation.dRot = [0.0, 0.0 , rotation]
    cont.activate(cobra_rotation)
    
    cobra_motion.linV= [roll, location , 0.0]
    cont.activate(cobra_motion)  
   
####################################################
### main control script

def cobra_controls(cont):
    
    ################################################
    ### set own object, sensors and actuators
    
    own = cont.owner
    
    m_move = cont.sensors['m_move'] # mouse pointer movement
    middle_m = cont.sensors['middle_m'] # middle button, used to toggle strafe
    
    cobra_motion = cont.actuators['cobra_motion'] # moves the chopper
    cobra_rotation = cont.actuators['cobra_rotation'] # rotates the chopper
    tilting = cont.actuators['tilting'] # visual tilt of the chopper
    rolling = cont.actuators['rolling'] # visual roll of the chopper
    
    ################################################
    ### get window info and mouse position
    ### return mouse pointer to the center
    
    window = window_info() ### this calls up info from our first function
    y = window[0]
    x = window[1]    
    pos = m_move.position ### this is the position of the mouse
    bge.render.setMousePosition(int(x),int(y)) ### we need to reset the mouse pointer now
    
    ################################################
    ### here we set some local properties
    ### you could set these on the object
    ### properties panel too for more control
    
    min_sens = 2 # dead zone of mouse movement    
    p_adjust = y-pos[1] # how far the mouse pointer has shifted from 0 on the y axis
    r_adjust = x-pos[0] # how far the mouse pointer has shifted from 0 on the y axis
    
    ### how quickly the mouse moves the player object
        
    pitch_rate = 0.2
    roll_rate = 0.2
    yaw_rate = 1.2
        
    ### how quickly it returns to a neutral orientation 
    
    pitch_reset = 0.001
    roll_reset = 0.02
    yaw_reset = 0.02
    
    ### a misc value
    
    twitch = 0.05
    
    ################################################
    ### here we use the mouse input to set properties
    ### which will drive motion and rotation
    ### as well as showing in game as aircraft 
    ### tilt and roll
    
    if middle_m.positive: # if we want to strafe from side to side and reset other movement
        if abs(r_adjust) < min_sens: # if no x axis movement of mouse
            own['roll'] -= own['roll'] * roll_reset # -= means reduce property by this much
        else:    
            own['roll'] += r_adjust * roll_rate # += means increase by this amount
        
        own['yaw'] -= own['yaw'] * twitch
        own['pitch'] -= own['pitch'] * twitch
        
    else: # normal movement profile
        if abs(r_adjust) < min_sens: # if no x axis movement of mouse
            own['yaw'] -= own['yaw'] * yaw_reset
            own['roll'] -= own['roll'] * roll_reset 
        else:    
            own['yaw'] += r_adjust * yaw_rate
            own['roll'] += r_adjust * twitch # if not strafing, we want to turn but also roll a little
            
        if abs(p_adjust) < min_sens: # if the mouse is not moving on the y axis
            own['pitch'] -= own['pitch'] * pitch_reset 
        else:    
            own['pitch'] += p_adjust *pitch_rate     
    
    ################################################        
    ### here we use a function to stop pitch and roll from exceeding maximum value
         
    max_value(own)          
    
    ################################################
    ### this is the function to apply movement      
    
    movement(own,cont,cobra_motion,cobra_rotation)
    
    ################################################
    ### these are functions to adjust the pitch and roll of the model using empties
    
    tilter = tilting.owner
    tilter['tilt'] = own['pitch']
    cont.activate(tilting)
    
    roller = rolling.owner
    roller['roll'] = -own['roll']
    cont.activate(rolling)
    
################################################
###  This is a short script for making the camera follow the player  
    
    
def cam_loc(cont):
    own = cont.owner  
        
    if own['player_ob']:
        ### make the camera parent locked on to the player
        own.worldPosition= own['player_ob'].worldPosition
        
    else:
        scene = bge.logic.getCurrentScene()  
        
        ### from a list of objects in the scene find the player and make a link to it using a property
        player = [ob for ob in scene.objects if ob.get("player",False) ==True][0]
        if player:
            own['player_ob'] = player

Here’s the third tutorial. It shows how to set up your weapons.

BGE tutorial 3.pdf (905 KB)

You can download the Blend file here.

This is the Python script you will need for this part of the tutorial.

cobra_py.zip (4.78 KB)

The script has become too long to be pasted as code. :slight_smile:

The next tutorial will cover creating enemies and setting up different levels of AI.

EDIT:
There are a couple of small issues with the code for this tutorial, they don’t affact the functionallity of the script, but veteran coders might think they look out of place. I’ll fix them up in the next release.

One example is that I called up a function that I didn’t need, but didn’t end up using it anyway and then forgot to remove it later. It could be confusing.

Anyway, at this point the idea is just to use the scripts as is, you don’t need to understand them yet. I’ll be giving an introduction to scripting for BGE in the next tutorial, showing how to find the nearest target and set an actuator to use that information.

Thanks a ton Smoking_mirror!

I nearly missed this tutorial series (found it accidentally in the resource forum), and now already tutorial 3!

This is exactly what i have been looking for. Will go through every precious word when i find my time. Having a peep at the .blend file, the helicopter look so damn cute!

Sure i’ll have some questions to ask after studying it, and hope you won’t mind answering it! Thanks again!

Thanks for the interest!
Ask any questions here and I’ll answer them. The scripts may be a little hard to understand at this point, but I plan on delving in to script writing more in the later tutorials. If anything else is unclear I’ll try my best to give some aditional instructions, and then write the extra info into the existing tutorials. :slight_smile:

1 Like

I like it. Maybe are you continue series? :wink:

I’m working on part 4 now, it includes some sample types of enemies.

Hi Smoking_Mirror,

Unsure if you have have finished this off as yet or have possibly abandoned it

Has part 4 of this tutorial been completed as yet?

Thanks

Sai

I have alot of web work on this weekend, but I shall be doing this series after work next week and posting the results,
Looks great so far.

Thanks for the interest everyone. I do plan to finish this series but I need to do some changes to the docs I’ve already posted. Blender recently moved on to version 2.7 and I’m sure some parts will now be a little wrong. If you get any problems just bear with me and I’ll try to get the tutorials finished.

Hi Smoking_mirror,
I tried my hand at modeling a cobra, using the references you provided in the PDF.
I’m only just getting back into Blender after a long break, please could you look at the attached Blend (If not too busy!) and let me know any ways to improve.

I plan to complete it mid next week and texture it!. Cannot wait to continue with your tutorials.

Attachments

cobra.blend (584 KB)

Hi Alan, it’s looking good.
With a game like this where the model is going to be so small on screen you can get most of the detail from the texture, there’s no need to model the windows for example. I’d say carry on with what you’ve got, it looks great and I’m sure unless you’re rocking out on a ten year old laptop, your computer should be able to handle the extra work load of a few triangles.

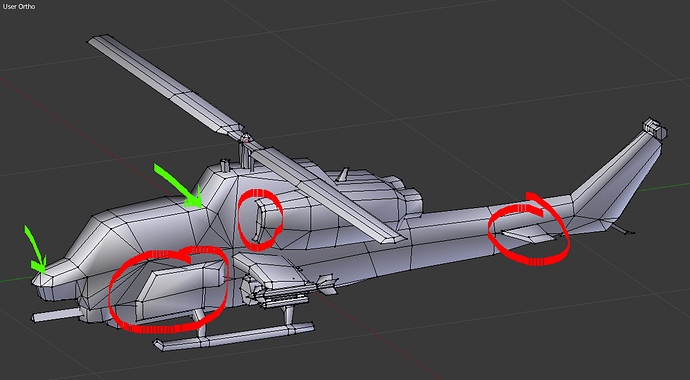
For future models, you should try to keep the triangle count very low. In the game engine there’s no need to worry about edge loops or making the model convex. You can add chunks of the model on without joining them to the main body (red areas on the following example). You can also use triangles wherever you want because the game engine breaks it down in to triangles automatically, keeping to quads won’t get the kind of improved shading you can see in the Blender render engine (green arrows on the example show where I’ve chosen to use triangles). Overall, with such a low poly asset you don’t want any extra edges or verts inside a flat planar area, a curved surface can be achieved with just a single extra edge.


In my RPG game I’m finding that although Bender handles a couple of low poly characters or objects very easily, once I start getting up to 10 or more on the screen at the same time there is visible slowdown because of rendering time. Keeping models as low poly as possible at first is a great way to go on with development. If at the end of your project you find some extra processing power is left, then by all means go back and pretty up your models with some extra geometry.

Rendering is a bit of a bottleneck in Bender, and though it has improved, and computers are faster these days, I’d still suggest aiming for no more than 3000 triangles on a single model.

As I say, stick with what you’ve got for now. I find that any project has two basic states:

  1. Enthusiasm mode. You are very interested in the project. Maybe you’ve just started or your just watched a movie or played a game or read a book or had a dream which has reignited your passion for a game project that was stalled. this is the time when you get most work done.

  2. Block mode. You just can’t find any energy to do any serious work on the project. Maybe theres a problem you can’t solve, or a sudden slowdown which you can’t work out how it was caused, or you are thinking of something else completely. At this time you normally just tinker with a project, improving textures, fiddling with code, hunting out old bugs, or making some concept art. This is the time when you spend most time posting in forums and helping other people with their problems.

If you are in mode 1, it’s best to just keep on doing stuff and don’t worry about perfecting it too much. There’s plenty of time to go back and fix stuff in mode two. Anyway, it’s all part of the cycle of game making for a hobbyist. :slight_smile:

Thanks for the advice smoking :slight_smile:
I decided I would start again with my model and went for a Russian ka-60 (My version of this game is going to focus on resupplying other forces as opposed to shooting at enemies…).

After modeling I realised that having an all black surfaces makes a model look hidious. Or maybe just my modeling skills. :o
I completed(80%) of tutorial two now :slight_smile:

I can follow the instructions, but I do not quite know WHY I am doing what I am told, if that makes sense.
I know some Java programming so I might have a play with some python…

Thanks for the feedback.
I’m in talks now with some other blender users on a new set of tutorials which would aim to do the same thing, but with less of a steep learning curve.
I realized after starting this tutorial series that the content is not really graded well. The things going on under the hood, in the python area are too advanced compared to what’s being done in the tutorial (basically just hooking up logic bricks and adding objects). I need a new project wich starts with just basic logic bricks and doesn’t bring in python until the user is comfortable with the basics, and then only one function at a time so people can understand not only what they are doing, but why.

Thank you very much :slight_smile:

i look forward to see your new tutorials :slight_smile:

So are there still going to be more tutorials

What is about part 4?

No fourth part? :frowning:

bump