Hi, everyone
Just like the title says I just keep getting more and more frustrated with the Blender hair workflow.
From combing the particles to the object mode view of the children to the final render all I do is see three completely different things and grooming becomes a totally counter intuitive process, at least for me.
Am I missing something here?
The way the children look on object mode view doesn´t reflect the Cycles render outcome at all. It usually looks much thinner and fake.
Suppose I choose to go for some sort of big curls, seventies vintage look, or just regular straight hair, no matter what I do, mess with clumping, roughness, strands, etc and there´s always something not right, be it the roots or the overall flow and look.
I´ve been getting more and more into Xgen, studying quite a lot and that system makes a lot of sense to me.
Still I believe, I´m sure I can achieve at least close results with B hair.
Are there any tips you´d like to share with me, something I´m doing wrong or just a certain workflow (separate the scalp into different grooming sections) that will allow me to achieve photorealistic results closer to my vision?
Thanks a lot! Looking forward to your replies.
The most common reason the rendered hair looks different than viewport is when you have a subsurf above the particle system with subsurf level 1/2. You must have both subsurf levels be the same, 11 or 22.
Perhaps you could share what you have been working on and what your are aiming for (a reference photo of some sort). I have been working with Blender’s Hair Particle System for quite a while and was always able to achieve what I was aiming for, may it be photo realism or a certain type of look. Especially with the Hair BSDF material node. The only thing I am not on board with is the hair collision… when it comes to long-hair styles. Most of my models have short hair because I have to do weird workarounds to make long hair physics look believable
Same here. I always end up hiding the hair of leaving it short. I´ll post some of my work.
Your emitter object must always have scale applied so that strange things do not happen. (Select Object, Ctrl+A and “Scale”)
Regarding differences in Viewport in the different modes…
There are a few different options for Render and Viewport, with the aim of making the Viewport not so heavy to work with:
In Particles tab you have Render and Viewport Display items. You can choose Amount=100% in Viewport Display. Also within Childern item, you can set the same Amount for Render and Display (viewport).
When you are in Particle Edit mode, you see in properties editor the options in the first tab (Active Tool and Workspace Settings). There in Options > Viewport Display you can check Children. These options are also found in Options menu in the Header.
As I have said, enabling all these options may make your work in Viewport heavy.
Interesting. So what you say is, for instance, if I´ve subsurfed at level 2 the hair level should be 22 instead of the standard 5 or 8?
And yes, collisions keep giving me trouble as well.
I do that most of the time. Luckily my system seems to cope with that load quite fine.
Sometimes after adding the peach fuzz and eyebrows, the head hair gets a little draggy though which also makes grooming harder.
No. Ok you should have the subsurf preview and render at the same 11 or 22. Now the [edit: path steps] both should be the same but usually higher, 44 55 or 66 probably. It’s tougher because preview and path steps are separated in the gui.
It’s also possible to have the hair appear the same as in object mode when using particle edit mode for combing. I will have to look but there is a place you can set the view path steps and also include children hairs, so what you see is what u get. I’ll look in the morning, it changed places in 2.8
Thanks so much, definitely looking forward to your reply!
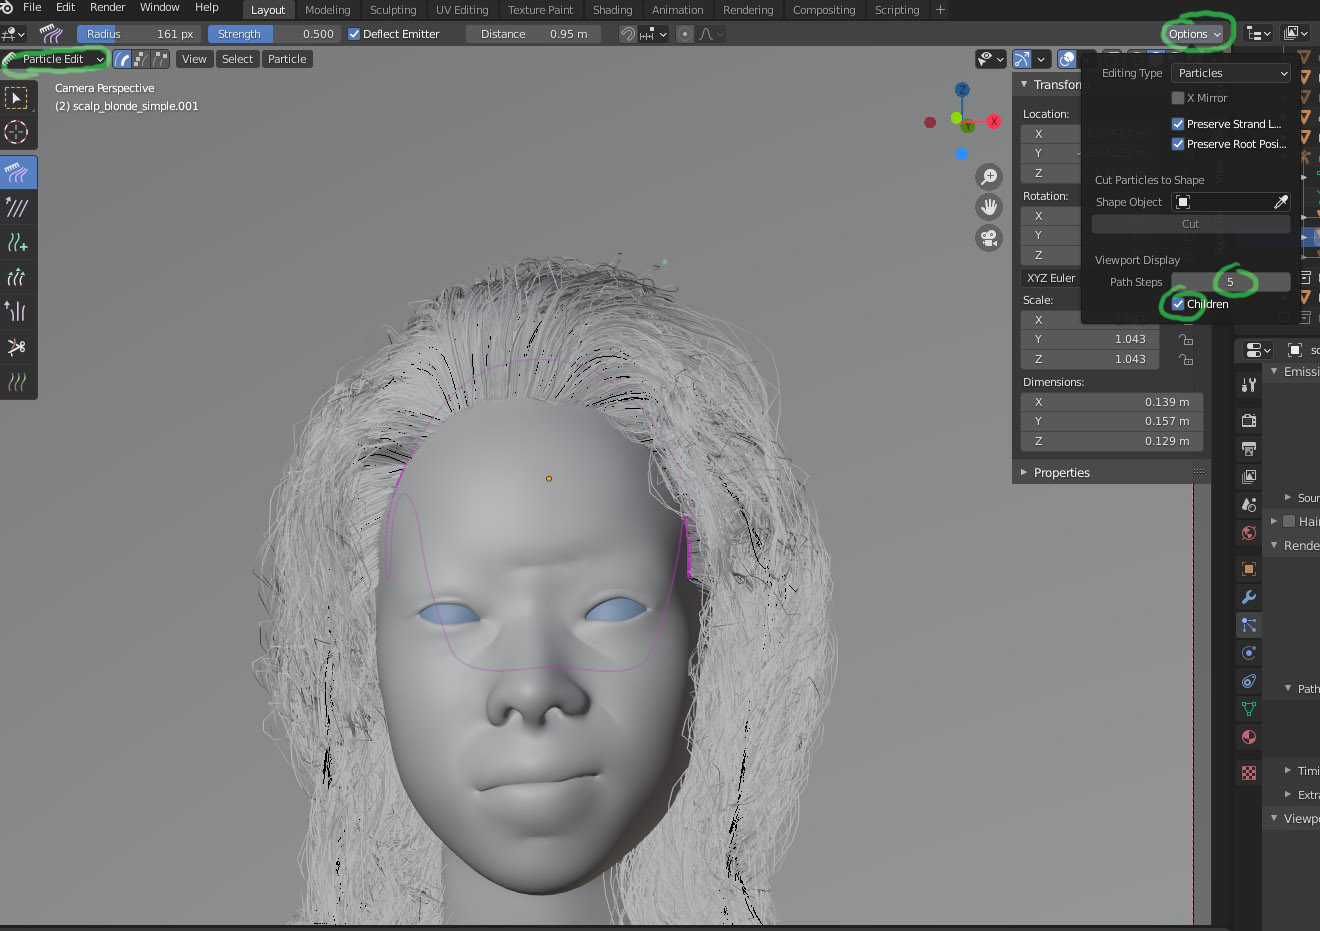
Ok when I was saying segments earlier, I meant ‘path steps’ which is like subdivision for hair. anywasy here’s a screenshot showing where the options are, you want to enable (Check) 'children to show children and match your path steps config, so the hair looks as it would in object or rendered mode.
Thanks Photox, I`ll try that today.
For what you wrote before I infered there´s a connection between B hair path steps and the subsurf modifier. I´ll increase the hair path steps to 11 to experiment and see the improvements. I´d usually leave the path steps at 5.
No!! I mean 1/1 not Eleven. eleven will melt your system.
should be like this:
mesh subsurf: viewport 1, render 1
hair path steps: viewport 4, render 4
Alright, thanks for clarifying. The computer was handling it quite well though! 
I think the confusing part here is that there are several options to improve or change the display in render and separate in viewport. There are render specific settings for cylcles and eevee.
In the hair particle setting is the bspline option, cycles diameter which is also a common reason for it to look different in viewport and render and the usually steps resolution of the hair for viewport and render.
I think that has to be grouped better so its easier to catch… I can clarify when you cant find some of the settings.
They are definitely grouped in a terrible UX way. There should probably be some kind of a global overide, something like ‘match render settings to viewport’
Yeah, definitely.
For instance, why couldn´t we just draw a few curves with our graphics tablet over the scalp that would then be turned into hair particles instead of having to deal with this hair ball system. Seems like more work to me.
Those hand drawn curves could also suggest the shape of the hair.
As for grooming and hair styles I think we´re absolutely short of presets, I mean, real life presets.
Same with diameter. I notice the individual hairs come basically in a “cone” shape that makes coming up with realistic hair thickness a pretty difficult task. Then again, there must be so much I don´t know.
Ah yes please presets! I am waiting for them for ages now… I hope that changes with the asset manager and the content call for it…
Any more suggestions/tips for realistic hair?
Last night I tried some of the suggestions presented here and the difference between object view and render still persist.
I already checked scale and normals and they both look fine. Still the rendered hair looks fake and patchy.
I basically go for hair strands 8, long hair, a little clump, like 0.200, some, just some roughness but all in all that has nothing to do with the poor outcome.
I also try to recreate the standard human hair number of 100 - 150k and thickness/diameter just a little thinner than the eybrow hair.
Still find grooming those hair particles a nightmare but when I get to a decent result on object view, the Cycles render looks oh so bad and different.
Yep its hard i know that. My latest artwork has the first hair system i was somehow confident with.
Best resources i found:
-
Thats me asking for tips and thats one of the most useful short tutorials: https://twitter.com/lucasfalcao3d/status/1261055082189250568
-
This explained also some cool settings: https://www.youtube.com/watch?v=Ge1qWMG-U90
Other software tutorials are also helpful since the principles are the same.