Hi there,
I’ve been trying to work out a way to generate a wavy bowl similar to this free one I found online: https://www.myminifactory.com/object/3d-print-wavy-bowl-56773
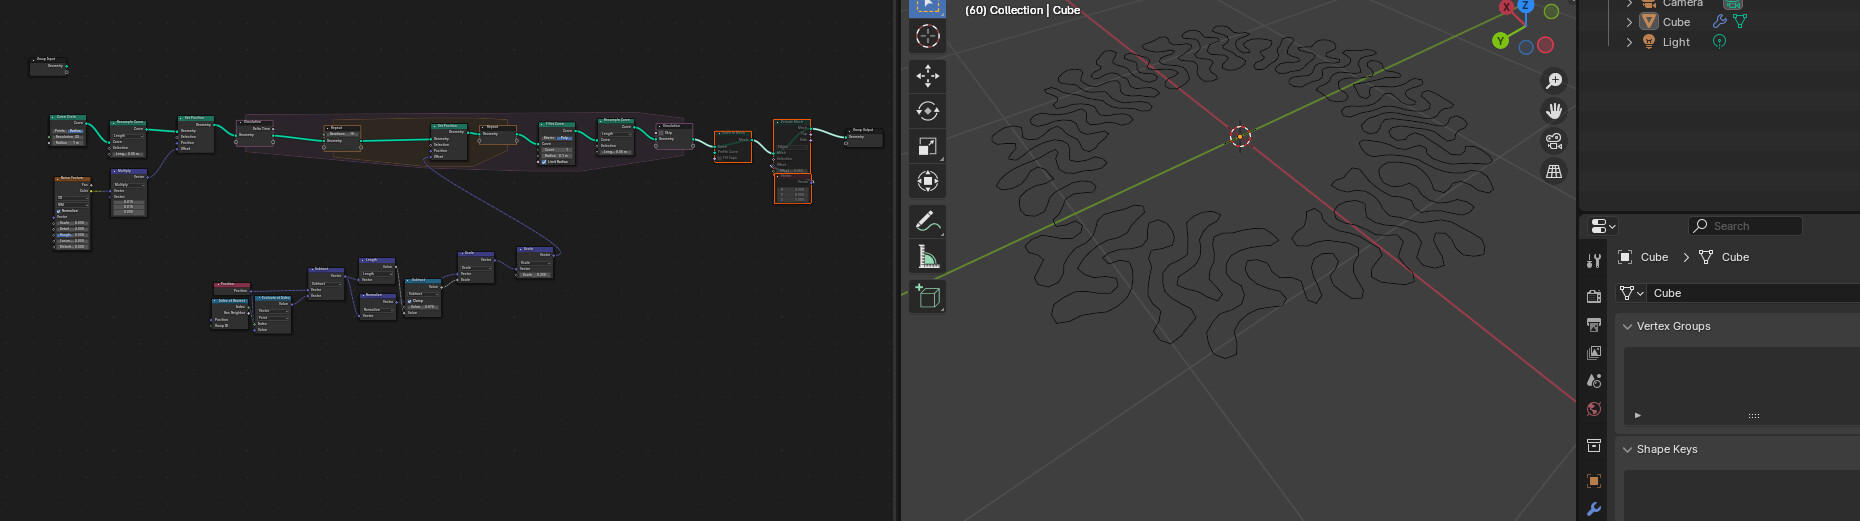
It’s a learning exercise and I tried utilising ChatGPT but I believe it’s hallucinating and giving wrong guidance.
Many of the Geometry Nodes that it references don’t seem to show up when I look for them in the geometry node. Eg - select edges. Would anyone be able to have a look at the below workflow to recommend how it could be made to work or provide other feedback?
Here’s how it recommend it be done with geometry nodes:
1.	Group Input
•	This is your starting point, where your geometry comes in.
2.	Subdivision Surface Node
•	You already have this node. It smooths your mesh.
3.	Select Edges Node
•	Use this to select edges where you want the ribbon effect. You might use criteria like edge angle or sharpness.
4.	Mesh to Curve Node
•	Connect this after the Select Edges Node to convert the selected edges into curves.
5.	Curve to Mesh Node
•	Connect a Curve Circle to the profile input to give the curves a ribbon-like thickness.
6.	Join Geometry Node
•	This will be used multiple times to combine different parts of your geometry. The first usage will combine the original mesh with the ribbon-like edges from the Curve to Mesh Node.
7.	Noise Texture Node
•	This is for creating organic displacements on the surface. Place this after the main geometry flow from the Group Input.
8.	Vector Math Node
•	Set to ‘Add’ or another appropriate function. Connect the output of the Noise Texture to this node to control the intensity and direction of displacement.
9.	Set Position Node
•	Connect this after the Vector Math Node to apply the displacement to your geometry.
10.	Join Geometry Node (again)
•	Use this to finally join the displaced geometry with the ribbon-edged geometry.
11.	Group Output
•	Connect the final output from the last Join Geometry Node to this to output the complete geometry.
Connections:
•	Connect Group Input to both the Subdivision Surface Node and later directly into the Select Edges Node (using a separate string).
•	Subdivision Surface Node outputs directly connect to the Join Geometry Node for merging with the ribbon-edged curves.
•	Noise Texture Node outputs connect to the Vector Math Node, then to the Set Position Node, and then into the second input of the final Join Geometry Node.
•	Ensure that outputs that need modifications, like displacement or curves, are properly connected to the inputs of nodes that require these modifications (like Set Position or Curve to Mesh).
This setup will give you a node tree that starts from the basic geometry, selects edges to create ribbons, applies displacement for organic textures, and finally merges all modifications back into a single geometry output. You can tweak parameters in the Select Edges, Noise Texture, and Vector Math nodes to get the exact look you’re aiming for.