Hello
what is the : geometry shader node for?
there is no material on the net about it.
and the manual is very superficial.
does anyone know something with images about this node?
thanks
Hello
what is the : geometry shader node for?
there is no material on the net about it.
and the manual is very superficial.
does anyone know something with images about this node?
thanks
It does quite a lot. The Pointiness output is the most commonly used- it’s for edge wear/highlighting pointy areas, it’s hard to explain but I’d encourage you to play around with it and learn how it works. Note that it is Cycles only
It’s chock full of goodness. I use it frequently.
Position: the world space position of the sample being evaluated. Good for fast, first pass texture coordinates because they don’t change scale.
Normal: world space surface normal of the sample. Most of the time that you need a normal input, like for homebrewed Fresnel or similar view dependent effects, you’ll use this.
Tangent: world space radial tangent vector. Not often used, as I usually want a UV tangent from a tangent node.
True normal: sample’s world space triangulated face normal. Not often useful.
Incoming: Direction of the incoming vector. In Eevee, this is the camera vector; in Cycles, it is the vector from the last surface the ray hit. Used in conjunction with normal for all those view dependent effects.
Parametric: Barycentric coordinates of the triangulated face. If you had 3D UV and one vertex was at 1,0,0, another at 0,1,0, the third at 0,0,1, this is what you’d get. Not often useful, but you can use it to create a wireframe if there wasn’t already one.
Backfacing: Returns 1 if the surface normal points in the same direction as incoming, 0 otherwise. Useful for backface (or frontface) culling, occasionally useful for other stuff.
Pointiness: As mentioned, it returns some kind of curvature value for the face-- stronger curvature, higher pointiness. There are a number of ways to do pointiness, Blender’s isn’t my favorite, but it’s all Blender has without baking.
Random per island: returns a random value for every UV island. I don’t use this ever, mostly because no Eevee support, but for some purposes it must be pretty useful.
thanks for listening .
you don’t have tutorials using this node?
without images of use it is difficult to understand.
thank you again
Go drop a Geometry node into a shader and play around with it, you’ll learn a thousand times more than you could from any image or tutorial ![]()
I already did that and it didn’t clarify anything.
I can’t understand where I would use this node .
thanks
Plug it into an emission shader
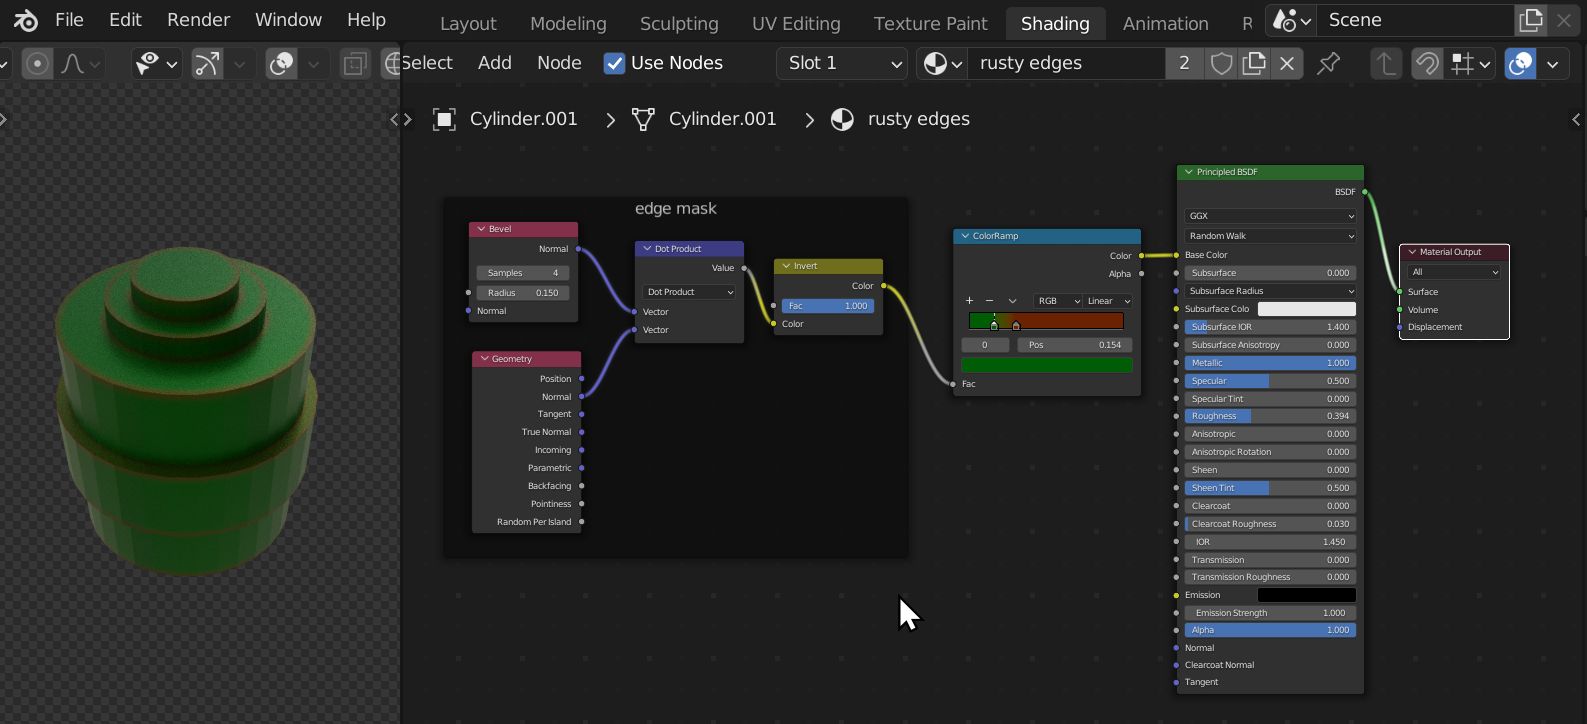
Nothing beats playing with nodes in a methodical way once you have a basic overview. But if you want an example with image, here’s one for a common case.
Edge masking using the Geometry node’s normal with a Bevel node. Simplified example:
Detailed explanation if you want to understand how it works:

I use geometry/backfacing a lot. Examples:
To add to bandages post:
Normal: World space being the key point. Texture coordinate node also has a normal output, but this one is object space. Use texture coordinate normal if you want effect i.e on the topside of an object no matter its orientation. Use geometry normal if you want effect in relation to the world of an object no matter its orientation. Think flipping a dusty teapot where the dust remains on its top vs flipping a teapot then it accumulates dust.
Incoming: Can be used to drive tangents for anisotropic shading if you want stretching/blurring direction to be dependent on camera (i.e. rippled water or wet asphalt). Can also be used as a normal for refraction, gives you access to refraction roughness but don’t require a volume (and as such don’t produce any actual refraction).
Parametric: Sometimes used for mapping light effects to certain types of lamp type lights. Refer to the manual on this one, can’t remember and I always have to look it up myself.
Random per island: It’s a fast way to randomize UV lookup, sometimes in conjunction with object info/random. Add them together and use a scaled 1D white noise to drive the offset. If this doesn’t work (i.e. beveled object where bevels become separate islands, conflicts with harden normals and so on), I tend to make a specialty UV where I collapse all the islands to single points, use this to drive a 2D white noise which is then vector snapped to some small number as UV locations doesn’t appear to be “stable”.